физическое освещение на настраиваемом узле SCNGeometry
Вопрос
Как вы определяете материал в произвольной геометрии из данных вершин , чтобы он отображался так же, как «типичные» узлы SCN?
Подробности
В этой сцене есть
- Направленный свет
- Красная сфера с использованием физически обоснованной модели освещения
- Синяя сфера с использованием физически обоснованной модели освещения
- Настраиваемая геометрия SCNG с использованием данных вершин, с использованием физически обоснованной модели освещения.
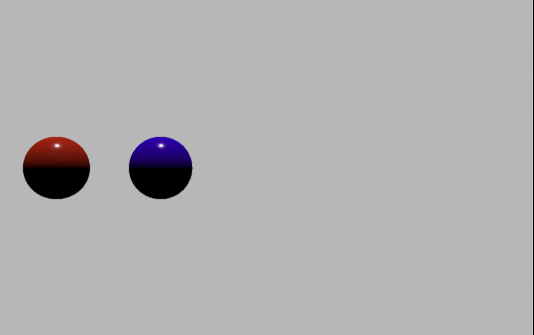
Красная и синяя сферы отображаются так, как я ожидал. Две точки / сферы в пользовательской геометрии - черные.
Почему?
Вот код playgrond:
Настройка сцены
import UIKit
import SceneKit
import PlaygroundSupport


// create a scene view with an empty scene
var sceneView = SCNView(frame: CGRect(x: 0, y: 0, width: 600, height: 600))
var scene = SCNScene()
sceneView.scene = scene
sceneView.backgroundColor = UIColor(white: 0.75, alpha: 1.0)
sceneView.allowsCameraControl = true
PlaygroundPage.current.liveView = sceneView

let directionalLightNode: SCNNode = {
    let n = SCNNode()
    n.light = SCNLight()
    n.light!.type = SCNLight.LightType.directional
    n.light!.color = UIColor(white: 0.75, alpha: 1.0)
    return n
}()

directionalLightNode.simdPosition = simd_float3(0,5,0) // Above the scene
directionalLightNode.simdOrientation = simd_quatf(angle: -90 * Float.pi / 180.0, axis: simd_float3(1,0,0)) // pointing down

scene.rootNode.addChildNode(directionalLightNode)

// a camera
var cameraNode = SCNNode()
cameraNode.camera = SCNCamera()
cameraNode.simdPosition = simd_float3(0,0,5)
scene.rootNode.addChildNode(cameraNode)
Добавляем синюю и красную сферы
      // ----------------------------------------------------
// Example creating SCNSphere Nodes directly

// Sphere 1
let sphere1 = SCNSphere(radius: 0.3)
let sphere1Material = SCNMaterial()
sphere1Material.diffuse.contents = UIColor.red
sphere1Material.lightingModel = .physicallyBased
sphere1.materials = [sphere1Material]

let sphere1Node = SCNNode(geometry: sphere1)
sphere1Node.simdPosition = simd_float3(-2,0,0)

// Sphere2
let sphere2 = SCNSphere(radius: 0.3)
let sphere2Material = SCNMaterial()
sphere2Material.diffuse.contents = UIColor.blue
sphere2Material.lightingModel = .physicallyBased
sphere2.materials = [sphere2Material]

let sphere2Node = SCNNode(geometry: sphere2)
sphere2Node.simdPosition = simd_float3(-1,0,0)

scene.rootNode.addChildNode(sphere1Node)
scene.rootNode.addChildNode(sphere2Node)
Добавление пользовательской геометрии SCNGeometry
      // ----------------------------------------------------
// Example creating SCNGeometry using vertex data
struct Vertex {
    let x: Float
    let y: Float
    let z: Float
    let r: Float
    let g: Float
    let b: Float
}

let vertices: [Vertex] = [
    Vertex(x: 0.0, y: 0.0, z: 0.0, r: 1.0, g: 0.0, b: 0.0),
    Vertex(x: 1.0, y: 0.0, z: 0.0, r: 0.0, g: 0.0, b: 1.0)
]

let vertexData = Data(
    bytes: vertices,
    count: MemoryLayout<Vertex>.size * vertices.count
)

let positionSource = SCNGeometrySource(
    data: vertexData,
    semantic: SCNGeometrySource.Semantic.vertex,
    vectorCount: vertices.count,
    usesFloatComponents: true,
    componentsPerVector: 3,
    bytesPerComponent: MemoryLayout<Float>.size,
    dataOffset: 0,
    dataStride: MemoryLayout<Vertex>.size
)
let colorSource = SCNGeometrySource(
    data: vertexData,
    semantic: SCNGeometrySource.Semantic.color,
    vectorCount: vertices.count,
    usesFloatComponents: true,
    componentsPerVector: 3,
    bytesPerComponent: MemoryLayout<Float>.size,
    dataOffset: MemoryLayout<Float>.size * 3,
    dataStride: MemoryLayout<Vertex>.size
)

let elements = SCNGeometryElement(
    data: nil,
    primitiveType: .point,
    primitiveCount: vertices.count,
    bytesPerIndex: MemoryLayout<Int>.size
)

elements.pointSize = 100
elements.minimumPointScreenSpaceRadius = 100
elements.maximumPointScreenSpaceRadius = 100

let spheres = SCNGeometry(sources: [positionSource, colorSource], elements: [elements])
let sphereNode = SCNNode(geometry: spheres)

let sphereMaterial = SCNMaterial()
sphereMaterial.lightingModel = .physicallyBased

spheres.materials = [sphereMaterial]

sphereNode.simdPosition = simd_float3(0,0,0)
scene.rootNode.addChildNode(sphereNode)
1 ответ
According to the documentation, making a custom geometry takes 3 steps.
- Create a that contains the 3D shape's vertices.
- Create a that contains an array of indices, showing how the vertices connect.
- Combine the source and into a
SCNGeometry.
Let's start from step 1. You want your custom geometry to be a 3D shape, right? You only have 2 vertices, though.
      let vertices: [Vertex] = [         /// what's `r`, `g`, `b` for btw?
    Vertex(x: 0.0, y: 0.0, z: 0.0, r: 1.0, g: 0.0, b: 0.0),
    Vertex(x: 1.0, y: 0.0, z: 0.0, r: 0.0, g: 0.0, b: 1.0)
]
This will form a line...
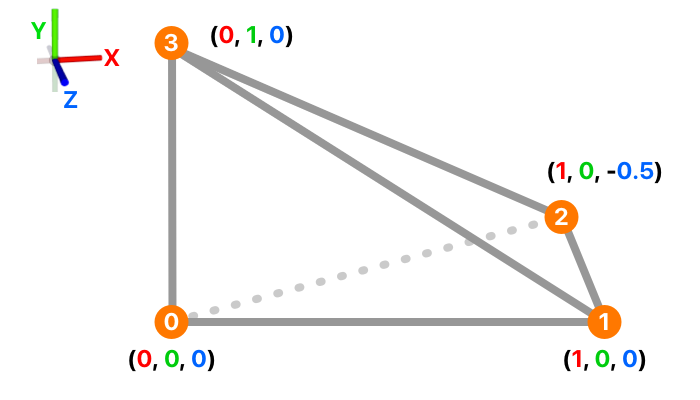
A common way of making 3D shapes is from triangles. Let's add 2 more vertices to make a pyramid.
      let vertices: [Vertex] = [
    Vertex(x: 0.0, y: 0.0, z: 0.0, r: 1.0, g: 0.0, b: 0.0), /// vertex 0
    Vertex(x: 1.0, y: 0.0, z: 0.0, r: 0.0, g: 0.0, b: 1.0), /// vertex 1
    Vertex(x: 1.0, y: 0.0, z: -0.5, r: 0.0, g: 0.0, b: 1.0), /// vertex 2
    Vertex(x: 0.0, y: 1.0, z: 0.0, r: 0.0, g: 0.0, b: 1.0), /// vertex 3
]
Now, we need to connect the vertices into something that SceneKit can handle. In your current code, you convert
vertices into
Data, then use the initializer.
      let vertexData = Data(
    bytes: vertices,
    count: MemoryLayout<Vertex>.size * vertices.count
)
let positionSource = SCNGeometrySource(
    data: vertexData,
    semantic: SCNGeometrySource.Semantic.vertex,
    vectorCount: vertices.count,
    usesFloatComponents: true,
    componentsPerVector: 3,
    bytesPerComponent: MemoryLayout<Float>.size,
    dataOffset: 0,
    dataStride: MemoryLayout<Vertex>.size
)
This is very advanced and complicated. It's way easier with .
      let verticesConverted = vertices.map { SCNVector3($0.x, $0.y, $0.z) } /// convert to `[SCNVector3]`
let positionSource = SCNGeometrySource(vertices: verticesConverted)
Now that you've got the , it's time for step 2 — connecting the vertices via . In your current code, you use init(data:primitiveType:primitiveCount:bytesPerIndex:), then pass in ...
      let elements = SCNGeometryElement(
    data: nil,
    primitiveType: .point,
    primitiveCount: vertices.count,
    bytesPerIndex: MemoryLayout<Int>.size
)
If the data itself is
nil, how will SceneKit know how to connect your vertices? But anyway, there's once again an easier initializer: init(indices:primitiveType:). This takes in an array of , each representing a vertex back in your .
So how is each vertex represented by a ? Well, remember how you passed in , an array of
SCNVector3, to
positionSource? SceneKit sees each as an index and uses it access
verticesConverted.
Since indices are always integers and positive, UInt16 should do fine (it conforms to
FixedWidthInteger).
/// pairs of 3 indices, each representing a vertex
let indices: [UInt16] = [
0, 1, 3, /// front triangle
1, 2, 3, /// right triangle
2, 0, 3, /// back triangle
3, 0, 2, /// left triangle
0, 2, 1 /// bottom triangle
]
let element = SCNGeometryElement(indices: indices, primitiveType: .triangles)
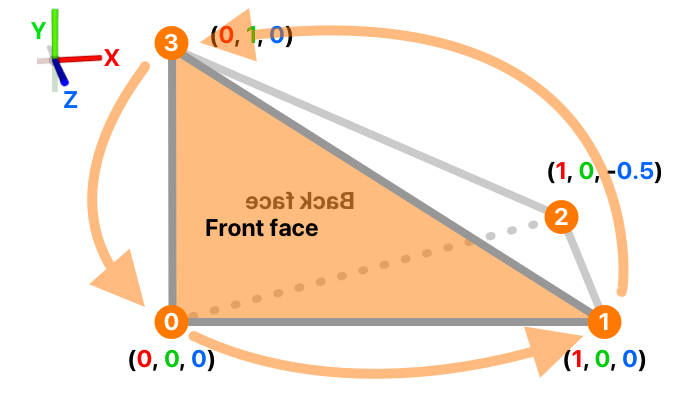
The order here is very specific. By default, SceneKit only renders the front face of triangles, and in order to distinguish between the front and back, it relies on your ordering. The basic rule is: counterclockwise means front.
So to refer to the first triangle, you could say:
- 0, 1, 3
- 1, 3, 0
- 3, 0, 1
All are fine. Finally, step 3 is super simple. Just combine the and .
let geometry = SCNGeometry(sources: [positionSource], elements: [element])
And that's it! Now that both your and
SCNGeometryElement are set up correctly,
lightingModel will work properly.
      /// add some color
let material = SCNMaterial()
material.diffuse.contents = UIColor.orange
material.lightingModel = .physicallyBased
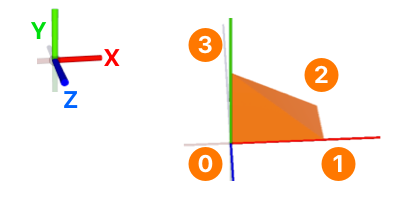
geometry.materials = [material]

/// add the node
let node = SCNNode(geometry: geometry)
scene.rootNode.addChildNode(node)
Notes:
- Я заметил, что вы пытались использовать 2
SCNGeometrySourceс. Второй - добавить цвета с помощьюSCNGeometrySource.Semantic.color, Правильно? Более простой инициализатор, который я использовал,init(vertices:), по умолчанию.vertex. Если вам нужен цвет для каждой вершины или что-то в этом роде, вам, вероятно, придется вернуться кinit(data:semantic:vectorCount:usesFloatComponents:componentsPerVector:bytesPerComponent:dataOffset:dataStride:). - Пытаться
sceneView.autoenablesDefaultLighting = trueдля лучшего освещения - Полная демонстрационная площадка здесь


