UITextView/UILabel с фоном, но с интервалом между строками
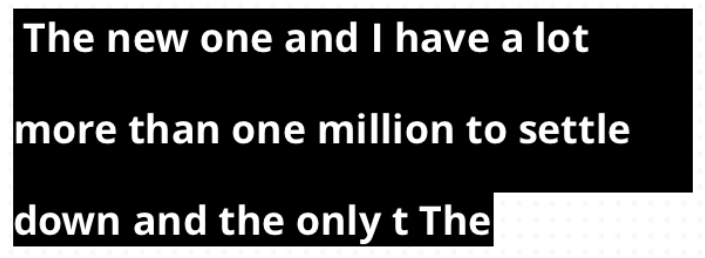
Как мне добиться такого стиля в iOS?
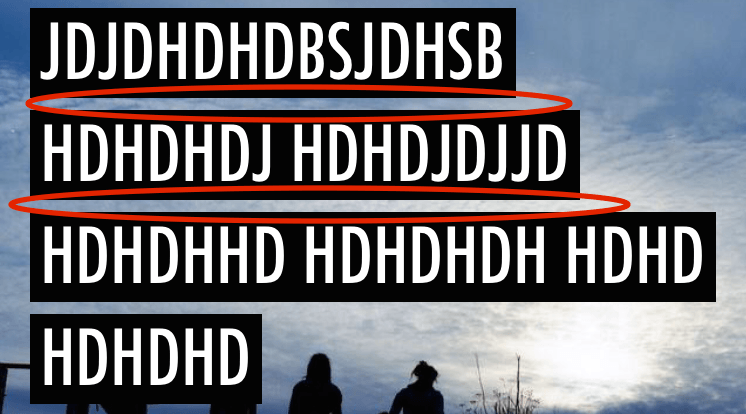
Я пытался с помощью NSAttributedString и настройка NSBackgroundColorAttributeName как blackColor но тогда у него нет clearColor пространство между линиями. Я также пытался установить lineSpacing к NSMutableParagraphStyle но все же стиль выглядит как один большой черный блок.
Мне просто нужна подсказка, в какую сторону идти... спасибо!
Другими словами, не как то так:
6 ответов
После некоторых исследований я нашел лучшее решение для того, что мне было нужно. Решение ниже - только iOS7+.
Сначала мы добавим это к - (void)drawRect:(CGRect)rect вашей UITextView подкласс.
- (void)drawRect:(CGRect)rect

    /// Position each line behind each line.
    [self.layoutManager enumerateLineFragmentsForGlyphRange:NSMakeRange(0, self.text.length) usingBlock:^(CGRect rect, CGRect usedRect, NSTextContainer *textContainer, NSRange glyphRange, BOOL *stop) {

        /// The frame of the rectangle.
        UIBezierPath *rectanglePath = [UIBezierPath bezierPathWithRect:CGRectMake(usedRect.origin.x, usedRect.origin.y+3, usedRect.size.width, usedRect.size.height-4)];

        /// Set the background color for each line.
        [UIColor.blackColor setFill];

        /// Build the rectangle.
        [rectanglePath fill];
    }];
 }];
Затем мы устанавливаем межстрочный интервал для UITextView:
- (CGFloat)layoutManager:(NSLayoutManager *)layoutManager lineSpacingAfterGlyphAtIndex:(NSUInteger)glyphIndex withProposedLineFragmentRect:(CGRect)rect
{
    return 15;
}
Вышеуказанный метод вызывается только если вы установили NSLayoutManagerDelegate, Вы могли бы сделать это в своем init, initWithFrame а также initWithCode методы как это:
self.layoutManager.delegate = self;
Также не забудьте объявить, что ваш подкласс является делегатом в вашем .h файл:
@interface YOUR_SUBCLASS_OF_UITEXTVIEW : UITextView <NSLayoutManagerDelegate>
Swift 3 версия решения @Fabio:
class splitedTextView: UITextView, NSLayoutManagerDelegate {

    override func awakeFromNib() {
        self.layoutManager.delegate = self
    }

    override func draw(_ rect: CGRect) {
        self.layoutManager.enumerateLineFragments(forGlyphRange: NSMakeRange(0, self.text.characters.count)) { (rect, usedRect, textContainer, glyphRange, Bool) in
            let rectanglePath = UIBezierPath(rect: CGRect(x: usedRect.origin.x, y: usedRect.origin.y+3, width: usedRect.size.width, height: usedRect.size.height-4))
            UIColor.black.setFill()
            rectanglePath.fill()
        }
    }

    func layoutManager(_ layoutManager: NSLayoutManager, lineSpacingAfterGlyphAt glyphIndex: Int, withProposedLineFragmentRect rect: CGRect) -> CGFloat {
        return 15
    }
}
Вы также можете создать переменную внутри вашего textView подкласс для управления цветом прямоугольника:
var color: UIColor?
А затем использовать его вместо черного по умолчанию в вашем textView подкласс:
self.color?.setFill()
Также, если вы делаете это, не забудьте использовать setNeedsDisplay() перерисовать textView и примените свой собственный цвет.
Для iOS 11 приписанная строка имеет проблему с таким поведением пользовательского интерфейса. Я создал подкласс UITextView с пробелом и свойством bgColor. Надеюсь, это тоже поможет. Ответ - только расширение к решению @Fabio.
class SpacingTextView: UITextView, NSLayoutManagerDelegate {

private var textHolder: String?
var spacing: CGFloat = 3
var bgColor: UIColor = .white

override var attributedText: NSAttributedString! {
    didSet {
        self.textHolder = self.attributedText.string
        self.setNeedsDisplay()
    }
}

override var text: String! {
    didSet {
        self.textHolder = self.attributedText.string
        self.setNeedsDisplay()
    }
}

override init(frame: CGRect, textContainer: NSTextContainer?) {
    super.init(frame: frame, textContainer: textContainer)
    self.configure()
}

required init?(coder aDecoder: NSCoder) {
    super.init(coder: aDecoder)
    self.configure()
}

private func configure() {
    self.layoutManager.delegate = self
    self.backgroundColor = .clear
}

override func draw(_ rect: CGRect) {
    super.draw(rect)
    guard let txt = self.textHolder else {
        return
    }
    let textRange = NSRange(location: 0, length: txt.count)

    self.layoutManager.enumerateLineFragments(forGlyphRange: textRange) { (rect, usedRect, _, _, _) in
        var bgRect = usedRect
        bgRect.origin.y += self.spacing / 2
        bgRect.size.height -= self.spacing
        let bezierPath = UIBezierPath(rect: bgRect)
        self.bgColor.setFill()
        bezierPath.fill()
        bezierPath.close()
    }
}

func layoutManager(_ layoutManager: NSLayoutManager,
                   lineSpacingAfterGlyphAt glyphIndex: Int, withProposedLineFragmentRect rect: CGRect) -> CGFloat {
    return rect.size.height
}

func layoutManager(_ layoutManager: NSLayoutManager,
                   shouldUse action: NSLayoutManager.ControlCharacterAction,
                   forControlCharacterAt charIndex: Int) -> NSLayoutManager.ControlCharacterAction {
    return .lineBreak
}
}
Просто добавьте новую пустую строку со стилем абзаца с желаемой высотой строки. В моем примере Swift я просто добавляю interlineAttributedString к оригинальному attribuStString:
let interlineStyle = NSMutableParagraphStyle()
interlineStyle.maximumLineHeight = 5.0
let interlineAttributedString = NSMutableAttributedString(string: "\n", attributes: [NSParagraphStyleAttributeName: interlineStyle])
attributedString.appendAttributedString(interlineAttributedString)
Экстра \n также может быть частью исходной строки attributed. В этом случае вы бы использовали addAttribute с соответствующим диапазоном.
Я тестировал только на iOS 9, но я уверен, что он хорошо работает на предыдущих версиях iOS. Это прекрасно работает в UITextView. Это гораздо проще реализовать, чем использовать множество UILabels или рисовать фоновые прямоугольники.
РЕДАКТИРОВАТЬ:
Для вашего требования вы должны использовать different UILabel за each line а также manage spacing от setting frame,
Это работает для меня, чтобы иметь spacing между lines в multiline UILabel,
 NSMutableAttributedString* attrString = [[NSMutableAttributedString alloc] initWithString:yourlblText.text];
NSMutableParagraphStyle *style = [[NSMutableParagraphStyle alloc] init];
[style setLineSpacing:16];
[attrString addAttribute:NSParagraphStyleAttributeName
                   value:style
                   range:NSMakeRange(0, yourlblText.text.length)];
yourlblText.attributedText = attrString;
Также проверьте многострочный межстрочный интервал в iOS 6
Мой подход состоял в том, чтобы создать UIView и добавить на него метку, ограничить его вертикальной вершиной и вычислить количество строк, используя размер шрифта и высоту строки, а затем создать CALayer для каждой строки и добавить их в UIView.
Вы можете проверить мою реализацию здесь
    func setBorderLabel() {
       let str = "This is label style with solid highlight and have gap between the texts, uses a combination of UIView and UILabel, you can have borders also per line... check comments in the code"
       let trimmedString = str.trimmingCharacters(in: .whitespacesAndNewlines)

       let string = NSMutableAttributedString(string: trimmedString)
       borderLabel.attributedText = string

       let labelWidth: CGFloat = borderLabel.frame.size.width
       var lineCount: Float = 0.0
       let textSize = CGSize(width: labelWidth, height: CGFloat(MAXFLOAT))
       let rHeight: Float = Float(borderLabel.sizeThatFits(textSize).height)
       //var rWidth: Int = lroundf(Float(borderLabel.sizeThatFits(textSize).width))
       let charSize: Float = Float(borderLabel.font.lineHeight)
       lineCount =  (rHeight / charSize).rounded()
       var count = 0
       // This needs a bit of trial and error, you need to play with the FONT_SIZE value to get the desired effect
       for i in stride(from: 0, to: Int(borderLabel.frame.size.height) , by: FONT_SIZE) {
           if count >= Int(lineCount){
               break
           }
           let border = CALayer()
           border.borderColor = #colorLiteral(red: 0.9254902005, green: 0.2352941185, blue: 0.1019607857, alpha: 1)
           border.frame = CGRect(x: 0, y: CGFloat(i), width: borderLabel.frame.size.width, height: CGFloat(FONT_SIZE - 1) )
           // Uncomment the below lines to have borders per line.
           //border.borderWidth = 1.0
           //border.cornerRadius = 6.0
           border.backgroundColor = #colorLiteral(red: 0.9411764741, green: 0.4980392158, blue: 0.3529411852, alpha: 1)
           borderLabel.layer.addSublayer(border)
           bgView.layer.insertSublayer(border, at: 0)
           count = count + 1
           borderLabel.layer.masksToBounds = true
       }

   }