Matplotlib: аннотирование трехмерной диаграммы рассеяния
Я пытаюсь сгенерировать трехмерную диаграмму рассеяния, используя Matplotlib. Я хотел бы аннотировать отдельные точки, как в случае с 2D, здесь: Matplotlib: Как разместить отдельные метки для точечной диаграммы.
Я пытался использовать эту функцию и обращался к документу Matplotlib, но обнаружил, что библиотека не поддерживает 3D-аннотации. Кто-нибудь знает как это сделать?
Спасибо!
7 ответов
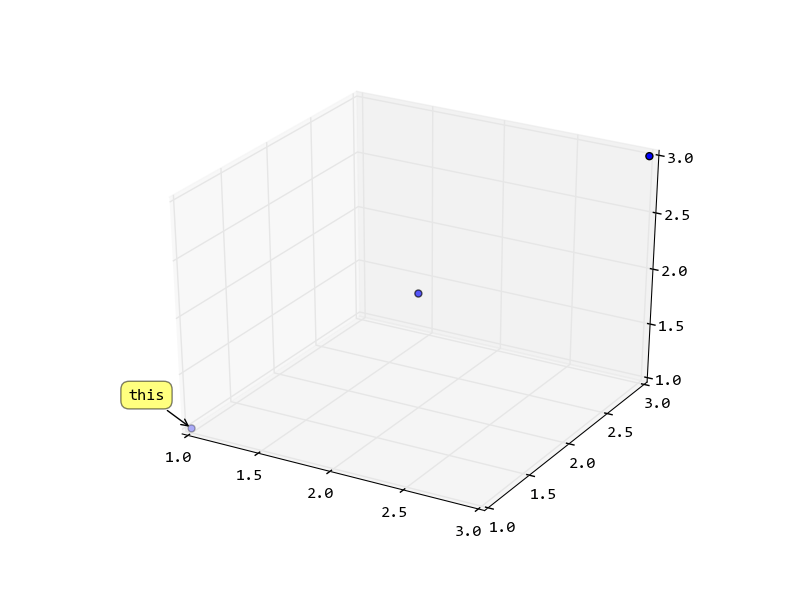
Рассчитайте 2D положение точки и используйте ее для создания аннотации. Если вам нужно интерактивно с рисунком, вы можете пересчитать местоположение, когда мышь отпущена.
import pylab
from mpl_toolkits.mplot3d import Axes3D
from mpl_toolkits.mplot3d import proj3d
fig = pylab.figure()
ax = fig.add_subplot(111, projection = '3d')
x = y = z = [1, 2, 3]
sc = ax.scatter(x,y,z)
# now try to get the display coordinates of the first point

x2, y2, _ = proj3d.proj_transform(1,1,1, ax.get_proj())

label = pylab.annotate(
    "this",
    xy = (x2, y2), xytext = (-20, 20),
    textcoords = 'offset points', ha = 'right', va = 'bottom',
    bbox = dict(boxstyle = 'round,pad=0.5', fc = 'yellow', alpha = 0.5),
    arrowprops = dict(arrowstyle = '->', connectionstyle = 'arc3,rad=0'))

def update_position(e):
    x2, y2, _ = proj3d.proj_transform(1,1,1, ax.get_proj())
    label.xy = x2,y2
    label.update_positions(fig.canvas.renderer)
    fig.canvas.draw()
fig.canvas.mpl_connect('button_release_event', update_position)
pylab.show()

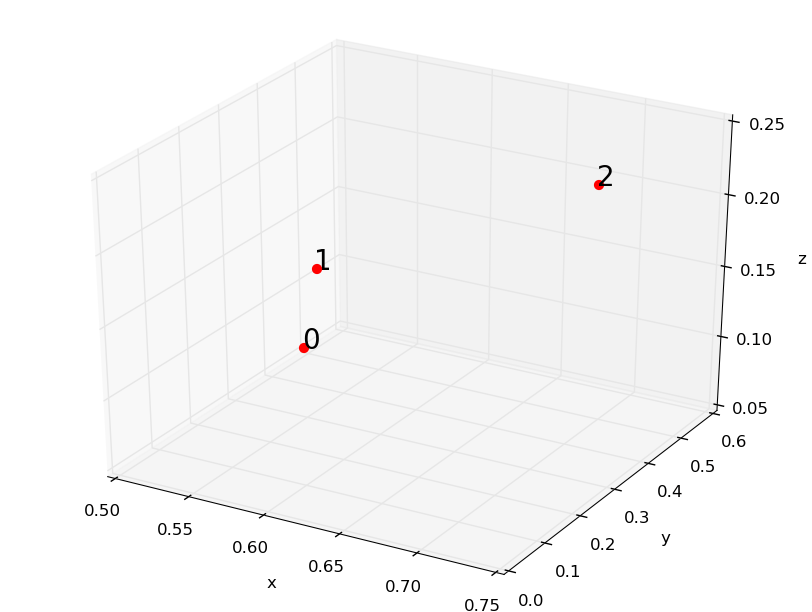
Может быть проще через ax.text(...):
from matplotlib import pyplot
from mpl_toolkits.mplot3d import Axes3D
from numpy.random import rand
from pylab import figure


m=rand(3,3) # m is an array of (x,y,z) coordinate triplets

fig = figure()
ax = Axes3D(fig)


for i in range(len(m)): #plot each point + it's index as text above
 ax.scatter(m[i,0],m[i,1],m[i,2],color='b')
 ax.text(m[i,0],m[i,1],m[i,2],  '%s' % (str(i)), size=20, zorder=1,
 color='k')

ax.set_xlabel('x')
ax.set_ylabel('y')
ax.set_zlabel('z')
pyplot.show()

В следующих постах [1], [2] обсуждается построение трехмерных стрелок в matplotlib.
Аналогичным образом можно создать класс Annotation3D (унаследованный от Annotation):
from mpl_toolkits.mplot3d.proj3d import proj_transform
from matplotlib.text import Annotation

class Annotation3D(Annotation):
    '''Annotate the point xyz with text s'''

    def __init__(self, s, xyz, *args, **kwargs):
        Annotation.__init__(self,s, xy=(0,0), *args, **kwargs)
        self._verts3d = xyz

    def draw(self, renderer):
        xs3d, ys3d, zs3d = self._verts3d
        xs, ys, zs = proj_transform(xs3d, ys3d, zs3d, renderer.M)
        self.xy=(xs,ys)
        Annotation.draw(self, renderer)
Далее, мы можем определить функцию annotate3D():
def annotate3D(ax, s, *args, **kwargs):
    '''add anotation text s to to Axes3d ax'''

    tag = Annotation3D(s, *args, **kwargs)
    ax.add_artist(tag)
С помощью этой функции можно добавить теги аннотаций в Axes3d, как показано ниже:
import matplotlib.pyplot as plt
from mpl_toolkits.mplot3d import axes3d
from mpl_toolkits.mplot3d.art3d import Line3DCollection

# data: coordinates of nodes and links
xn = [1.1, 1.9, 0.1, 0.3, 1.6, 0.8, 2.3, 1.2, 1.7, 1.0, -0.7, 0.1, 0.1, -0.9, 0.1, -0.1, 2.1, 2.7, 2.6, 2.0]
yn = [-1.2, -2.0, -1.2, -0.7, -0.4, -2.2, -1.0, -1.3, -1.5, -2.1, -0.7, -0.3, 0.7, -0.0, -0.3, 0.7, 0.7, 0.3, 0.8, 1.2]
zn = [-1.6, -1.5, -1.3, -2.0, -2.4, -2.1, -1.8, -2.8, -0.5, -0.8, -0.4, -1.1, -1.8, -1.5, 0.1, -0.6, 0.2, -0.1, -0.8, -0.4]
group = [1, 1, 1, 1, 1, 1, 1, 1, 1, 1, 2, 2, 3, 2, 2, 2, 3, 3, 3, 3]
edges = [(1, 0), (2, 0), (3, 0), (3, 2), (4, 0), (5, 0), (6, 0), (7, 0), (8, 0), (9, 0), (11, 10), (11, 3), (11, 2), (11, 0), (12, 11), (13, 11), (14, 11), (15, 11), (17, 16), (18, 16), (18, 17), (19, 16), (19, 17), (19, 18)]
xyzn = zip(xn, yn, zn)
segments = [(xyzn[s], xyzn[t]) for s, t in edges]

# create figure
fig = plt.figure(dpi=60)
ax = fig.gca(projection='3d')
ax.set_axis_off()

# plot vertices
ax.scatter(xn,yn,zn, marker='o', c = group, s = 64)
# plot edges
edge_col = Line3DCollection(segments, lw=0.2)
ax.add_collection3d(edge_col)
# add vertices annotation.
for j, xyz_ in enumerate(xyzn):
    annotate3D(ax, s=str(j), xyz=xyz_, fontsize=10, xytext=(-3,3),
               textcoords='offset points', ha='right',va='bottom')
plt.show()
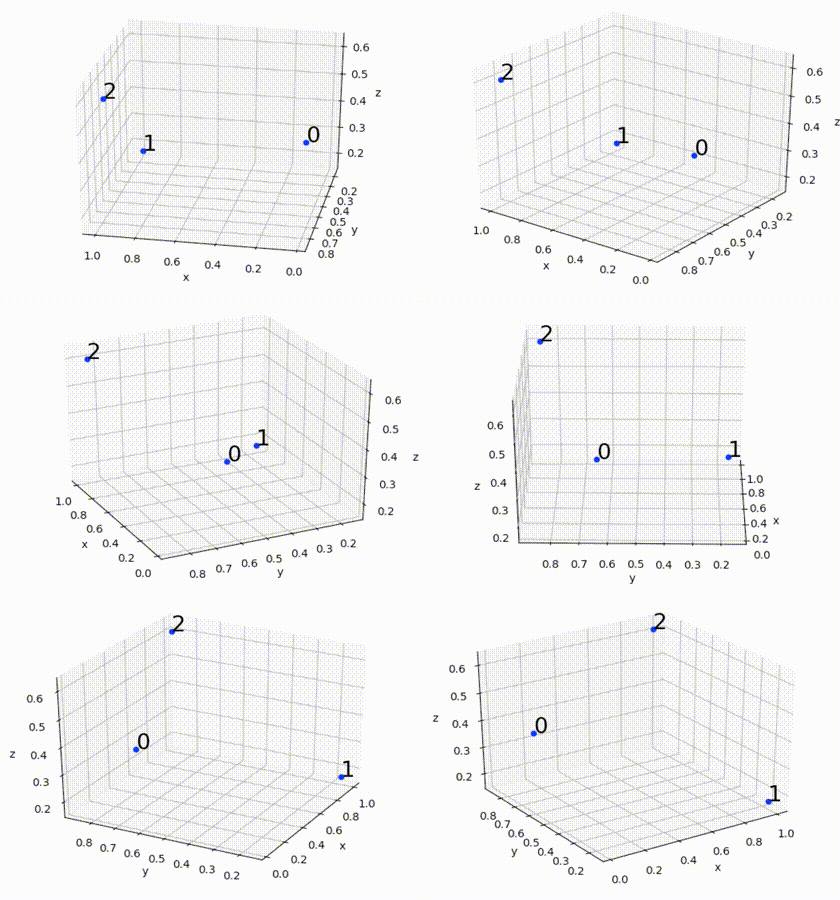
Если вы хотите, чтобы ответ @msch вращался:
from mpl_toolkits.mplot3d import axes3d
import matplotlib.pyplot as plt
from numpy.random import rand

m = rand(3,3) # m is an array of (x,y,z) coordinate triplets

fig = plt.figure()
ax = fig.add_subplot(111, projection='3d')

for i in range(len(m)): # plot each point + it's index as text above
  x = m[i,0]
  y = m[i,1]
  z = m[i,2]
  label = i
  ax.scatter(x, y, z, color='b')
  ax.text(x, y, z, '%s' % (label), size=20, zorder=1, color='k')

ax.set_xlabel('x')
ax.set_ylabel('y')
ax.set_zlabel('z')

for angle in range(0, 360):
  ax.view_init(30, angle)
  plt.draw()
  plt.pause(.001)
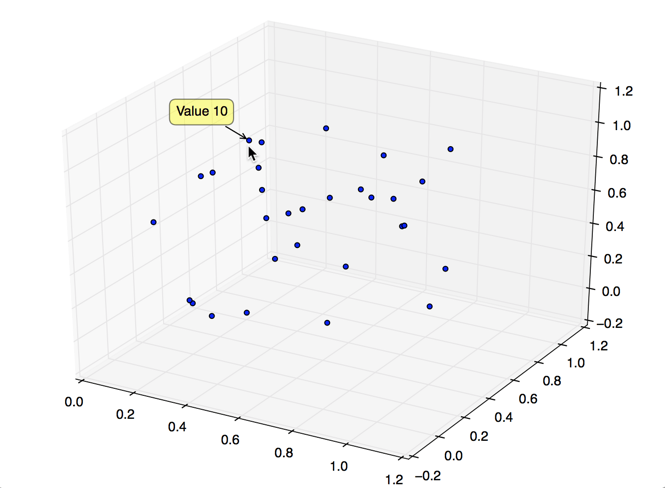
Если у вас много точек данных, диаграмма может стать очень загроможденной, если вы аннотируете их все. Следующее решение (построенное поверх ответа HYRY) реализует решение с наведением мыши (всплывающее окно) для точек данных в трехмерных диаграммах. Только точка данных рядом с вашей позицией мыши будет аннотирована. После каждого движения мыши вычисляется расстояние от указателя мыши до всех точек данных, а самая близкая точка отмечается аннотацией. 
import matplotlib.pyplot as plt, numpy as np
from mpl_toolkits.mplot3d import proj3d

def visualize3DData (X):
    """Visualize data in 3d plot with popover next to mouse position.

    Args:
        X (np.array) - array of points, of shape (numPoints, 3)
    Returns:
        None
    """
    fig = plt.figure(figsize = (16,10))
    ax = fig.add_subplot(111, projection = '3d')
    ax.scatter(X[:, 0], X[:, 1], X[:, 2], depthshade = False, picker = True)


    def distance(point, event):
        """Return distance between mouse position and given data point

        Args:
            point (np.array): np.array of shape (3,), with x,y,z in data coords
            event (MouseEvent): mouse event (which contains mouse position in .x and .xdata)
        Returns:
            distance (np.float64): distance (in screen coords) between mouse pos and data point
        """
        assert point.shape == (3,), "distance: point.shape is wrong: %s, must be (3,)" % point.shape

        # Project 3d data space to 2d data space
        x2, y2, _ = proj3d.proj_transform(point[0], point[1], point[2], plt.gca().get_proj())
        # Convert 2d data space to 2d screen space
        x3, y3 = ax.transData.transform((x2, y2))

        return np.sqrt ((x3 - event.x)**2 + (y3 - event.y)**2)


    def calcClosestDatapoint(X, event):
        """"Calculate which data point is closest to the mouse position.

        Args:
            X (np.array) - array of points, of shape (numPoints, 3)
            event (MouseEvent) - mouse event (containing mouse position)
        Returns:
            smallestIndex (int) - the index (into the array of points X) of the element closest to the mouse position
        """
        distances = [distance (X[i, 0:3], event) for i in range(X.shape[0])]
        return np.argmin(distances)


    def annotatePlot(X, index):
        """Create popover label in 3d chart

        Args:
            X (np.array) - array of points, of shape (numPoints, 3)
            index (int) - index (into points array X) of item which should be printed
        Returns:
            None
        """
        # If we have previously displayed another label, remove it first
        if hasattr(annotatePlot, 'label'):
            annotatePlot.label.remove()
        # Get data point from array of points X, at position index
        x2, y2, _ = proj3d.proj_transform(X[index, 0], X[index, 1], X[index, 2], ax.get_proj())
        annotatePlot.label = plt.annotate( "Value %d" % index,
            xy = (x2, y2), xytext = (-20, 20), textcoords = 'offset points', ha = 'right', va = 'bottom',
            bbox = dict(boxstyle = 'round,pad=0.5', fc = 'yellow', alpha = 0.5),
            arrowprops = dict(arrowstyle = '->', connectionstyle = 'arc3,rad=0'))
        fig.canvas.draw()


    def onMouseMotion(event):
        """Event that is triggered when mouse is moved. Shows text annotation over data point closest to mouse."""
        closestIndex = calcClosestDatapoint(X, event)
        annotatePlot (X, closestIndex)

    fig.canvas.mpl_connect('motion_notify_event', onMouseMotion)  # on mouse motion
    plt.show()


if __name__ == '__main__':
    X = np.random.random((30,3))
    visualize3DData (X)
Вот немного более общая форма отличного ответа HYRY. Работает для любого списка точек и меток.
import numpy as np
from matplotlib import pyplot as plt
from mpl_toolkits.mplot3d import Axes3D
from mpl_toolkits.mplot3d import proj3d

points = np.array([(1,1,1), (2,2,2)])
labels = ['billy', 'bobby']

fig = plt.figure()
ax = fig.add_subplot(111, projection = '3d')
xs, ys, zs = np.split(points, 3, axis=1)
sc = ax.scatter(xs,ys,zs)

# if this code is placed inside a function, then
# we must use a predefined global variable so that
# the update function has access to it. I'm not
# sure why update_positions() doesn't get access
# to its enclosing scope in this case.
global labels_and_points
labels_and_points = []

for txt, x, y, z in zip(labels, xs, ys, zs):
    x2, y2, _ = proj3d.proj_transform(x,y,z, ax.get_proj())
    label = plt.annotate(
        txt, xy = (x2, y2), xytext = (-20, 20),
        textcoords = 'offset points', ha = 'right', va = 'bottom',
        bbox = dict(boxstyle = 'round,pad=0.5', fc = 'yellow', alpha = 0.5),
        arrowprops = dict(arrowstyle = '->', connectionstyle = 'arc3,rad=0'))
    labels_and_points.append((label, x, y, z))


def update_position(e):
    for label, x, y, z in labels_and_points:
        x2, y2, _ = proj3d.proj_transform(x, y, z, ax.get_proj())
        label.xy = x2,y2
        label.update_positions(fig.canvas.renderer)
    fig.canvas.draw()

fig.canvas.mpl_connect('motion_notify_event', update_position)

plt.show()
Существует досадная проблема с пространством имен, которую я мог решить только (хакерски), используя глобальную переменную. Если кто-нибудь может предложить лучшее решение или объяснить, что происходит, пожалуйста, дайте мне знать!
Этот ответ основан на предыдущем ответе пользователя user315582. Я сделал несколько модификаций, чтобы обеспечить решение без использования глобальных переменных.
import numpy as np
from matplotlib import pyplot as plt
from mpl_toolkits.mplot3d import Axes3D
from mpl_toolkits.mplot3d import proj3d

def main():
    fig = plt.figure()
    ax = fig.add_subplot(111, projection = '3d')
    points = np.array([(1,1,1), (2,2,2)])
    labels = ['billy', 'bobby']
    plotlabels = []
    xs, ys, zs = np.split(points, 3, axis=1)
    sc = ax.scatter(xs,ys,zs)

    for txt, x, y, z in zip(labels, xs, ys, zs):
        x2, y2, _ = proj3d.proj_transform(x,y,z, ax.get_proj())
        label = plt.annotate(
            txt, xy = (x2, y2), xytext = (-20, 20),
            textcoords = 'offset points', ha = 'right', va = 'bottom',
            bbox = dict(boxstyle = 'round,pad=0.5', fc = 'yellow', alpha = 0.5),
            arrowprops = dict(arrowstyle = '-', connectionstyle = 'arc3,rad=0'))
        plotlabels.append(label)
    fig.canvas.mpl_connect('motion_notify_event', lambda event: update_position(event,fig,ax,zip(plotlabels, xs, ys, zs)))
    plt.show()


def update_position(e,fig,ax,labels_and_points):
    for label, x, y, z in labels_and_points:
        x2, y2, _ = proj3d.proj_transform(x, y, z, ax.get_proj())
        label.xy = x2,y2
        label.update_positions(fig.canvas.renderer)
    fig.canvas.draw()


if __name__ == '__main__':
    main()

