Как захватить рабочий стол в OpenCV (т.е. превратить растровое изображение в коврик)?
Я хочу использовать OpenCV для обработки моего рабочего стола, как если бы это был видеопоток.
Я знаком с OpenCV.
Я не знаком с Windows API. Я понимаю, что есть и другие способы захвата экрана, но для моего вопроса мне нужно, чтобы это было сделано с использованием OpenCV.
Вот мой (супер наивный) код:
HWND hDesktopWnd;
HDC hDesktopDC;
hDesktopWnd=GetDesktopWindow();
hDesktopDC=GetDC(hDesktopWnd);

// get the height and width of the screen
int height = GetSystemMetrics(SM_CYVIRTUALSCREEN);
int width = GetSystemMetrics(SM_CXVIRTUALSCREEN);

// create a bitmap
HBITMAP hbDesktop = CreateCompatibleBitmap( hDesktopDC, width, height);

Mat src(height,width,CV_8UC4);
src.data = (uchar*)hbDesktop;

imshow("output",src);  //fails :(
Есть аналогичные вопросы о Stackru, но они относятся либо к старому стилю OpenCV, либо к операционной системе Android.
Я на Windows 7 64x
Opencv 2.4.3
Спасибо всем, кто может ответить на этот вопрос.
2 ответа
После МНОГО проб и ошибок мне удалось написать функцию для этого. здесь это для любого, кто мог бы хотеть этого:
#include "stdafx.h"
#include "opencv2/core/core.hpp"
#include "opencv2/imgproc/imgproc.hpp"
#include <opencv2/highgui/highgui.hpp>
#include <Windows.h>
#include <iostream>
#include <string>
using namespace std;
using namespace cv;

Mat hwnd2mat(HWND hwnd){

    HDC hwindowDC,hwindowCompatibleDC;

    int height,width,srcheight,srcwidth;
    HBITMAP hbwindow;
    Mat src;
    BITMAPINFOHEADER  bi;

    hwindowDC=GetDC(hwnd);
    hwindowCompatibleDC=CreateCompatibleDC(hwindowDC);
    SetStretchBltMode(hwindowCompatibleDC,COLORONCOLOR);

    RECT windowsize;    // get the height and width of the screen
    GetClientRect(hwnd, &windowsize);

    srcheight = windowsize.bottom;
    srcwidth = windowsize.right;
    height = windowsize.bottom/2;  //change this to whatever size you want to resize to
    width = windowsize.right/2;

    src.create(height,width,CV_8UC4);

    // create a bitmap
    hbwindow = CreateCompatibleBitmap( hwindowDC, width, height);
    bi.biSize = sizeof(BITMAPINFOHEADER);    //http://msdn.microsoft.com/en-us/library/windows/window/dd183402%28v=vs.85%29.aspx
    bi.biWidth = width;
    bi.biHeight = -height;  //this is the line that makes it draw upside down or not
    bi.biPlanes = 1;
    bi.biBitCount = 32;
    bi.biCompression = BI_RGB;
    bi.biSizeImage = 0;
    bi.biXPelsPerMeter = 0;
    bi.biYPelsPerMeter = 0;
    bi.biClrUsed = 0;
    bi.biClrImportant = 0;

    // use the previously created device context with the bitmap
    SelectObject(hwindowCompatibleDC, hbwindow);
    // copy from the window device context to the bitmap device context
    StretchBlt( hwindowCompatibleDC, 0,0, width, height, hwindowDC, 0, 0,srcwidth,srcheight, SRCCOPY); //change SRCCOPY to NOTSRCCOPY for wacky colors !
    GetDIBits(hwindowCompatibleDC,hbwindow,0,height,src.data,(BITMAPINFO *)&bi,DIB_RGB_COLORS);  //copy from hwindowCompatibleDC to hbwindow

    // avoid memory leak
    DeleteObject (hbwindow); DeleteDC(hwindowCompatibleDC); ReleaseDC(hwnd, hwindowDC);

    return src;
}
Лучший способ сделать это - выделить память пикселям только один раз. поэтому единственная копия, сделанная здесь, сделана BitBlt
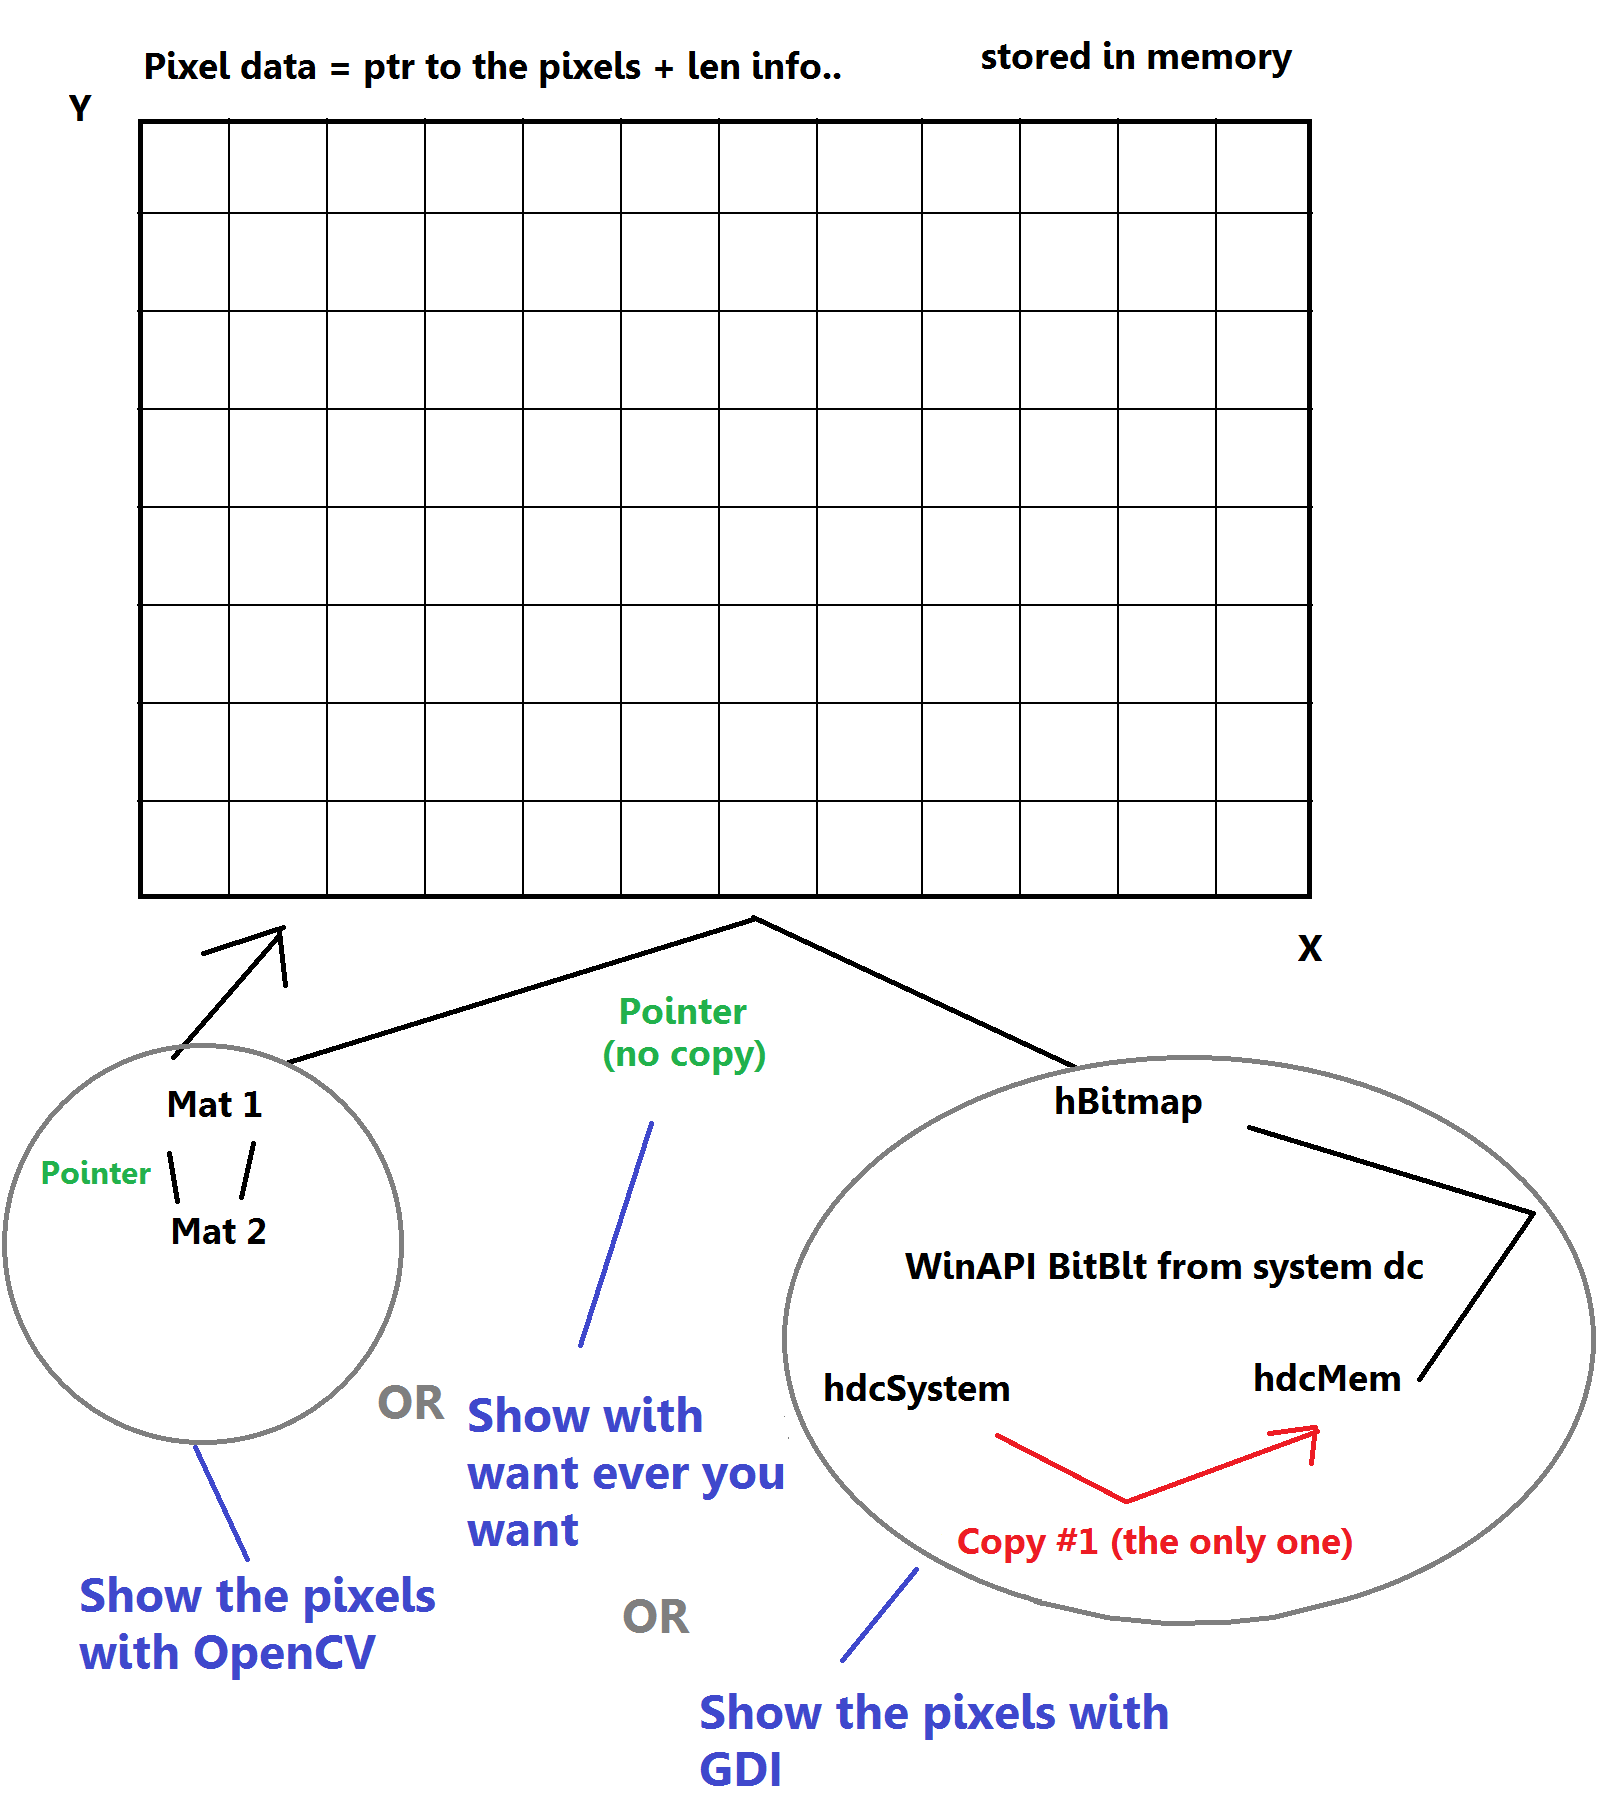
int main()

{

    int x_size = 800, y_size = 600; // <-- Your res for the image


    HBITMAP hBitmap; // <-- The image represented by hBitmap

    Mat matBitmap; // <-- The image represented by mat


    // Initialize DCs

    HDC hdcSys = GetDC(NULL); // Get DC of the target capture..
    HDC hdcMem = CreateCompatibleDC(hdcSys); // Create compatible DC


    void *ptrBitmapPixels; // <-- Pointer variable that will contain the potinter for the pixels


    // Create hBitmap with Pointer to the pixels of the Bitmap
    BITMAPINFO bi; HDC hdc;
    ZeroMemory(&bi, sizeof(BITMAPINFO));
    bi.bmiHeader.biSize = sizeof(BITMAPINFOHEADER);
    bi.bmiHeader.biWidth = x_size;
    bi.bmiHeader.biHeight = -y_size;  //negative so (0,0) is at top left

    bi.bmiHeader.biPlanes = 1;

    bi.bmiHeader.biBitCount = 32;
    hdc = GetDC(NULL);
    hBitmap = CreateDIBSection(hdc, &bi, DIB_RGB_COLORS, &ptrBitmapPixels, NULL, 0);
    // ^^ The output: hBitmap & ptrBitmapPixels


    // Set hBitmap in the hdcMem
    SelectObject(hdcMem, hBitmap);


    // Set matBitmap to point to the pixels of the hBitmap
    matBitmap = Mat(y_size, x_size, CV_8UC4, ptrBitmapPixels, 0);
    //                ^^ note: first it is y, then it is x. very confusing

    // * SETUP DONE *


    // Now update the pixels using BitBlt
    BitBlt(hdcMem, 0, 0, x_size, y_size, hdcSys, 0, 0, SRCCOPY);


    // Just to do some image processing on the pixels.. (Dont have to to this)
    Mat matRef = matBitmap(Range(100, 200), Range(100, 200));
    //                              y1    y2            x1     x2
    bitwise_not(matRef, matRef); // Invert the colors in this x1,x2,y1,y2


    // Display the results through Mat
    imshow("Title", matBitmap);

    // Wait until some key is pressed

    waitKey(0);


    return 0;


}
Обратите внимание, что здесь нет обработки ошибок, чтобы ее было легко понять, но вы должны выполнять обработку ошибок в своем коде!
Надеюсь это поможет