Преобразование RGB8 в NV12 с помощью libav/ffmpeg
Я пытаюсь преобразовать входное изображение RGB8 в NV12 с помощью libav, но sws_scale вызывает нарушение доступа для чтения. Я, должно быть, неправильно выбрал самолет или шаг, но я не понимаю, почему.
На данный момент я считаю, что мне бы пригодилась пара свежих глаз. Что мне не хватает?
void convertRGB2NV12(unsigned char *rgb_in, width, height) {
 struct SwsContext* sws_context = nullptr;
 const int in_linesize[1] = {3 * width}; // RGB stride
 int out_linesize[2] = {width, width}; // NV12 stride

 // NV12 data is separated in two
 // planes, one for the intensity (Y) and another one for
 // the colours(UV) interleaved, both with
 // the same width as the frame but the UV plane with
 // half of its height.
 uint8_t* out_planes[2];
 out_planes[0] = new uint8_t[width * height];
 out_planes[1] = new uint8_t[width * height/2];

 sws_context = sws_getCachedContext(sws_context, width, height,
                                    AV_PIX_FMT_RGB8, width, height,
                                    AV_PIX_FMT_NV12, 0, 0, 0, 0);
 sws_scale(sws_context, (const uint8_t* const*)rgb_in, in_linesize,
           0, height, out_planes, out_linesize);
// (.....)
}
2 ответа
Есть две основные проблемы:
Заменять
AV_PIX_FMT_RGB8сAV_PIX_FMT_RGB24.rgb_inдолжен быть "обернут" массивом указателей:const uint8_t* in_planes[1] = {rgb_in}; sws_scale(sws_context, in_planes, ...)
Тестирование:
Используйте инструмент командной строки FFmpeg для создания двоичного ввода в формате пикселей RGB24:
ffmpeg -y -f lavfi -i testsrc=size=192x108:rate=1 -vcodec rawvideo -pix_fmt rgb24 -frames 1 -f rawvideo rgb_image.bin
Прочитайте входное изображение, используя код C:
      const int width = 192;
const int height = 108;
unsigned char* rgb_in = new uint8_t[width * height * 3];

FILE* f = fopen("rgb_image.bin", "rb");
fread(rgb_in, 1, width * height * 3, f);
fclose(f);
Выполнять
convertRGB2NV12(rgb_in, width, height);.
Перед окончанием функции добавьте временный код для записи вывода в бинарный файл:
      FILE* f = fopen("nv12_image.bin", "wb");
fwrite(out_planes[0], 1, width * height, f);
fwrite(out_planes[1], 1, width * height/2, f);
fclose(f);
Преобразуйте nv12_image.bin как входной файл шкалы серого в файл изображения PNG (для просмотра результата):
ffmpeg -y -f rawvideo -s 192x162 -pix_fmt gray -i nv12_image.bin -pix_fmt rgb24 nv12_image.png
Полный пример кода:
      #include <stdio.h>
#include <string.h>
#include <stdint.h>

extern "C"
{
#include <libswscale/swscale.h>
}


void convertRGB2NV12(const unsigned char *rgb_in, int width, int height)
{
    struct SwsContext* sws_context = nullptr;
    const int in_linesize[1] = {3 * width}; // RGB stride
    const int out_linesize[2] = {width, width}; // NV12 stride

    // NV12 data is separated in two
    // planes, one for the intensity (Y) and another one for
    // the colours(UV) interleaved, both with
    // the same width as the frame but the UV plane with
    // half of its height.
    uint8_t* out_planes[2];
    out_planes[0] = new uint8_t[width * height];
    out_planes[1] = new uint8_t[width * height/2];

    sws_context = sws_getCachedContext(sws_context, width, height,
                                    AV_PIX_FMT_RGB24, width, height,
                                    AV_PIX_FMT_NV12, SWS_BILINEAR, nullptr, nullptr, nullptr);

    const uint8_t* in_planes[1] = {rgb_in};

    int response = sws_scale(sws_context, in_planes, in_linesize,
                             0, height, out_planes, out_linesize);

    if (response < 0)
    {
        printf("Error: sws_scale response = %d\n", response);
        return;
    }

// (.....)

    //Write NV12 output image to binary file (for testing)
    ////////////////////////////////////////////////////////////////////////////
    FILE* f = fopen("nv12_image.bin", "wb");
    fwrite(out_planes[0], 1, width * height, f);
    fwrite(out_planes[1], 1, width * height/2, f);
    fclose(f);
    ////////////////////////////////////////////////////////////////////////////


    delete[] out_planes[0];
    delete[] out_planes[1];

    sws_freeContext(sws_context);
}


int main()
{
    //Use ffmpeg for building raw RGB image (used as input).
    //ffmpeg -y -f lavfi -i testsrc=size=192x108:rate=1 -vcodec rawvideo -pix_fmt rgb24 -frames 1 -f rawvideo rgb_image.bin

    const int width = 192;
    const int height = 108;
    unsigned char* rgb_in = new uint8_t[width * height * 3];

    //Read input image for binary file (for testing)
    ////////////////////////////////////////////////////////////////////////////
    FILE* f = fopen("rgb_image.bin", "rb");
    fread(rgb_in, 1, width * height * 3, f);
    fclose(f);
    ////////////////////////////////////////////////////////////////////////////


    convertRGB2NV12(rgb_in, width, height);

    delete[] rgb_in;

    return 0;
}
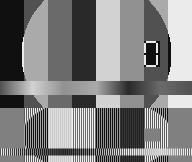
Вывод (NV12 отображается в оттенках серого):

Преобразование NV12 в RGB:
ffmpeg -y -f rawvideo -s 192x108 -pix_fmt nv12 -i nv12_image.bin -pix_fmt rgb24 rgb_output_image.png
Плоскости входного формата должны быть в формате массива указателей, как заметил Rotem в первом комментарии к исходному посту.

