Flutter: как добавить BackdropFilter в SliverAppBar
Я хочу добавить
BackdropFilter() к
SliverAppbar().
Я хочу, чтобы она выглядела как панель приложений библиотеки приложений iOS: https://cln.sh/eP8wfY.
Полоса заголовка не перемещается по списку в NestedScrollView , но только в заголовке, я хочу, чтобы
title и
actions быть видимым, пока фон размыт.
Спасибо!
3 ответа
ВНИМАНИЕ: у вас возникли проблемы с цветом, даже если вы потратили много времени.
- вам нужно изменить цвета
- вы обнаружили какую-то проблему с областью, которая может быть связана с safeArea или CupertinoNavBar.
- вы можете удалить / изменить цвет тени, я слишком много даю для проверки.
- Все, что вам нужно, чтобы играть с цветами и
LinearGradient
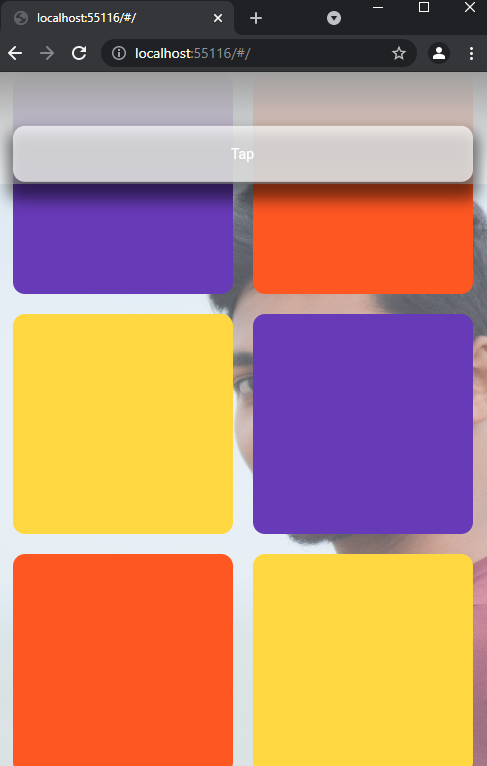
Выход
Вот моя концепция:
      Stack
    - backgroundImage
    - Container with white.3
         - CustomScrollView
              - SliverToBoxAdapter 2x kToolbarHeight for extra height for GridList,
              - SliverGrid
     - LinearGradient 2xkToolbarHeight for fadeEffect on upper scroll
     - our widget TextField or anything
Демо
class Body extends StatelessWidget {
  const Body({Key? key}) : super(key: key);

  Widget build(BuildContext context) {
    return Scaffold(
      body: LayoutBuilder(
        builder: (context, constraints) => Stack(
          children: [
            Container(
              decoration: BoxDecoration(
                // color: Colors.white.withOpacity(.3),
                image: DecorationImage(
                  image: AssetImage("assets/me.jpg"),
                  fit: BoxFit.cover,
                ),
              ),
              child: Container(),
            ),
            Container(
              decoration: BoxDecoration(
                color: Colors.white.withOpacity(.3),
              ),
              child: CustomScrollView(
                slivers: [
                  SliverToBoxAdapter(
                    child: SizedBox(
                      height: kToolbarHeight * 2,
                    ),
                  ),
                  SliverPadding(
                    padding: EdgeInsets.all(20),
                    sliver: SliverGrid.count(
                      crossAxisCount: 2,
                      mainAxisSpacing: 20,
                      crossAxisSpacing: 20,
                      children: [
                        ...List.generate(
                            12,
                            (index) => Container(
                                  decoration: BoxDecoration(
                                    color: index % 3 == 0
                                        ? Colors.deepPurple
                                        : index % 3 == 1
                                            ? Colors.deepOrange
                                            : Colors.amberAccent,
                                    borderRadius: BorderRadius.circular(12),
                                  ),
                                ))
                      ],
                    ),
                  )
                ],
              ),
            ),
            Align(
              alignment: Alignment.topCenter,
              child: Container(
                height: kToolbarHeight * 2,
                width: constraints.maxWidth,
                decoration: BoxDecoration(
                  gradient: LinearGradient(
                    begin: Alignment.topCenter,
                    end: Alignment.bottomCenter,
                    colors: [
                      Colors.grey,
                      Colors.white.withOpacity(.7),
                    ],
                  ),
                ),
                child: Text(""),
              ),
            ),
            Positioned(
              top: kTextTabBarHeight * 1.122,

              /// need to tweek
              left: 20,
              right: 20,
              child: Container(
                height: kToolbarHeight,
                alignment: Alignment.center,
                decoration: BoxDecoration(
                  borderRadius: BorderRadius.circular(12),
                  color: Colors.white70,
                  boxShadow: [
                    BoxShadow(
                        blurRadius: 12,
                        spreadRadius: 6,
                        color: Colors.black54,
                        offset: Offset(0, 12))
                  ],
                ),
                child: Row(
                  crossAxisAlignment: CrossAxisAlignment.center,
                  mainAxisAlignment: MainAxisAlignment.center,
                  children: [
                    GestureDetector(
                        onTap: () {
                          print("boosm");
                        },
                        child: Text("Tap")),
                  ],
                ),
              ),
            ),
          ],
        ),
      ),
    );
  }
}
      SliverAppBar(
  primary: false,
  toolbarHeight: kToolbarHeight * 1.5,
  floating: true,
  snap: true,
  backgroundColor: Colors.black45,
  titleSpacing: 0.0,
  title: BackdropFilter(
    filter: ImageFilter.blur(sigmaX: 36.0, sigmaY: 36.0),
    child: SizedBox(
      width: MediaQuery.of(context).size.width,
      height: kToolbarHeight * 1.5,
    ),
  ),
)
Ты можешь изменитьсяtoolbarHeightпо своему вкусу, но дитяBackdropFilterдолжны иметь одинаковую высоту.
TL;DR Я исправил проблему с помощью обычного, так как мне не нужен
SliverAppBar(). Я сделал настраиваемую панель приложения, чтобы решить эту проблему (см. Код в конце вопроса).
Я понял, что мне не нужен
SilverAppBar() потому что он просто останется
floating а также
pinned. Это сделало мою жизнь намного проще, так как я мог использовать и устанавливать
extendBodyBehindAppBar к
true в
Scaffold(). Благодаря этому мне не пришлось создавать пользовательский виджет ленты, поскольку я не знаком с их созданием.
Моим решением было сделать кастом. У меня был бы
Stack() затем примените эффект размытия и
AppBar() над ним.
https://github.com/flutter/flutter/issues/48212 показывает, что вы не можете использовать
ShaderMasks()с s. Чтобы обойти это, я сделал столбец с кучей
BackdropFilter()с. У них были бы уменьшающиеся значения сигмы, чтобы создать эффект градиента, который я искал. Однако это не очень эффективно, и в более тяжелых приложениях работать не будет. Делать каждый блок длиной в один логический пиксель было слишком тяжело, поэтому я сделал его двумя логическими пикселями.
Его также можно легко расширить, например, добавив эффект затухания, как это сделал я.
Вот как выглядит результат.
- Раньше: https://cln.sh/vcCY4j
- После:
- https://cln.sh/vNZVJW (включает эффект непрозрачности (0.8))
- https://cln.sh/jfH7OP (Эффект пониженной непрозрачности (0,5))
- https://cln.sh/nXzPLe (без эффекта непрозрачности)
Вот код решения:
      import 'dart:math';
import 'dart:ui';
import 'package:flutter/material.dart';

class BlurredAppBar extends StatelessWidget implements PreferredSizeWidget {
  final String title;
  final List<Widget>? actions;

  /// An `AppBar()` which has a blur effect behind it which fades in to hide it
  /// until content appears behind it. This has a similar effect to the iOS 14
  /// App Library app bar. It also has the possibility of having a fade effect to
  /// redude the opacity of widgets behind the `BlurredAppBar()` using a `LinearGradient()`.
  const BlurredAppBar({required this.title, this.actions, Key? key})
      : super(key: key);

  /// The height of the `AppBar()`
  final double height = 56;

  /// Returns a `List<Widget>` of `BackdropFilter()`s which have decreasing blur values.
  /// This will create the illusion of a gradient blur effect as if a `ShaderMask()` was used.
  List<Widget> _makeBlurGradient(double height, MediaQueryData mediaQuery) {
    List<Widget> widgets = [];
    double length = height + mediaQuery.padding.top;

    for (int i = 1; i <= (length / 2); i++) {
      widgets.add(
        ClipRRect(
          child: BackdropFilter(
            filter: ImageFilter.blur(
              sigmaX: max(((length / 2) - i.toDouble()) / 2, 0),
              sigmaY: min(5, max(((length / 2) - i.toDouble()) / 2, 0)),
            ),
            child: SizedBox(
              height: 2,
              width: mediaQuery.size.width,
            ),
          ),
        ),
      );
    }

    return widgets;
  }

  @override
  Widget build(BuildContext context) {
    final MediaQueryData mediaQuery = MediaQuery.of(context);

    return Stack(
      children: [
        // BackdropFilters
        SizedBox(
          height: height + mediaQuery.padding.top,
          child: Column(
            children: _makeBlurGradient(height, mediaQuery),
          ),
        ),
        // Fade effect.
        Container(
          decoration: BoxDecoration(
            gradient: LinearGradient(
              begin: Alignment.topCenter,
              end: Alignment.bottomCenter,
              stops: [0.5, 1],
              colors: [
                Colors.white.withOpacity(0.8),
                Colors.white.withOpacity(0),
              ],
            ),
          ),
        ),

        // AppBar
        AppBar(
          title: Text(
            title,
            style: Theme.of(context).textTheme.headline3,
          ),
          automaticallyImplyLeading: false,
          actions: actions,
        ),
      ],
    );
  }

  @override
  Size get preferredSize => Size.fromHeight(height);
}
