flutter: переместить нижний лист, содержащий TabBarView с текстовым полем вместе с клавиатурой
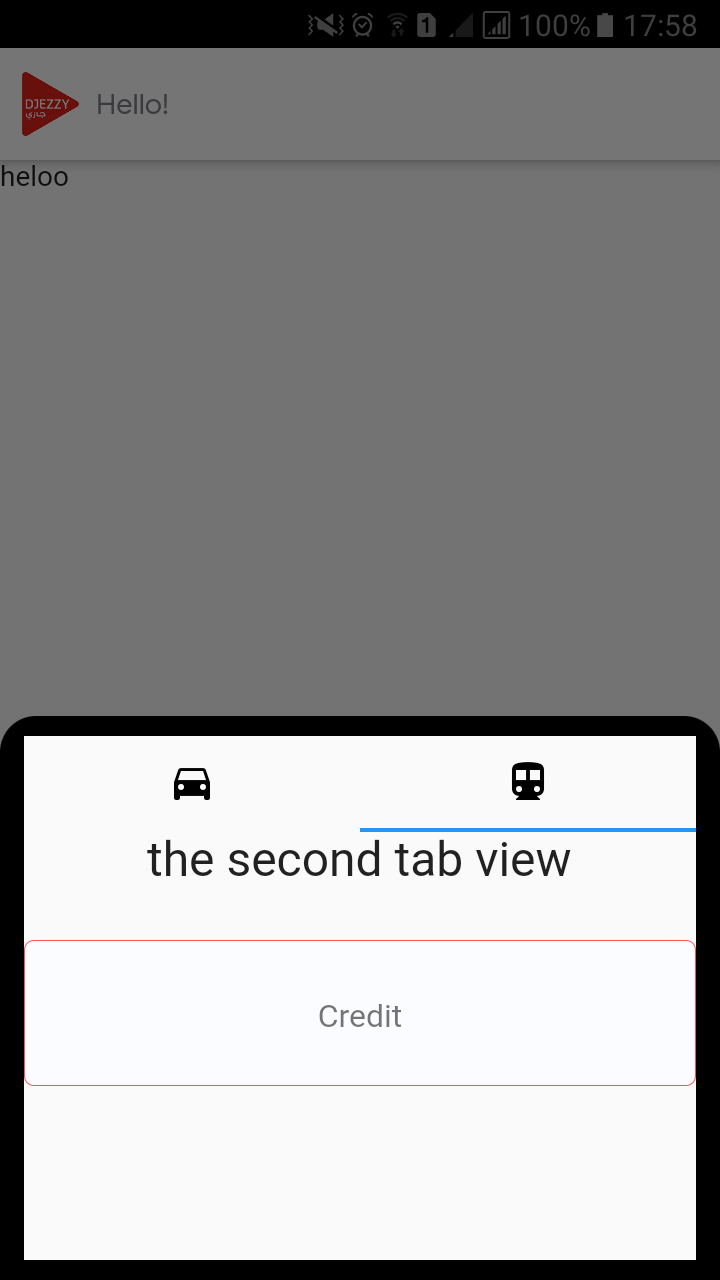
Я пытаюсь создать нижний лист с текстовым полем внутри обоих вкладок (второго и первого) . Но нижний лист перекрывается клавиатурой.
Я пробовал все решения, упомянутые здесь: Как переместить нижний лист вместе с клавиатурой с текстовым полем (автофокусировка - это правда)?
он работает, но только для вкладок (вкладки внутри каркаса, который находится внутри контейнера) без отображения содержимого вкладок, я имею в виду, что вкладки исчезают и показывают только белый экран!
вот изображения моего экрана до появления клавиатуры и после:
перед:
КОД:
showModalBottomSheet(
    backgroundColor: Colors.transparent,
    context: context,
    isScrollControlled: true,
    builder: (context) {
    return Padding(
    padding: MediaQuery.of(context).viewInsets,
    child: StatefulBuilder(builder:
    (BuildContext context, StateSetter setState) {
    return Container(
        width: MediaQuery.of(context).size.width,
        height: 282,
        decoration: BoxDecoration(
            // color: colorPrimary,
            color: Colors.black,
            borderRadius: BorderRadius.only(
            topLeft: Radius.circular(18.0),
            topRight: const Radius.circular(18.0),
            ),
        ),
child: DefaultTabController(
    length: 2,
    child: Padding(
    padding: const EdgeInsets.symmetric(
        vertical: 10, horizontal: 12),
    child: Scaffold(
        resizeToAvoidBottomInset: true,
appBar: TabBar(
    tabs: [
    Tab(
        icon: Icon(
        Icons.directions_car,
        color: Colors.black,
    )),
    Tab(
        icon: Icon(
        Icons.directions_transit,
        color: Colors.black,
    )),
    ],
),
body: TabBarView(
    controller: _controller,
    children: <Widget>[
    Column(
        children: <Widget>[
        Text(
            'the first tab view',
            style: TextStyle(fontSize: 24),
        ),
        SizedBox(height: 26),
        Container(
            height: 73,
            width: MediaQuery.of(context).size.width -24,
            decoration: BoxDecoration(
                borderRadius: BorderRadius.circular(5),
                color: colorPrimary,
                border: Border.all(width: 0.5,
                    color: Colors.redAccent)),
            child: Align(
                alignment:Alignment.center,
                child: TextField(
                maxLength: 30,
                enableInteractiveSelection:false,
                keyboardType: TextInputType.number,
                style: TextStyle(height: 1.6),
                cursorColor: Colors.green[800],
                textAlign: TextAlign.center,
                autofocus: false,
                decoration:
                    InputDecoration(
                    border:InputBorder.none,
                    hintText:'Internet',
                    counterText: "",
                ),
                ),
            )),
        ],
    ),
    Column(
        children: <Widget>[
        Text(
            'the second tab view',
            style: TextStyle(fontSize: 24),
        ),
        SizedBox(height: 26),
        Container(
            height: 73,
            width: MediaQuery.of(context).size.width -24,
            decoration: BoxDecoration(
                borderRadius: BorderRadius.circular(5),
                color: colorPrimary,
                border: Border.all(width: 0.5,
                    color: Colors.redAccent)),
            child: Align(
                alignment:Alignment.center,
                child: TextField(
                maxLength: 30,
                enableInteractiveSelection:false,
                keyboardType: TextInputType.number,
                style: TextStyle(height: 1.6),
                cursorColor: Colors.green[800],
                textAlign: TextAlign.center,
                autofocus: false,
                decoration:
                    InputDecoration(
                    border:InputBorder.none,
                    hintText:'Credit',
                    counterText: "",
                ),
                ),
            )),
        ],
    )
],
)),
 ),));}),);});
так! кто-нибудь сталкивался с этим раньше или есть идеи помочь?! и спасибо.
1 ответ
Вы можете скопировать и вставить полный код ниже
Шаг 1. Вы можете обернутьSingleChildScrollView
builder: (context) {
        return SingleChildScrollView(
          child: Padding(
Шаг 2: Удалить Scaffold appbar body и заменить на Column
 child: Column(
      mainAxisAlignment:
          MainAxisAlignment.center,
      crossAxisAlignment:
          CrossAxisAlignment.start,
      children: <Widget>[
        TabBar(
        ...
         Expanded(
          child: TabBarView(
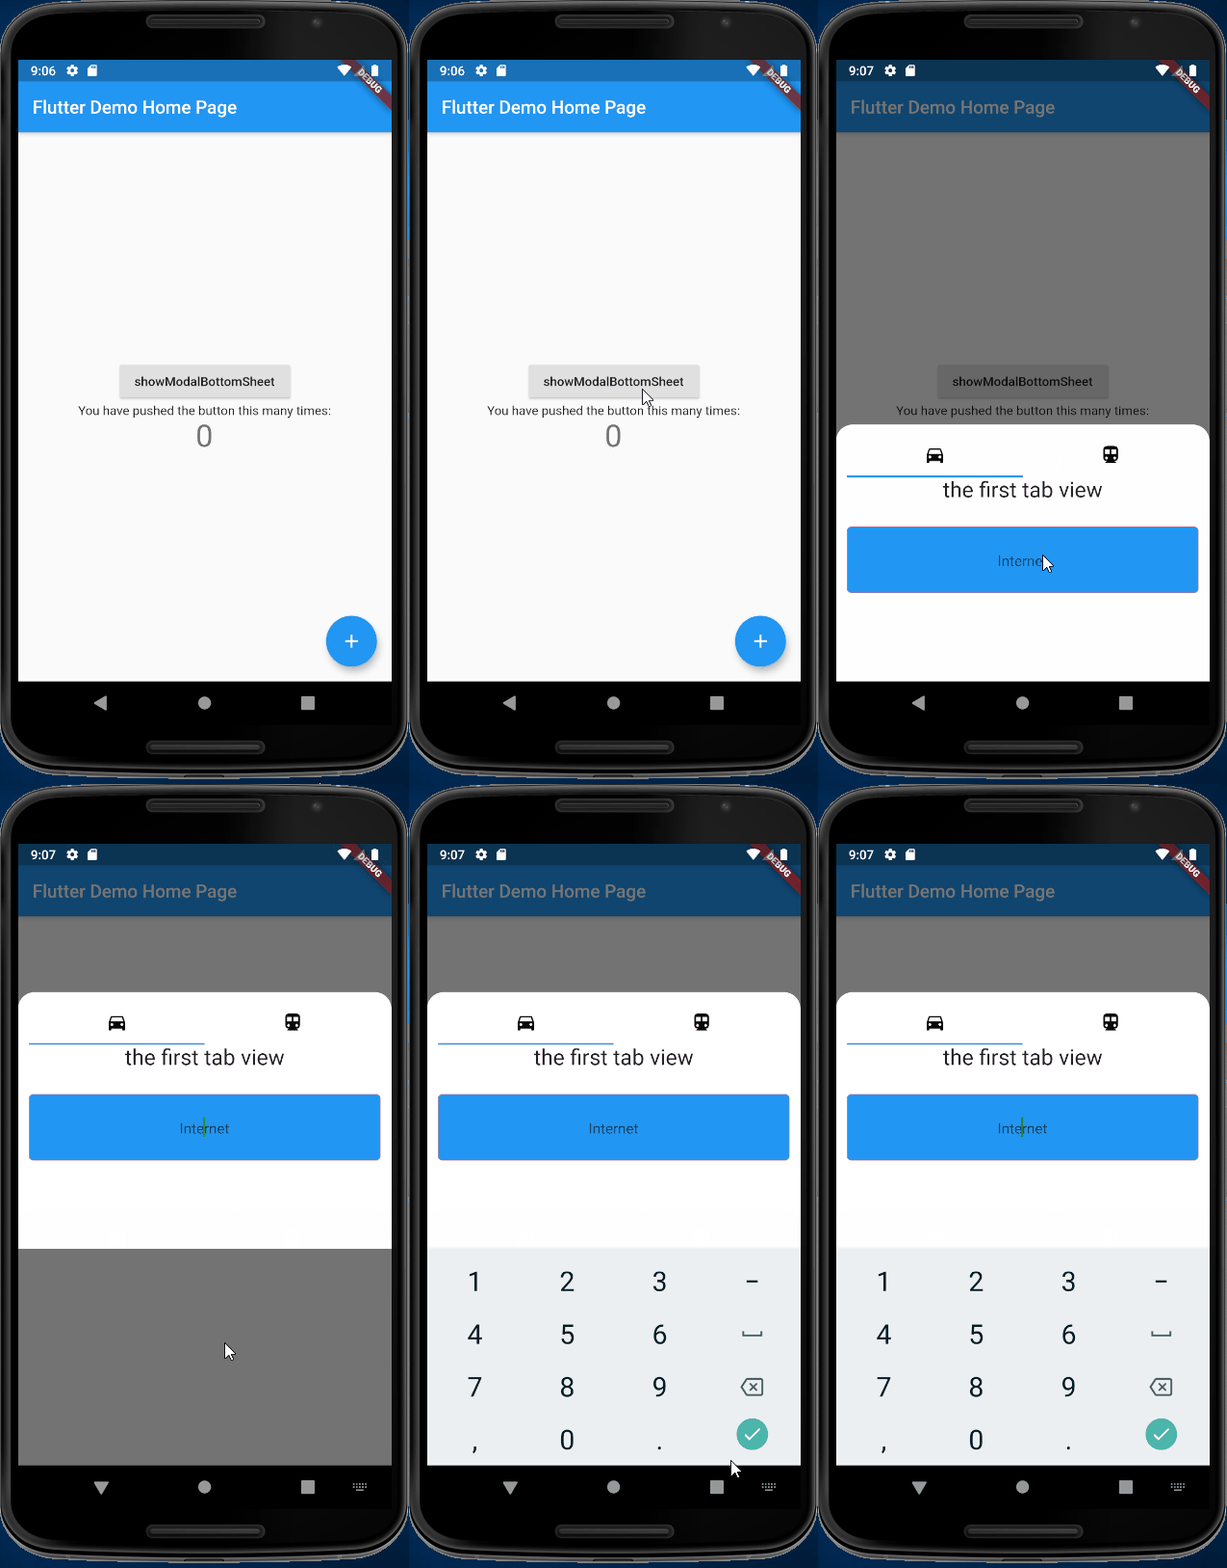
рабочая демонстрация
полный код
import 'package:flutter/material.dart';
void main() {
runApp(MyApp());
}
class MyApp extends StatelessWidget {
@override
Widget build(BuildContext context) {
return MaterialApp(
title: 'Flutter Demo',
theme: ThemeData(
primarySwatch: Colors.blue,
visualDensity: VisualDensity.adaptivePlatformDensity,
),
home: MyHomePage(title: 'Flutter Demo Home Page'),
);
}
}
class MyHomePage extends StatefulWidget {
MyHomePage({Key key, this.title}) : super(key: key);
final String title;
@override
_MyHomePageState createState() => _MyHomePageState();
}
class _MyHomePageState extends State<MyHomePage>
with SingleTickerProviderStateMixin {
int _counter = 0;
Color colorPrimary = Colors.blue;
TabController _controller;
void _incrementCounter() {
setState(() {
_counter++;
});
}
void initState() {
super.initState();
// 添加监听器
_controller = TabController(vsync: this, length: 2);
}
@override
Widget build(BuildContext context) {
return Scaffold(
appBar: AppBar(
title: Text(widget.title),
),
body: Center(
child: Column(
mainAxisAlignment: MainAxisAlignment.center,
children: <Widget>[
RaisedButton(
child: const Text('showModalBottomSheet'),
onPressed: () {
showModalBottomSheet(
backgroundColor: Colors.transparent,
context: context,
isScrollControlled: true,
builder: (context) {
return SingleChildScrollView(
child: Padding(
padding: MediaQuery.of(context).viewInsets,
child: StatefulBuilder(builder:
(BuildContext context, StateSetter setState) {
return Container(
width: MediaQuery.of(context).size.width,
height: 282,
decoration: BoxDecoration(
// color: colorPrimary,
color: Colors.white,
borderRadius: BorderRadius.only(
topLeft: Radius.circular(18.0),
topRight: const Radius.circular(18.0),
),
),
child: DefaultTabController(
length: 2,
child: Padding(
padding: const EdgeInsets.symmetric(
vertical: 10, horizontal: 12),
child: Column(
mainAxisAlignment:
MainAxisAlignment.center,
crossAxisAlignment:
CrossAxisAlignment.start,
children: <Widget>[
TabBar(
tabs: [
Tab(
icon: Icon(
Icons.directions_car,
color: Colors.black,
)),
Tab(
icon: Icon(
Icons.directions_transit,
color: Colors.black,
)),
],
),
Expanded(
child: TabBarView(
controller: _controller,
children: <Widget>[
Column(
children: <Widget>[
Text(
'the first tab view',
style: TextStyle(
fontSize: 24),
),
SizedBox(height: 26),
Container(
height: 73,
width: MediaQuery.of(
context)
.size
.width -
24,
decoration: BoxDecoration(
borderRadius:
BorderRadius
.circular(
5),
color:
colorPrimary,
border: Border.all(
width: 0.5,
color: Colors
.redAccent)),
child: Align(
alignment: Alignment
.center,
child: TextField(
maxLength: 30,
enableInteractiveSelection:
false,
keyboardType:
TextInputType
.number,
style: TextStyle(
height: 1.6),
cursorColor:
Colors.green[
800],
textAlign:
TextAlign
.center,
autofocus: false,
decoration:
InputDecoration(
border:
InputBorder
.none,
hintText:
'Internet',
counterText: "",
),
),
)),
],
),
Column(
children: <Widget>[
Text(
'the second tab view',
style: TextStyle(
fontSize: 24),
),
SizedBox(height: 26),
Container(
height: 73,
width: MediaQuery.of(
context)
.size
.width -
24,
decoration: BoxDecoration(
borderRadius:
BorderRadius
.circular(
5),
color:
colorPrimary,
border: Border.all(
width: 0.5,
color: Colors
.redAccent)),
child: Align(
alignment: Alignment
.center,
child: TextField(
maxLength: 30,
enableInteractiveSelection:
false,
keyboardType:
TextInputType
.number,
style: TextStyle(
height: 1.6),
cursorColor:
Colors.green[
800],
textAlign:
TextAlign
.center,
autofocus: false,
decoration:
InputDecoration(
border:
InputBorder
.none,
hintText:
'Credit',
counterText: "",
),
),
)),
],
)
],
),
)
]),
),
));
}),
),
);
});
}),
Text(
'You have pushed the button this many times:',
),
Text(
'$_counter',
style: Theme.of(context).textTheme.headline4,
),
],
),
),
floatingActionButton: FloatingActionButton(
onPressed: _incrementCounter,
tooltip: 'Increment',
child: Icon(Icons.add),
),
);
}
}
Вы можете просто обернуть своего дочернего элемента modalBottomSheet с помощью
Scaffold как это:
showModalBottomSheet(
        builder: (context){
            return Scaffold(
                backgroundColor: Colors.transparent,
                resizeToAvoidBottomInset: true,
                body: //your child

