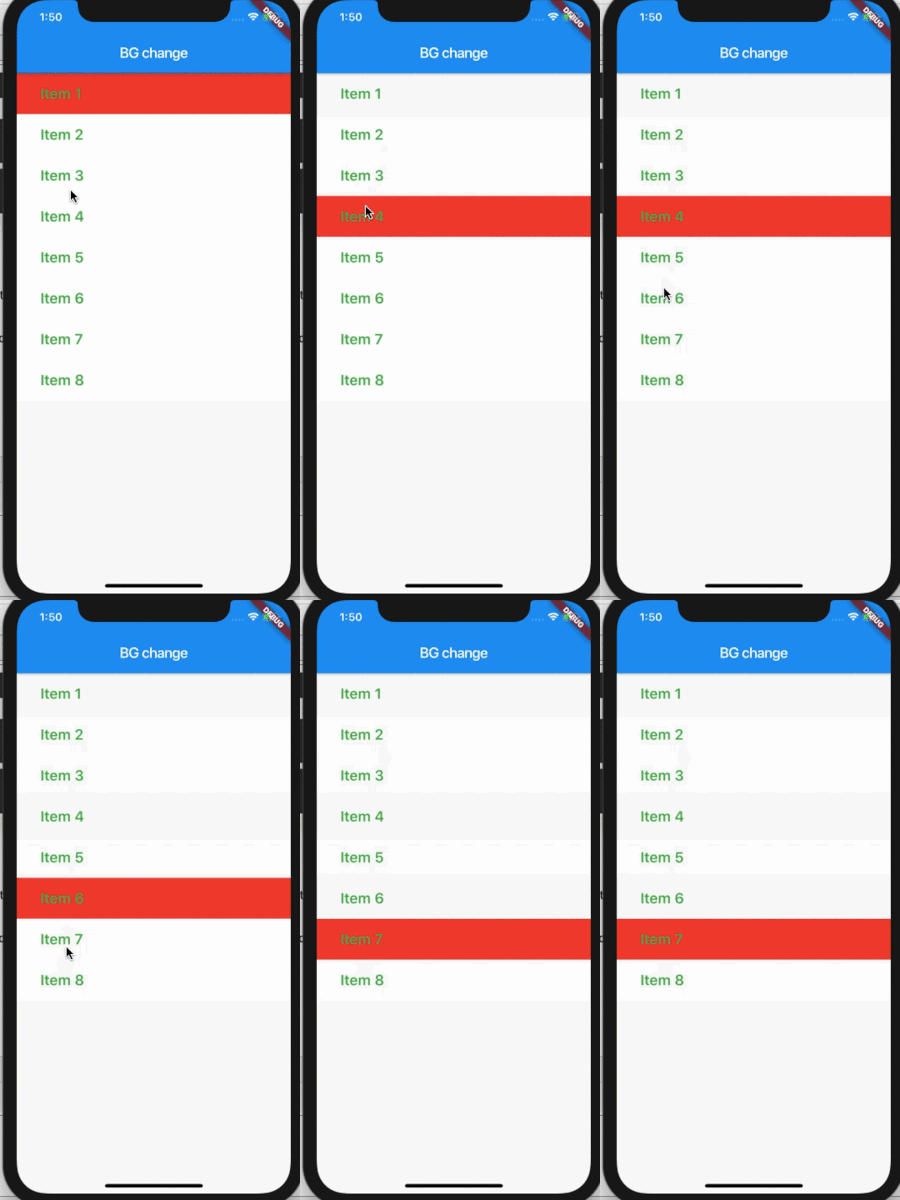
Я хочу изменить цвет CustomListTile, который является дочерним элементом ListView при нажатии onTap, и установить цвет других дочерних элементов на значение по умолчанию?
В ящике, в списке, хотите изменить цвет CustomListTile при нажатии onTap и установить цвет всех остальных дочерних элементов по умолчанию?
class CustomListTile extends StatelessWidget {

  final Color itemContainerColor;

  const CustomListTile({
    //deafult color is Colors.white
    this.itemContainerColor= Colors.white,
  });

  @override
  Widget build(BuildContext context) {
    return InkWell(
      onTap: (){},

    child: Container(
    margin: EdgeInsets.symmetric(vertical: 4),
    padding: EdgeInsets.symmetric(vertical: 5, horizontal: 16),
    width: 150,
    decoration: BoxDecoration(

        color: itemContainerColor,
       )
    child:
        Text(
          "ListTile 1",
          style: TextStyle(
              fontSize: 20,
              color: Colors.green,
              fontWeight: FontWeight.w600),
        ),

     ),
   ));
  }
 }
3 ответа
Попробуй это.
    class ChangeListViewBGColor extends StatefulWidget {
    _ChangeListViewBGColorState createState() => _ChangeListViewBGColorState();
    }

    class _ChangeListViewBGColorState extends State<ChangeListViewBGColor> {
    final List<String> _listViewData = [
        "Item 1",
        "Item 2",
        "Item 3",
        "Item 4",
        "Item 5",
        "Item 6",
        "Item 7",
        "Item 8",
    ];

    int _selectedIndex = 0;

    _onSelected(int index) {
        setState(() => _selectedIndex = index);
    }

    @override
    Widget build(BuildContext context) {
        return Scaffold(
        appBar: AppBar(
            title: Text('BG change'),
        ),
        body: ListView.builder(
            itemCount: _listViewData.length,
            itemBuilder: (context, index) => Container(
            color: _selectedIndex != null && _selectedIndex == index
                ? Colors.red
                : Colors.white,
            child: ListTile(
                title: CustomListTile(_listViewData[index]),
                onTap: () => _onSelected(index),
            ),
            ),
        ),
        );
    }
    }

    class CustomListTile extends StatelessWidget {

    var titleName;

    CustomListTile(this.titleName);

    @override
    Widget build(BuildContext context) {
        return InkWell(
        child: Container(
            child: Text(
                this.titleName,
                style: TextStyle(
                    fontSize: 20, color: Colors.green, fontWeight: FontWeight.w600),
            ),
            margin: EdgeInsets.symmetric(vertical: 4),
            padding: EdgeInsets.symmetric(vertical: 5, horizontal: 16),
            width: 150,

        )
        );
    }
    }
Aakash Просто используйте логическое значение на вкладке, например colorChange = true, при нажатии кнопки и других руках в дочернем виджете контейнера...
     colorChange ?
       Text(
         "ListTile 1",
         style: TextStyle(
             fontSize: 20,
             color: Colors.red, // which color you need to use
             fontWeight: FontWeight.w600),
       ): Text(
         "ListTile 2",
         style: TextStyle(
             fontSize: 20,
             color: Colors.green,
             fontWeight: FontWeight.w600),
       )
Примечание. Можно использовать решение / логику @Amit Prajapati, но если ваш вариант использования со временем станет сложным, я бы рекомендовал действовать в соответствии с решением ниже.
Всякий раз, когда вам нужно изменить свойство определенного элемента из списка элементов, используйте список значений, имеющих тот же тип данных, что и значение, принимаемое этим свойством, имеющее ту же длину, что и количество элементов в вашем основном списке..
В вашем случае вам нужно изменить цвет определенного ListTile всякий раз, когда пользователь нажимает на него. Итак, объявите список цветов.
List<Color> tileColors;
Теперь в initState() вашего основного виджета инициализируйте список со значениями по умолчанию (в зависимости от длины нашего основного виджета).
for(int i=0;i<items.length;i++) tileColors.add(defaultColor);
Теперь, используя функцию построителя, установите каждый элемент (ListTile) вашего списка с tileColors[index],
(Я буду использовать ListView.builder)
ListView.builder(
itemCount: items.length,
 itemBuilder: (BuildContext context, int index) {
     return new Container(
       color: tileColors[index],
       child: ListTile([...]),
);
    }
)
Теперь просто установите State() значение свойства (цвета) этого ListTile всякий раз, когда пользователь нажимает на него.
ListView.builder(
  itemCount: items.length,
  itemBuilder: (BuildContext context, int index) {
     return new Container(
       color: tileColors[index],
       child: ListTile(
         onTap: (){
            setState((){
          for(int i=0;i<item.length;i++) tileColors[i] = defaultColor;

          tileColors[index] = selectedColor; // selectedColor is the color which you wish to change to.

         // Note: You can add your own conditions over. e.g. If you want the first tile to be of a specific color and the rest should be different color while the user taps.
});
}
),
   );
    }
)
Совет: вы можете использовать AnimatedContainer вместо виджета "Контейнер", чтобы создать плавный переход при нажатии пользователем. Установить
durationпараметр дляDuration(milliseconds: 300).
