Захват полного снимка экрана с помощью строки состояния в iOS программно
Я использую этот код, чтобы сделать снимок экрана и сохранить его в фотоальбоме.
-(void)TakeScreenshotAndSaveToPhotoAlbum
{
   UIWindow *window = [UIApplication sharedApplication].keyWindow;

   if ([[UIScreen mainScreen] respondsToSelector:@selector(scale)])
       UIGraphicsBeginImageContextWithOptions(window.bounds.size, NO, [UIScreen mainScreen].scale);
   else
       UIGraphicsBeginImageContext(window.bounds.size);

   [self.view.layer renderInContext:UIGraphicsGetCurrentContext()];
   UIImage *image = UIGraphicsGetImageFromCurrentImageContext();
   UIGraphicsEndImageContext();

   UIImageWriteToSavedPhotosAlbum(image, nil, nil, nil);
}
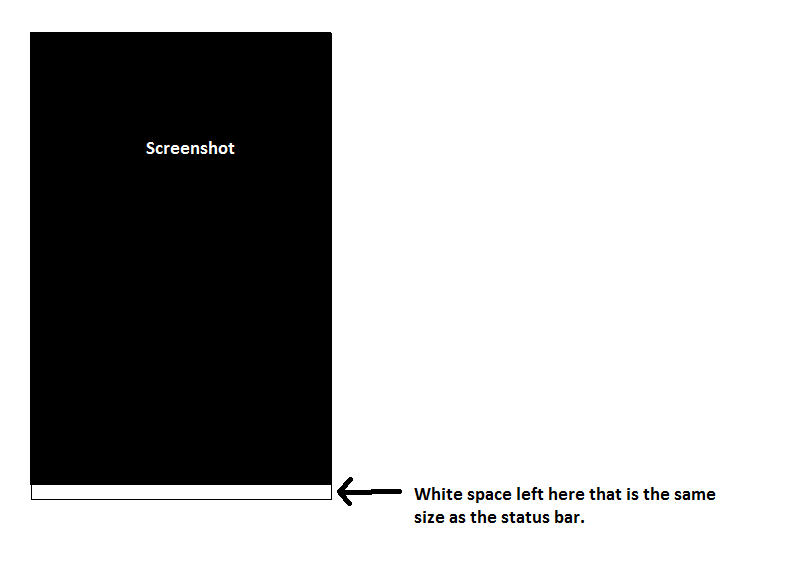
Но проблема в том, что всякий раз, когда снимок экрана сохраняется, я вижу, что строка состояния iPhone не захвачена. Вместо этого пробел появляется внизу. Как следующее изображение:
Что я делаю неправильно?
5 ответов
Строка состояния на самом деле находится в своем собственном UIWindow, в вашем коде вы отображаете только представление вашего viewcontroller, которое не включает это.
"Официальный" метод скриншотов был здесь, но теперь, похоже, был удален Apple, возможно, из-за того, что он устарел.
Под iOS 7 теперь есть новый метод UIScreen для получения представления, содержащего содержимое всего экрана:
- (UIView *)snapshotViewAfterScreenUpdates:(BOOL)afterUpdates
Это даст вам представление, которым вы можете затем управлять на экране для различных визуальных эффектов.
Если вы хотите нарисовать иерархию представления в контексте, вам нужно пройтись по окнам приложения ([[UIApplication sharedApplication] windows]) и вызовите этот метод для каждого:
- (BOOL)drawViewHierarchyInRect:(CGRect)rect afterScreenUpdates:(BOOL)afterUpdates
Возможно, вы сможете объединить два вышеупомянутых подхода и сделать снимок, а затем использовать описанный выше метод на снимке, чтобы нарисовать его.
Предлагаемый "официальный" метод скриншотов не захватывает строку состояния (ее нет в списке окон приложения). Как проверено на iOS 5.
Я полагаю, это по соображениям безопасности, но в документах нет упоминаний об этом.
Я предлагаю два варианта:
- нарисовать заглушку в строке состояния изображения из ресурсов вашего приложения (опционально обновить индикатор времени);
- захватывать только ваш вид без строки состояния или обрезать изображение впоследствии (размер изображения будет отличаться от стандартного разрешения устройства); рамка строки состояния известна из соответствующего свойства объекта приложения.
Вот мой код, чтобы сделать снимок экрана и сохранить его как NSData (внутри IBAction). С sotred NSData вы можете поделиться или по электронной почте или все, что вы хотите сделать
CGSize imageSize = [[UIScreen mainScreen] bounds].size;
        if (NULL != UIGraphicsBeginImageContextWithOptions)
            UIGraphicsBeginImageContextWithOptions(imageSize, NO, 0);
        else
            UIGraphicsBeginImageContext(imageSize);

        CGContextRef context = UIGraphicsGetCurrentContext();

        // Iterate over every window from back to front
        for (UIWindow *window in [[UIApplication sharedApplication] windows])
        {
            if (![window respondsToSelector:@selector(screen)] || [window screen] == [UIScreen mainScreen])
            {
                // -renderInContext: renders in the coordinate space of the layer,
                // so we must first apply the layer's geometry to the graphics context
                CGContextSaveGState(context);
                // Center the context around the window's anchor point
                CGContextTranslateCTM(context, [window center].x, [window center].y);
                // Apply the window's transform about the anchor point
                CGContextConcatCTM(context, [window transform]);
                // Offset by the portion of the bounds left of and above the anchor point
                CGContextTranslateCTM(context,
                                      -[window bounds].size.width * [[window layer] anchorPoint].x,
                                      -[window bounds].size.height * [[window layer] anchorPoint].y);

                // Render the layer hierarchy to the current context
                [[window layer] renderInContext:context];

                // Restore the context
                CGContextRestoreGState(context);
            }
        }

        // Retrieve the screenshot image
        UIImage *imageForEmail = UIGraphicsGetImageFromCurrentImageContext();

        UIGraphicsEndImageContext();

    NSData *imageDataForEmail = UIImageJPEGRepresentation(imageForEmail, 1.0);
Ответ на вышеуказанный вопрос для Objective-C уже пишут, вот Swift вариант ответа на вышеуказанный вопрос.
Для Swift 3+
Сделайте снимок экрана, а затем используйте его для отображения где-нибудь или для отправки через Интернет.
extension UIImage {
    class var screenShot: UIImage? {
        let imageSize = UIScreen.main.bounds.size as CGSize;
        UIGraphicsBeginImageContextWithOptions(imageSize, false, 0)
        guard let context = UIGraphicsGetCurrentContext() else {return nil}
        for obj : AnyObject in UIApplication.shared.windows {
            if let window = obj as? UIWindow {
                if window.responds(to: #selector(getter: UIWindow.screen)) || window.screen == UIScreen.main {
                    // so we must first apply the layer's geometry to the graphics context
                    context.saveGState();
                    // Center the context around the window's anchor point
                    context.translateBy(x: window.center.x, y: window.center
                        .y);
                    // Apply the window's transform about the anchor point
                    context.concatenate(window.transform);
                    // Offset by the portion of the bounds left of and above the anchor point
                    context.translateBy(x: -window.bounds.size.width * window.layer.anchorPoint.x,
                                         y: -window.bounds.size.height * window.layer.anchorPoint.y);

                    // Render the layer hierarchy to the current context
                    window.layer.render(in: context)

                    // Restore the context
                    context.restoreGState();
                }
            }
        }
        guard let image = UIGraphicsGetImageFromCurrentImageContext() else {return nil}
        return image
    }
}
Использование приведенного выше скриншота
Позволяет отображать выше снимок экрана на UIImageView
yourImageView = UIImage.screenShotПолучить данные изображения для сохранения / отправки через Интернет
if let img = UIImage.screenShot {
    if let data = UIImagePNGRepresentation(img) {
        //send this data over web or store it anywhere
    }
}
Swift, iOS 13:
Приведенный ниже код (и другие способы доступа) теперь вызывает сбой приложения с сообщением:
Приложение называется -statusBar или -statusBarWindow в UIApplication: этот код необходимо изменить, так как больше нет строки состояния или окна строки состояния. Вместо этого используйте объект statusBarManager в сцене окна.
Сцены окна и statusBarManager действительно дают нам доступ только к фрейму - если это все еще возможно, я не знаю как.
Swift, iOS10-12:
Следующее работает для меня, и после профилирования всех методов создания программных снимков экрана - это самый быстрый и рекомендуемый способ от Apple после iOS 10
let screenshotSize = CGSize(width: UIScreen.main.bounds.width * 0.6, height: UIScreen.main.bounds.height * 0.6)
let renderer = UIGraphicsImageRenderer(size: screenshotSize)
let statusBar = UIApplication.shared.value(forKey: "statusBarWindow") as? UIWindow
let screenshot = renderer.image { _ in
    UIApplication.shared.keyWindow?.drawHierarchy(in: CGRect(origin: .zero, size: screenshotSize), afterScreenUpdates: true)
    statusBar?.drawHierarchy(in: CGRect(origin: .zero, size: screenshotSize), afterScreenUpdates: true)
}
Вам не нужно уменьшать размер скриншота (вы можете использовать UIScreen.main.bounds прямо если хочешь)
Захватите весь экран iPhone, получите строку состояния с помощью KVC:
if let snapView = window.snapshotView(afterScreenUpdates: false) {
    if let statusBarSnapView = (UIApplication.shared.value(forKey: "statusBar") as? UIView)?.snapshotView(afterScreenUpdates: false) {
        snapView.addSubview(statusBarSnapView)
    }
    UIGraphicsBeginImageContextWithOptions(snapView.bounds.size, true, 0)
    snapView.drawHierarchy(in: snapView.bounds, afterScreenUpdates: true)
    let snapImage = UIGraphicsGetImageFromCurrentImageContext()
    UIGraphicsEndImageContext()
}
Следующее работает для меня, отлично захватывает строку состояния (iOS 9, Swift)
let screen = UIScreen.mainScreen()
let snapshotView = screen.snapshotViewAfterScreenUpdates(true)
UIGraphicsBeginImageContextWithOptions(snapshotView.bounds.size, true, 0)
snapshotView.drawViewHierarchyInRect(snapshotView.bounds, afterScreenUpdates: true)
let image = UIGraphicsGetImageFromCurrentImageContext()
UIGraphicsEndImageContext()