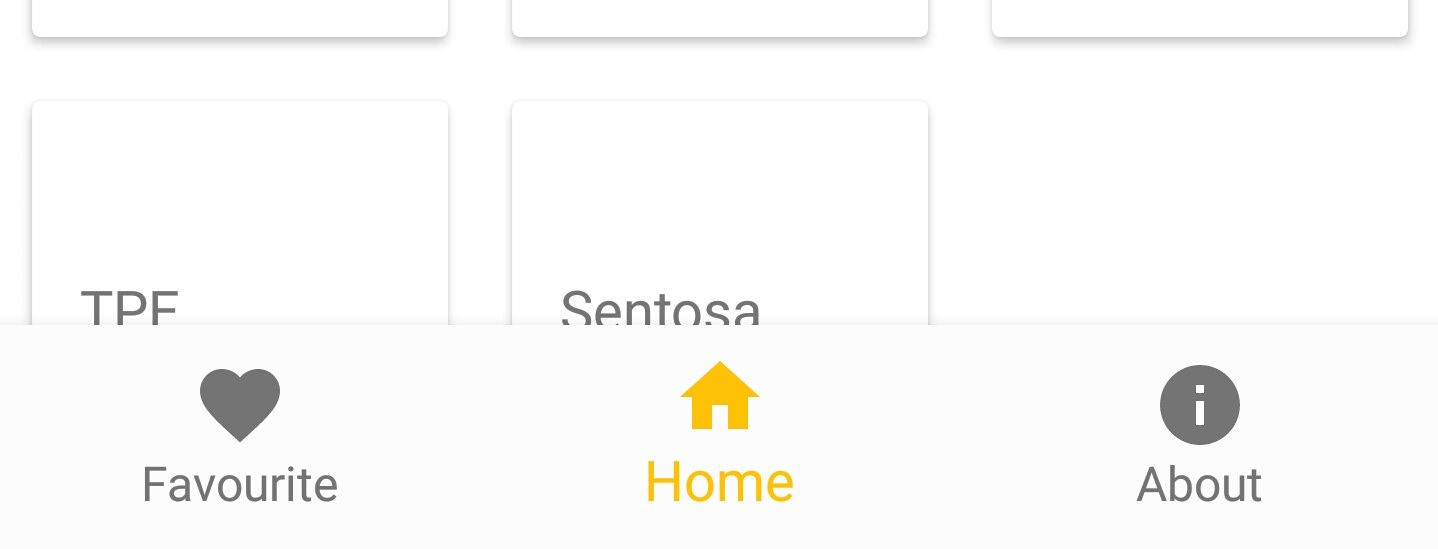
Recyclerview покрывается BottomNavigationView
Я попробовал библиотеку поддержки Google BottomNavigationView с Framelayout для моих фрагментов.
Вот мой код
<?xml version="1.0" encoding="utf-8"?>

<android.support.design.widget.CoordinatorLayout xmlns:android="http://schemas.android.com/apk/res/android"
xmlns:app="http://schemas.android.com/apk/res-auto"
xmlns:tools="http://schemas.android.com/tools"
android:layout_width="match_parent"
android:layout_height="match_parent"
android:fitsSystemWindows="true"
tools:context="com.bottombarnavigation.MainActivity">

<android.support.design.widget.AppBarLayout
    android:layout_width="match_parent"
    android:layout_height="wrap_content"
    android:theme="@style/AppTheme.AppBarOverlay">

  <include layout="@layout/toolbar"/>

</android.support.design.widget.AppBarLayout>

<include layout="@layout/content_main" />

<android.support.design.widget.BottomNavigationView
    android:background="#fcfcfc"
    android:id="@+id/bottom_navigation"
    android:layout_width="match_parent"
    android:layout_height="wrap_content"
    android:layout_gravity="bottom|end"
    app:menu="@menu/bottom_navigation" />

</android.support.design.widget.CoordinatorLayout>
Когда я заполняю свой Recyclerview внутри фрагмента, его содержимое скрывается BottomNavigationView .
Я понятия не имею, почему это происходит. Я смотрю учебник других людей, и он работает отлично.
РЕДАКТИРОВАТЬ Вот мой файл content_main.xml
<?xml version="1.0" encoding="utf-8"?>
    <RelativeLayout xmlns:android="http://schemas.android.com/apk/res/android"
    xmlns:app="http://schemas.android.com/apk/res-auto"
    xmlns:tools="http://schemas.android.com/tools"
    android:layout_width="match_parent"
    android:layout_height="match_parent"
    android:background="@android:color/white"
    app:layout_behavior="@string/appbar_scrolling_view_behavior"
    tools:context="com.bottombarnavigation.MainActivity"
    tools:showIn="@layout/activity_main">


<FrameLayout
    android:id="@+id/container"
    android:layout_width="match_parent"
    android:layout_height="match_parent"></FrameLayout>
</RelativeLayout>
8 ответов
Здесь мое решение работает на меня.
У меня почти такой же макет, как у вас, я переместил BottomNavigationView вне CoordinatorLayout так как мне не нужна анимация. Я выровнял BottomNavigationView к низу родителя, и добавил layout_above в CoordinatorLayout иметь его выше BottomNavigationView но заполняя весь экран.
В этой конфигурации я исправил проблему с перекрытием, надеюсь, это поможет вам.
Здесь у вас есть мой макет.
    <RelativeLayout
            xmlns:android="http://schemas.android.com/apk/res/android"
            xmlns:app="http://schemas.android.com/apk/res-auto"
            xmlns:tools="http://schemas.android.com/tools"
            android:layout_width="match_parent"
            android:layout_height="match_parent"
            tools:context=".ui.activities.MainActivity">

        <android.support.design.widget.CoordinatorLayout
                android:id="@+id/main_coordinator"
                android:layout_width="match_parent"
                android:layout_height="match_parent"
                android:fitsSystemWindows="true"
                android:layout_above="@+id/dashboard_navigation">

            <android.support.design.widget.AppBarLayout
                    android:id="@+id/main_appbar"
                    android:layout_width="match_parent"
                    android:layout_height="?attr/actionBarSize"
                    android:elevation="16dp">

                    <android.support.v7.widget.Toolbar
                        android:id="@+id/dashboard_toolbar"
                        android:layout_width="match_parent"
                        android:layout_height="?attr/actionBarSize"
                        android:background="@color/colorPrimary"/>
            </android.support.design.widget.AppBarLayout>

            <FrameLayout
                    android:id="@+id/main_frame_layout"
                    android:layout_width="match_parent"
                    android:layout_height="match_parent"/>

        </android.support.design.widget.CoordinatorLayout>

        <android.support.design.widget.BottomNavigationView
                android:id="@+id/dashboard_navigation"
                android:layout_width="match_parent"
                android:layout_height="wrap_content"
                android:layout_alignParentBottom="true"
                android:background="@color/colorPrimaryDark"
                app:itemTextColor="@color/colorAccent"
                app:menu="@menu/menu_main"/>
    </RelativeLayout>
Одна из самых полезных функций CoordinatorLayout это вид уклонения.
Детские взгляды на CoordinatorLayout может быть назначен как "вставка" ребра. Любое другое дочернее представление, которое вы назначаете как уклоняющееся от того же края, будет затем отрегулировано в соответствии с требованиями.
В вашем случае вы бы сделали что-то вроде следующего:
<android.support.design.widget.AppBarLayout
    android:layout_width="match_parent"
    android:layout_height="wrap_content"
    android:theme="@style/AppTheme.AppBarOverlay">

  <include layout="@layout/toolbar"/>

</android.support.design.widget.AppBarLayout>

<include
    layout="@layout/content_main"
    app:layout_dodgeInsetEdges="bottom" />   <-- Specifies this view dodges any views that inset the bottom edge

<android.support.design.widget.BottomNavigationView
    android:background="#fcfcfc"
    android:id="@+id/bottom_navigation"
    android:layout_width="match_parent"
    android:layout_height="wrap_content"
    android:layout_gravity="bottom|end"
    app:menu="@menu/bottom_navigation"
    app:layout_insetEdge="bottom" />      <-- Specifies that this view insets the bottom edge

</android.support.design.widget.CoordinatorLayout>
Вы можете поместить RecyclerView и BottomNavigationView в LinearLayout, а затем поместить LinearLayout в CoordinatorLayout. Установите атрибут RecyclerView как layout_height="0dp"layout_weight="1"и атрибут BottomnavigationView как layout_height="wrap_content"layout_gravity="bottom",
Вот часть моего кода, хочу помочь вам.
<android.support.design.widget.CoordinatorLayout
    android:layout_width="match_parent"
    android:layout_height="match_parent">

    <android.support.design.widget.AppBarLayout
        android:layout_width="match_parent"
        android:layout_height="wrap_content">

        <android.support.v7.widget.Toolbar
            android:id="@+id/manager_main_toolbar"
            android:layout_width="match_parent"
            android:layout_height="?attr/actionBarSize"
            android:background="?attr/colorPrimary"
            android:theme="@style/ThemeOverlay.AppCompat.Dark.ActionBar"
            app:popupTheme="@style/ThemeOverlay.AppCompat.Light" />

    </android.support.design.widget.AppBarLayout>

    <LinearLayout
        android:orientation="vertical"
        android:layout_width="match_parent"
        android:layout_height="match_parent"
        app:layout_behavior="@string/appbar_scrolling_view_behavior">

        <android.support.v4.widget.SwipeRefreshLayout
            android:id="@+id/swipe_refresh"
            android:layout_width="match_parent"
            android:layout_height="0dp"
            android:layout_weight="1">

            <android.support.v7.widget.RecyclerView
                android:id="@+id/recycler_view"
                android:layout_width="match_parent"
                android:layout_height="wrap_content" />

        </android.support.v4.widget.SwipeRefreshLayout>

        <android.support.design.widget.BottomNavigationView
            android:id="@+id/bottom_nav"
            android:layout_width="match_parent"
            android:layout_height="wrap_content"
            android:layout_gravity="bottom"
            android:background="?android:attr/windowBackground" />

    </LinearLayout>

</android.support.design.widget.CoordinatorLayout>
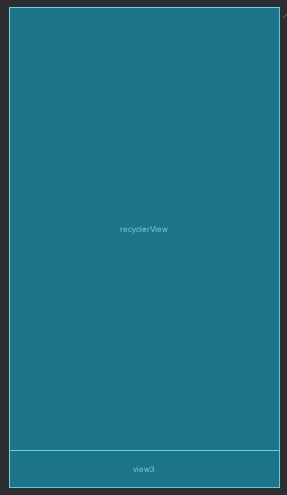
У меня есть простое решение, может быть, не самое лучшее, но оно выполняет свою работу, просто создайте View с высотой как высота appBar (панели инструментов) с actionBarSize, высота панели приложений и нижней навигации одинакова, поэтому вы можете ограничить свой recyclerview до верхней части этого представления, при этом он не будет перекрываться вашей нижней навигацией
<?xml version="1.0" encoding="utf-8"?>
<androidx.constraintlayout.widget.ConstraintLayout xmlns:android="http://schemas.android.com/apk/res/android"
    xmlns:app="http://schemas.android.com/apk/res-auto"
    xmlns:tools="http://schemas.android.com/tools"
    android:layout_width="match_parent"
    android:layout_height="match_parent"
    tools:context=".ui.pedidos.PedidoFragment">

    <androidx.recyclerview.widget.RecyclerView
        android:id="@+id/recyclerView"
        android:layout_width="match_parent"
        android:layout_height="0dp"
        app:layout_constraintBottom_toTopOf="@+id/view3"
        app:layout_constraintEnd_toEndOf="parent"
        app:layout_constraintStart_toStartOf="parent"
        app:layout_constraintTop_toTopOf="parent" />

    <View
        android:id="@+id/view3"
        android:layout_width="match_parent"
        android:layout_height="?attr/actionBarSize"
        app:layout_constraintBottom_toBottomOf="parent"
        app:layout_constraintEnd_toEndOf="parent"
        app:layout_constraintStart_toStartOf="parent" />

</androidx.constraintlayout.widget.ConstraintLayout>
- Переместить ваш
BottomNavigationViewвcontent_main.xmlи поместите его внутрьRelativeLayout - Добавить атрибут
android:layout_alignParentBottom="true"вBottomNavigationView - Добавить атрибут
android:layout_above="@id/bottom_navigation"в контейнерFrameLayout
Обновите ваш макет XML, как показано ниже:
activity_main.xml:
<?xml version="1.0" encoding="utf-8"?>
<android.support.design.widget.CoordinatorLayout xmlns:android="http://schemas.android.com/apk/res/android"
    xmlns:app="http://schemas.android.com/apk/res-auto"
    xmlns:tools="http://schemas.android.com/tools"
    android:layout_width="match_parent"
    android:layout_height="match_parent"
    android:fitsSystemWindows="true"
    tools:context="com.bottombarnavigation.MainActivity">

    <android.support.design.widget.AppBarLayout
        android:layout_width="match_parent"
        android:layout_height="wrap_content"
        android:theme="@style/AppTheme.AppBarOverlay">

      <include layout="@layout/toolbar"/>
    </android.support.design.widget.AppBarLayout>

    <include layout="@layout/content_main" />

</android.support.design.widget.CoordinatorLayout>
content_main.xml:
<?xml version="1.0" encoding="utf-8"?>
<RelativeLayout xmlns:android="http://schemas.android.com/apk/res/android"
    xmlns:app="http://schemas.android.com/apk/res-auto"
    xmlns:tools="http://schemas.android.com/tools"
    android:layout_width="match_parent"
    android:layout_height="match_parent"
    android:background="@android:color/white"
    app:layout_behavior="@string/appbar_scrolling_view_behavior"
    tools:context="com.bottombarnavigation.MainActivity"
    tools:showIn="@layout/activity_main">

    <android.support.design.widget.BottomNavigationView
        android:id="@+id/bottom_navigation"
        android:layout_width="match_parent"
        android:layout_height="wrap_content"
        android:layout_alignParentBottom="true"
        android:background="#fcfcfc"
        app:menu="@menu/bottom_navigation" />

    <FrameLayout
        android:id="@+id/container"
        android:layout_width="match_parent"
        android:layout_height="match_parent"
        android:layout_above="@id/bottom_navigation" />
</RelativeLayout>
Надеюсь, это поможет ~
Вы можете добавить ItemDecorator в ваше представление переработчика, которое добавляет некоторые отступы. Я использую Kotlin вместо Java, но общая идея такова:
 recyclerView.addItemDecoration(object : RecyclerView.ItemDecoration() {
        override fun getItemOffsets(outRect: Rect?, view: View?, parent: RecyclerView?, state: RecyclerView.State?) {
            // Get the position of the view in the recycler view
            val position = parent?.getChildAdapterPosition(view)
            if (position == null || position == RecyclerView.NO_POSITION) {
                return
            }

            if (position == parent.adapter.itemCount - 1) {
                // Add padding to the last item. You should probably use a @dimen resource.
                outRect?.bottom = 200
            }
        }
    })
Установите recycle veiw или любой другой вид, высоту 0dp и weight 1. Это позволит ему занять все доступное пространство.
Укажите некоторую статическую высоту в dp для BottomNavigationView вместо wrap_content, потому что ваша родительская компоновка, т.е. компоновка координатора, расширяет каркасный макет, при котором его поведение по умолчанию размещает дочерние представления один над другим. То есть ваш контейнер фрагментов покрыт botomnavigationview.
В основной контент, который вы включили в свой макет. Дайте край поля в поле зрения переработчика. Потому что вид рециркулятора скрывается за нижним видом навигации

