Кнопка загрузки элемента формы файла Twitter Bootstrap
Почему в загрузчике Twitter нет красивой кнопки загрузки элемента? Было бы здорово, если бы для кнопки загрузки была реализована синяя основная кнопка. Можно ли даже отточить кнопку загрузки с помощью CSS? (похоже на нативный элемент браузера, которым нельзя манипулировать)
27 ответов
Вот решение для Bootstrap 3 и 4.
Чтобы сделать функциональный элемент управления вводом файлов, который выглядит как кнопка, вам нужен только HTML:
HTML
<label class="btn btn-default">
    Browse <input type="file" hidden>
</label>
Это работает во всех современных браузерах, включая IE9+. Если вам нужна поддержка старого IE, пожалуйста, используйте устаревший подход, показанный ниже.
Эта техника опирается на HTML5 hidden приписывать. Bootstrap 4 использует следующий CSS-код для упрощения этой функции в неподдерживаемых браузерах. Возможно, вам придется добавить, если вы используете Bootstrap 3.
[hidden] {
  display: none !important;
}
Устаревший подход для старого IE
Если вам нужна поддержка IE8 и ниже, используйте следующий HTML / CSS:
HTML
<span class="btn btn-default btn-file">
    Browse <input type="file">
</span>
CSS
.btn-file {
    position: relative;
    overflow: hidden;
}
.btn-file input[type=file] {
    position: absolute;
    top: 0;
    right: 0;
    min-width: 100%;
    min-height: 100%;
    font-size: 100px;
    text-align: right;
    filter: alpha(opacity=0);
    opacity: 0;
    outline: none;
    background: white;
    cursor: inherit;
    display: block;
}
Обратите внимание, что старый IE не запускает ввод файла, когда вы нажимаете <label>Таким образом, CSS "раздувает" делает несколько вещей, чтобы обойти это:
- Делает область ввода файла полной шириной / высотой окружения
<span> - Делает ввод файла невидимым
Обратная связь и дополнительное чтение
Я опубликовал более подробную информацию об этом методе, а также примеры того, как показать пользователю, какие / сколько файлов выбраны:
http://www.abeautifulsite.net/whipping-file-inputs-into-shape-with-bootstrap-3/
Я удивлен, что не было упоминания о <label> элемент.
Решение:
<label class="btn btn-primary" for="my-file-selector">
    <input id="my-file-selector" type="file" style="display:none;">
    Button Text Here
</label>
Нет необходимости в JS или в стиле фанк CSS...
Решение для включения имени файла:
<label class="btn btn-primary" for="my-file-selector">
    <input id="my-file-selector" type="file" style="display:none"
    onchange="$('#upload-file-info').html(this.files[0].name)">
    Button Text Here
</label>
<span class='label label-info' id="upload-file-info"></span>
Решение выше требует jQuery.
Без дополнительного плагина это загрузочное решение отлично работает для меня:
<div style="position:relative;">
<a class='btn btn-primary' href='javascript:;'>
Choose File...
<input type="file" style='position:absolute;z-index:2;top:0;left:0;filter: alpha(opacity=0);-ms-filter:"progid:DXImageTransform.Microsoft.Alpha(Opacity=0)";opacity:0;background-color:transparent;color:transparent;' name="file_source" size="40" onchange='$("#upload-file-info").html($(this).val());'>
</a>
<span class='label label-info' id="upload-file-info"></span>
</div>
демо:
http://jsfiddle.net/haisumbhatti/cAXFA/1/ (начальная загрузка 2)

http://jsfiddle.net/haisumbhatti/y3xyU/ (начальная загрузка 3)

Это включено в форк начальной загрузки Jasny's.
Простая кнопка загрузки может быть создана с помощью
<span class="btn btn-file">Upload<input type="file" /></span>
С помощью плагина fileupload вы можете создавать более сложные виджеты. Взгляните на http://jasny.github.io/bootstrap/javascript/
Кнопки загрузки - это боль в стиле, потому что это стиль ввода, а не кнопки.
но вы можете использовать этот трюк:
http://www.quirksmode.org/dom/inputfile.html
Резюме:
Взять нормальный
<input type="file">и положить его в элемент сposition: relative,К этому же родительскому элементу добавьте нормальный
<input>и изображение, которое имеет правильные стили. Расположите эти элементы абсолютно так, чтобы они занимали то же место, что и<input type="file">,Установите z-индекс
<input type="file">до 2, чтобы он лежал поверх стилизованного ввода / изображения.Наконец, установите непрозрачность
<input type="file">до 0.<input type="file">теперь становится практически невидимым, а стили ввода / изображения просвечивают, но вы все равно можете нажать на кнопку "Обзор". Если кнопка расположена в верхней части изображения, пользователь, кажется, нажимает на изображение и получает обычное окно выбора файла. (Обратите внимание, что вы не можете использовать видимость: скрытый, потому что действительно невидимый элемент тоже нельзя кликнуть, и нам нужно, чтобы он оставался кликабельным)
Работает для меня:
Обновить
// Based in: http://duckranger.com/2012/06/pretty-file-input-field-in-bootstrap/
// Version: 0.0.3
// Compatibility with: Bootstrap 3.2.0 and jQuery 2.1.1
// Use:
//     <input class="nice_file_field" type="file" data-label="Choose Document">
//     <script> $(".nice_file_field").niceFileField(); </script>
//
(function( $ ) {
  $.fn.niceFileField = function() {
    this.each(function(index, file_field) {
      file_field = $(file_field);
      var label = file_field.attr("data-label") || "Choose File";

      file_field.css({"display": "none"});

      nice_file_block_text  = '<div class="input-group nice_file_block">';
      nice_file_block_text += '  <input type="text" class="form-control">';
      nice_file_block_text += '  <span class="input-group-btn">';
      nice_file_block_text += '   <button class="btn btn-default nice_file_field_button" type="button">' + label + '</button>';
      nice_file_block_text += '  </span>';
      nice_file_block_text += '</div>';

      file_field.after(nice_file_block_text);

      var nice_file_field_button = file_field.parent().find(".nice_file_field_button");
      var nice_file_block_element = file_field.parent().find(".nice_file_block");

      nice_file_field_button.on("click", function(){ console.log("click"); file_field.click() } );
      file_field.change( function(){
        nice_file_block_element.find("input").val(file_field.val());
      });
    });
  };
})( jQuery );
Упрощенный ответ с использованием деталей из других ответов, в первую очередь user2309766 и dotcomsuperstar.
Особенности:
- Использует аддон кнопки Bootstrap для кнопки и поля.
- Только один вход; несколько входов будут подобраны с помощью формы.
- Никаких дополнительных CSS, кроме "display: none;" скрыть файл ввода.
- Видимая кнопка запускает событие щелчка для скрытого ввода файла.
splitдля удаления пути к файлу используются регулярные выражения и разделители '\' и '/'.
Код:
<script src="https://maxcdn.bootstrapcdn.com/bootstrap/3.3.4/js/bootstrap.min.js"></script>
<link href="https://maxcdn.bootstrapcdn.com/bootstrap/3.3.4/css/bootstrap.min.css" rel="stylesheet"/>
<script src="https://ajax.googleapis.com/ajax/libs/jquery/2.1.1/jquery.min.js"></script>

<div class="input-group">
  <span class="input-group-btn">
    <span class="btn btn-primary" onclick="$(this).parent().find('input[type=file]').click();">Browse</span>
    <input name="uploaded_file" onchange="$(this).parent().parent().find('.form-control').html($(this).val().split(/[\\|/]/).pop());" style="display: none;" type="file">
  </span>
  <span class="form-control"></span>
</div>С некоторым вдохновением от других постов выше, вот полное решение, которое сочетает в себе то, что выглядит как поле управления формой, с надстройкой группы ввода для чистого виджета ввода файла, который включает ссылку на текущий файл.
.input-file { position: relative; margin: 60px 60px 0 } /* Remove margin, it is just for stackru viewing */
.input-file .input-group-addon { border: 0px; padding: 0px; }
.input-file .input-group-addon .btn { border-radius: 0 4px 4px 0 }
.input-file .input-group-addon input { cursor: pointer; position:absolute; width: 72px; z-index:2;top:0;right:0;filter: alpha(opacity=0);-ms-filter:"progid:DXImageTransform.Microsoft.Alpha(Opacity=0)";opacity:0; background-color:transparent; color:transparent; }
<script src="https://ajax.googleapis.com/ajax/libs/jquery/2.1.1/jquery.min.js"></script>
<link rel="stylesheet" href="https://maxcdn.bootstrapcdn.com/bootstrap/3.3.1/css/bootstrap.min.css">
<div class="input-group input-file">
<div class="form-control">
<a href="/path/to/your/current_file_name.pdf" target="_blank">current_file_name.pdf</a>
</div>
<span class="input-group-addon">
<a class='btn btn-primary' href='javascript:;'>
Browse
<input type="file" name="field_name" onchange="$(this).parent().parent().parent().find('.form-control').html($(this).val());">
</a>
</span>
</div>Это прекрасно работает для меня
<span>
<input type="file"
style="visibility:hidden; width: 1px;"
id='${multipartFilePath}' name='${multipartFilePath}'
onchange="$(this).parent().find('span').html($(this).val().replace('C:\\fakepath\\', ''))" /> <!-- Chrome security returns 'C:\fakepath\' -->
<input class="btn btn-primary" type="button" value="Upload File.." onclick="$(this).parent().find('input[type=file]').click();"/> <!-- on button click fire the file click event -->
<span class="badge badge-important" ></span>
</span>
Пожалуйста, проверьте Twitter Bootstrap File Input. Он использует очень простое решение, просто добавьте один файл javascript и вставьте следующий код:
$('input[type=file]').bootstrapFileInput();
Простое решение с приемлемым результатом:
<input type="file" class="form-control">
И стиль:
input[type=file].form-control {
    height: auto;
}
Решение для множественной загрузки
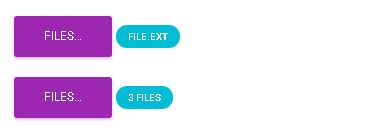
Я подправил два предыдущих ответа, чтобы включить несколько загрузок. Таким образом, метка показывает имя файла, если выбран только один, или x files в обратном случае.
<label class="btn btn-primary" for="my-file-selector">
<input id="my-file-selector" type="file" multiple="multiple" style="display:none"
onchange="$('#upload-file-info').html(
(this.files.length > 1) ? this.files.length + ' files' : this.files[0].name)">
Files…
</label>
<span class='label label-info' id="upload-file-info"></span>
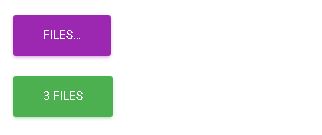
Это может также применяться для изменения текста кнопки и класса.
<label class="btn btn-primary" for="multfile">
<input id="multfile" type="file" multiple="multiple" style="display:none"
onchange="$('#multfile-label').html(
(this.files.length == 1) ? this.files[0].name : this.files.length + ' files');
$(this).parent().addClass('btn-success')">
<span id="multfile-label">Files…</span>
</label>
Я создал пользовательскую кнопку загрузки, чтобы принимать только изображения, которые могут быть изменены в соответствии с вашими требованиями.
Надеюсь это поможет!!:)
(Используется Bootstrap framework)
HTML
<center>
 <br />
 <br />
 <span class="head">Upload Button Re-Imagined</span>
 <br />
 <br />
 <div class="fileUpload blue-btn btn width100">
   <span>Upload your Organizations logo</span>
   <input type="file" class="uploadlogo" />
 </div>
</center>
CSS
 .head {
   font-size: 25px;
   font-weight: 200;
 }

 .blue-btn:hover,
 .blue-btn:active,
 .blue-btn:focus,
 .blue-btn {
   background: transparent;
   border: solid 1px #27a9e0;
   border-radius: 3px;
   color: #27a9e0;
   font-size: 16px;
   margin-bottom: 20px;
   outline: none !important;
   padding: 10px 20px;
 }

 .fileUpload {
   position: relative;
   overflow: hidden;
   height: 43px;
   margin-top: 0;
 }

 .fileUpload input.uploadlogo {
   position: absolute;
   top: 0;
   right: 0;
   margin: 0;
   padding: 0;
   font-size: 20px;
   cursor: pointer;
   opacity: 0;
   filter: alpha(opacity=0);
   width: 100%;
   height: 42px;
 }


 /*Chrome fix*/

 input::-webkit-file-upload-button {
   cursor: pointer !important;
 }
JS
// You can modify the upload files to pdf's, docs etc
//Currently it will upload only images
$(document).ready(function($) {

  // Upload btn
  $(".uploadlogo").change(function() {
    readURL(this);
  });

  function readURL(input) {
    var url = input.value;
    var ext = url.substring(url.lastIndexOf('.') + 1).toLowerCase();
    if (input.files && input.files[0] && (ext == "png" || ext == "jpeg" || ext == "jpg" || ext == "gif" || ext == "svg")) {
      var path = $('.uploadlogo').val();
      var filename = path.replace(/^.*\\/, "");
      $('.fileUpload span').html('Uploaded logo : ' + filename);
      // console.log(filename);
    } else {
      $(".uploadlogo").val("");
      $('.fileUpload span').html('Only Images Are Allowed!');
    }
  }
});
Это лучший стиль загрузки файлов, который мне нравится:
<div class="fileupload fileupload-new" data-provides="fileupload">
  <div class="input-append">
    <div class="uneditable-input span3"><i class="icon-file fileupload-exists"></i> <span class="fileupload-preview"></span></div><span class="btn btn-file"><span class="fileupload-new">Select file</span><span class="fileupload-exists">Change</span><input type="file" /></span><a href="#" class="btn fileupload-exists" data-dismiss="fileupload">Remove</a>
  </div>
</div>
Вы можете получить демо и другие стили на:
http://www.jasny.net/bootstrap/javascript/
но, используя это, вы должны заменить Twitter начальной загрузки с файлами Jasny начальной загрузки..
С уважением.
Основано на абсолютно блестящем решении @claviska, которому все заслуги.
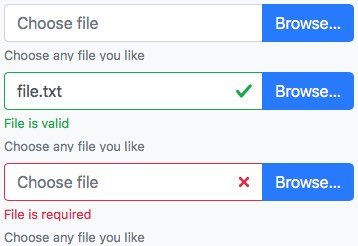
Полнофункциональный ввод файла Bootstrap 4 с проверкой и текстом справки.
Основываясь на примере группы ввода, у нас есть фиктивное поле ввода текста, используемое для отображения имени файла пользователю, которое заполняется из onchange событие в поле фактического входного файла, скрытое за кнопкой метки. Помимо включения поддержки проверки bootstrap 4, мы также дали возможность щелкнуть в любом месте ввода, чтобы открыть диалоговое окно файла.
Три состояния ввода файла
Три возможных состояния не подтверждены, действительны и недействительны с атрибутом тега ввода html required задавать.
HTML-разметка для ввода
Мы вводим только 2 пользовательских класса input-file-dummy а также input-file-btn правильно стилизовать и связать желаемое поведение. Все остальное - стандартная разметка Bootstrap 4.
<div class="input-group">
  <input type="text" class="form-control input-file-dummy" placeholder="Choose file" aria-describedby="fileHelp" required>
  <div class="valid-feedback order-last">File is valid</div>
  <div class="invalid-feedback order-last">File is required</div>
  <label class="input-group-append mb-0">
    <span class="btn btn-primary input-file-btn">
      Browse… <input type="file" hidden>
    </span>
  </label>
</div>
<small id="fileHelp" class="form-text text-muted">Choose any file you like</small>
JavaScript поведенческие положения
Фиктивный ввод должен быть доступен только для чтения, в соответствии с исходным примером, чтобы пользователь не мог изменить ввод, который может быть изменен только через диалог открытия файла. К сожалению, проверка не происходит на readonly поля, поэтому мы переключаем редактируемость ввода на фокус и размытие ( события jquery onfocusin а также onfocusout) и убедитесь, что он снова становится доступным для проверки после выбора файла.
Кроме того, чтобы сделать текстовое поле кликабельным, инициируя событие нажатия кнопки, остальная функциональность заполнения фиктивного поля была предусмотрена @claviska.
$(function () {
  $('.input-file-dummy').each(function () {
    $($(this).parent().find('.input-file-btn input')).on('change', {dummy: this}, function(ev) {
      $(ev.data.dummy)
        .val($(this).val().replace(/\\/g, '/').replace(/.*\//, ''))
        .trigger('focusout');
    });
    $(this).on('focusin', function () {
        $(this).attr('readonly', '');
      }).on('focusout', function () {
        $(this).removeAttr('readonly');
      }).on('click', function () {
        $(this).parent().find('.input-file-btn').click();
      });
  });
});
Индивидуальные настройки
Самое главное, мы не хотим readonly поле для перехода между серым фоном и белым, поэтому мы гарантируем, что он остается белым. У кнопки span нет курсора-указателя, но мы все равно должны добавить его для ввода.
.input-file-dummy, .input-file-btn {
  cursor: pointer;
}
.input-file-dummy[readonly] {
  background-color: white;
}
NJoy!
Я использую http://gregpike.net/demos/bootstrap-file-input/demo.html:
$('input[type=file]').bootstrapFileInput();
или же
$('.file-inputs').bootstrapFileInput();
Я думал, что я добавлю свою тройную стоимость, просто чтобы сказать, как по умолчанию .custom-file-label а также custom-file-input Ввод файла BS4 и как это можно использовать.
Последний класс находится в группе ввода и не виден. В то время как первый является видимым ярлыком и имеет псевдоэлемент: after, который выглядит как кнопка.
<div class="custom-file">
<input type="file" class="custom-file-input" id="upload">
<label class="custom-file-label" for="upload">Choose file</label>
</div>
Вы не можете добавлять классы в psuedoelements, но вы можете стилизовать их в CSS (или SASS).
.custom-file-label:after {
    color: #fff;
    background-color: #1e7e34;
    border-color: #1c7430;
    pointer: cursor;
}
Я изменил ответ @claviska и работает так, как мне нравится (Bootstrap 3, 4 не тестировался):
<label class="btn btn-default">
    <span>Browse</span>
    <input type="file" style="display: none;" onchange="$(this).prev('span').text($(this).val()!=''?$(this).val():'Browse')">
</label>
Следующий код делает как на картинке выше
Html
<form>
<div class="row">
<div class="col-lg-6">
<label for="file">
<div class="input-group">
<span class="input-group-btn">
<button class="btn btn-default" type="button">Browse</button>
</span>
<input type="text" class="form-control" id="info" readonly="" style="background: #fff;" placeholder="Search for...">
</div><!-- /input-group -->
</label>
</div><!-- /.col-lg-6 -->
</div>

</div>
<input type="file" style="display: none;" onchange="$('#info').val($(this).val().split(/[\\|/]/).pop()); " name="file" id="file">
</form>
Javascript
<script type="text/javascript">

$(function() {
    $("label[for=file]").click(function(event) {
        event.preventDefault();
        $("#file").click();
    });
});

</script>
/* * Boosttrap 3 filestyle * http://dev.tudosobreweb.com.br/bootstrap-filestyle/ * * Авторские права (c) 2013 Маркус Винисиус да Сильва Лима * Обновление начальной загрузки 3 Пауло Энрике Фоксера * Версия 2.0.0 * Лицензировано под лицензией MIT. * */
(function ($) {
"use strict";

var Filestyle = function (element, options) {
    this.options = options;
    this.$elementFilestyle = [];
    this.$element = $(element);
};

Filestyle.prototype = {
    clear: function () {
        this.$element.val('');
        this.$elementFilestyle.find(':text').val('');
    },

    destroy: function () {
        this.$element
            .removeAttr('style')
            .removeData('filestyle')
            .val('');
        this.$elementFilestyle.remove();
    },

    icon: function (value) {
        if (value === true) {
            if (!this.options.icon) {
                this.options.icon = true;
                this.$elementFilestyle.find('label').prepend(this.htmlIcon());
            }
        } else if (value === false) {
            if (this.options.icon) {
                this.options.icon = false;
                this.$elementFilestyle.find('i').remove();
            }
        } else {
            return this.options.icon;
        }
    },

    input: function (value) {
        if (value === true) {
            if (!this.options.input) {
                this.options.input = true;
                this.$elementFilestyle.prepend(this.htmlInput());

                var content = '',
                    files = [];
                if (this.$element[0].files === undefined) {
                    files[0] = {'name': this.$element[0].value};
                } else {
                    files = this.$element[0].files;
                }

                for (var i = 0; i < files.length; i++) {
                    content += files[i].name.split("\\").pop() + ', ';
                }
                if (content !== '') {
                    this.$elementFilestyle.find(':text').val(content.replace(/\, $/g, ''));
                }
            }
        } else if (value === false) {
            if (this.options.input) {
                this.options.input = false;
                this.$elementFilestyle.find(':text').remove();
            }
        } else {
            return this.options.input;
        }
    },

    buttonText: function (value) {
        if (value !== undefined) {
            this.options.buttonText = value;
            this.$elementFilestyle.find('label span').html(this.options.buttonText);
        } else {
            return this.options.buttonText;
        }
    },

    classButton: function (value) {
        if (value !== undefined) {
            this.options.classButton = value;
            this.$elementFilestyle.find('label').attr({'class': this.options.classButton});
            if (this.options.classButton.search(/btn-inverse|btn-primary|btn-danger|btn-warning|btn-success/i) !== -1) {
                this.$elementFilestyle.find('label i').addClass('icon-white');
            } else {
                this.$elementFilestyle.find('label i').removeClass('icon-white');
            }
        } else {
            return this.options.classButton;
        }
    },

    classIcon: function (value) {
        if (value !== undefined) {
            this.options.classIcon = value;
            if (this.options.classButton.search(/btn-inverse|btn-primary|btn-danger|btn-warning|btn-success/i) !== -1) {
                this.$elementFilestyle.find('label').find('i').attr({'class': 'icon-white '+this.options.classIcon});
            } else {
                this.$elementFilestyle.find('label').find('i').attr({'class': this.options.classIcon});
            }
        } else {
            return this.options.classIcon;
        }
    },

    classInput: function (value) {
        if (value !== undefined) {
            this.options.classInput = value;
            this.$elementFilestyle.find(':text').addClass(this.options.classInput);
        } else {
            return this.options.classInput;
        }
    },

    htmlIcon: function () {
        if (this.options.icon) {
            var colorIcon = '';
            if (this.options.classButton.search(/btn-inverse|btn-primary|btn-danger|btn-warning|btn-success/i) !== -1) {
                colorIcon = ' icon-white ';
            }

            return '<i class="'+colorIcon+this.options.classIcon+'"></i> ';
        } else {
            return '';
        }
    },

    htmlInput: function () {
        if (this.options.input) {
            return '<input type="text" class="'+this.options.classInput+'" style="width: '+this.options.inputWidthPorcent+'% !important;display: inline !important;" disabled> ';
        } else {
            return '';
        }
    },

    constructor: function () {
        var _self = this,
            html = '',
            id = this.$element.attr('id'),
            files = [];

        if (id === '' || !id) {
            id = 'filestyle-'+$('.bootstrap-filestyle').length;
            this.$element.attr({'id': id});
        }

        html = this.htmlInput()+
             '<label for="'+id+'" class="'+this.options.classButton+'">'+
                this.htmlIcon()+
                '<span>'+this.options.buttonText+'</span>'+
             '</label>';

        this.$elementFilestyle = $('<div class="bootstrap-filestyle" style="display: inline;">'+html+'</div>');

        var $label = this.$elementFilestyle.find('label');
        var $labelFocusableContainer = $label.parent();

        $labelFocusableContainer
            .attr('tabindex', "0")
            .keypress(function(e) {
                if (e.keyCode === 13 || e.charCode === 32) {
                    $label.click();
                }
            });

        // hidding input file and add filestyle
        this.$element
            .css({'position':'absolute','left':'-9999px'})
            .attr('tabindex', "-1")
            .after(this.$elementFilestyle);

        // Getting input file value
        this.$element.change(function () {
            var content = '';
            if (this.files === undefined) {
                files[0] = {'name': this.value};
            } else {
                files = this.files;
            }

            for (var i = 0; i < files.length; i++) {
                content += files[i].name.split("\\").pop() + ', ';
            }

            if (content !== '') {
                _self.$elementFilestyle.find(':text').val(content.replace(/\, $/g, ''));
            }
        });

        // Check if browser is Firefox
        if (window.navigator.userAgent.search(/firefox/i) > -1) {
            // Simulating choose file for firefox
            this.$elementFilestyle.find('label').click(function () {
                _self.$element.click();
                return false;
            });
        }
    }
};

var old = $.fn.filestyle;

$.fn.filestyle = function (option, value) {
    var get = '',
        element = this.each(function () {
            if ($(this).attr('type') === 'file') {
                var $this = $(this),
                    data = $this.data('filestyle'),
                    options = $.extend({}, $.fn.filestyle.defaults, option, typeof option === 'object' && option);

                if (!data) {
                    $this.data('filestyle', (data = new Filestyle(this, options)));
                    data.constructor();
                }

                if (typeof option === 'string') {
                    get = data[option](value);
                }
            }
        });

    if (typeof get !== undefined) {
        return get;
    } else {
        return element;
    }
};

$.fn.filestyle.defaults = {
    'buttonText': 'Escolher arquivo',
    'input': true,
    'icon': true,
    'inputWidthPorcent': 65,
    'classButton': 'btn btn-primary',
    'classInput': 'form-control file-input-button',
    'classIcon': 'icon-folder-open'
};

$.fn.filestyle.noConflict = function () {
    $.fn.filestyle = old;
    return this;
};

// Data attributes register
$('.filestyle').each(function () {
    var $this = $(this),
        options = {
            'buttonText': $this.attr('data-buttonText'),
            'input': $this.attr('data-input') === 'false' ? false : true,
            'icon': $this.attr('data-icon') === 'false' ? false : true,
            'classButton': $this.attr('data-classButton'),
            'classInput': $this.attr('data-classInput'),
            'classIcon': $this.attr('data-classIcon')
        };

    $this.filestyle(options);
});
})(window.jQuery);
В отношении клависного ответа - если вы хотите показать загруженное имя файла в базовой загрузке файла, вы можете сделать это во входах ' onchange событие. Просто используйте этот код:
 <label class="btn btn-default">
                    Browse...
                    <span id="uploaded-file-name" style="font-style: italic"></span>
                    <input id="file-upload" type="file" name="file"
                           onchange="$('#uploaded-file-name').text($('#file-upload')[0].value);" hidden>
 </label>
Этот код JSquery JS отвечает за получение имени загруженного файла:
$('#file-upload')[0].value
Или с ванильным JS:
document.getElementById("file-upload").value
Вот альтернативный трюк, это не лучшее решение, но оно просто дает вам выбор
HTML код:
<button clss="btn btn-primary" id="btn_upload">Choose File</button>
<input id="fileupload" class="hide" type="file" name="files[]">
Javascript:
$("#btn_upload").click(function(e){
e.preventDefault();
$("#fileupload").trigger('click');
});
У меня та же проблема, и я пытаюсь это так.
<div>
<button type='button' class='btn btn-info btn-file'>Browse</button>
<input type='file' name='image'/>
</div>
CSS
<style>
.btn-file {
    position:absolute;
}
</style>
JS
<script>
$(document).ready(function(){
    $('.btn-file').click(function(){
        $('input[name="image"]').click();
    });
});
</script>
Примечание. Кнопка.btn-file должна находиться в том же теге, что и входной файл
Надеюсь, вы нашли лучшее решение...
Попробуйте следовать в Bootstrap v.3.3.4
<div>
    <input id="uplFile" type="file" style="display: none;">

    <div class="input-group" style="width: 300px;">
        <div  id="btnBrowse"  class="btn btn-default input-group-addon">Select a file...</div>
        <span id="photoCover" class="form-control">
    </div>
</div>

<script type="text/javascript">
    $('#uplFile').change(function() {
        $('#photoCover').text($(this).val());
    });

    $('#btnBrowse').click(function(){
        $('#uplFile').click();
    });
</script>
Если вас интересует, принятый ответ не касается навигации по клавиатуре. Вы должны добавить немного js.
Вот моя реализация, я добавил отзыв о выбранном имени и размере входного файла.
Это реализация лезвия laravel (игнорируйте инструкции удаления '{{}}' и @)
      <div class="col-12 col-md-4 py-2">
    <div class="mb-3">
        <label class="btn btn-lg btn-tertiary f-intro-head-b-base px-3 py-2" id="fileAddon" for="file"
            role="button" tabindex="0">
            {{ __('Ajouter une piéce jointe') }}
            <input class="d-none mx-auto" id="file" name="file" type="file"
                value="{{ old('file') }}" aria-label="{{ __('validation.custom.attachment') }}" required />
        </label>
        <div class="mb-3">
            <input class="form-control text-bg-primary text-truncate my-2 border-0" id="fileDescription"
                type="text" aria-describedby="file" aria-label="Upload"
                @if ($errors->has('file')) is-invalid @endif disabled>
        </div>
        @push('scripts')
            <script nonce="{{ $nonce }}">
                document.addEventListener('DOMContentLoaded', function() {
                    const UNITS = [
                        "byte",
                        "kilobyte",
                        "megabyte",
                        "gigabyte",
                        "terabyte",
                        "petabyte",
                    ];
                    const BYTES_PER_KB = 1024;
                    const humanFileSize = (sizeBytes) => {
                        let size = Math.abs(Number(sizeBytes));

                        let u = 0;
                        while (size >= BYTES_PER_KB && u < UNITS.length - 1) {
                            size /= BYTES_PER_KB;
                            ++u;
                        }

                        return new Intl.NumberFormat([], {
                            style: "unit",
                            unit: UNITS[u],
                            unitDisplay: "short",
                            maximumFractionDigits: 1,
                        }).format(size);
                    };

                    const inputLabelBtn = document.getElementById('fileAddon');
                    const input = document.getElementById('file');
                    // Keyboard navigation
                    inputLabelBtn.addEventListener('keyup', (e) => {
                        if (e.keyCode === 32) {
                            document.getElementById('file').click()
                        }
                    });
                    // Get input change name and size
                    input.addEventListener('change', function() {
                        const file = this.files[0];
                        document.getElementById('fileDescription').value = `${humanFileSize(file.size)} ${file.name}`;
                    })
                });
            </script>
        @endpush
    </div>
    @foreach ($errors->get('file') as $message)
        <div class="invalid-feedback">{{ $message }}</div>
    @endforeach
</div>
Не нужно модных шизов:
HTML:
<form method="post" action="/api/admin/image" enctype="multipart/form-data">
    <input type="hidden" name="url" value="<%= boxes[i].url %>" />
    <input class="image-file-chosen" type="text" />
    <br />
    <input class="btn image-file-button" value="Choose Image" />
    <input class="image-file hide" type="file" name="image"/> <!-- Hidden -->
    <br />
    <br />
    <input class="btn" type="submit" name="image" value="Upload" />
    <br />
</form>
JS:
$('.image-file-button').each(function() {
      $(this).off('click').on('click', function() {
           $(this).siblings('.image-file').trigger('click');
      });
});
$('.image-file').each(function() {
      $(this).change(function () {
           $(this).siblings('.image-file-chosen').val(this.files[0].name);
      });
});
ВНИМАНИЕ: Три рассматриваемых элемента формы ДОЛЖНЫ быть родственными элементами друг друга (.image-file-selected, .image-file-button, .image-file)
http://markusslima.github.io/bootstrap-filestyle/
$(":file").filestyle();
ИЛИ ЖЕ
<input type="file" class="filestyle" data-input="false">


