Представление центра Android в FrameLayout не работает
У меня есть FrameLayout, в котором у меня есть 2 элемента управления: - пользовательский вид, который рисует изображение и некоторый текст на нем - текстовое представление с текстом
Я хочу сосредоточить оба в FrameLayout, но мне не удается это сделать. Texview по центру очень хорошо, мой обычный вид остается с левой стороны, когда я делаю его видимым.
<FrameLayout android:id="@+id/CompassMap"
               android:layout_width="fill_parent"
               android:layout_height="wrap_content"
               android:layout_weight="1"
               android:gravity="center">

             <view class="com.MyView"
        android:id="@+id/myView"
        android:layout_width="wrap_content"
        android:layout_height="wrap_content"
        android:layout_gravity="center_vertical|center_horizontal"
        android:visibility="gone"/>

                <TextView android:layout_width="wrap_content"
        android:layout_height="wrap_content"
        android:layout_gravity="center_vertical|center_horizontal"
        android:text="CENTERED" />
</FrameLayout>
Для Матиаса я ничего не делаю в конструкторе, просто
   public class MyMapView extends View {

private int xPos = 0;
private int yPos = 0;
private Bitmap trackMap;

private Matrix backgroundMatrix;
private Paint backgroundPaint;

private Bitmap position;
private Matrix positionMatrix;
private Paint positionPaint;

public MyMapView(Context context) {
    super(context);
    init(context, null);
}

public MyMapView(Context context, AttributeSet attrs) {
    super(context, attrs);
    init(context, attrs);
}

public MyMapView(Context context, AttributeSet attrs, int defStyle) {
    super(context, attrs, defStyle);
    init(context, attrs);
}

private void init(final Context context, AttributeSet attrs) {

backgroundMatrix = new Matrix();
backgroundPaint = new Paint();
backgroundPaint.setFilterBitmap(true);

position = BitmapFactory.decodeResource(getContext().getResources(), R.drawable.position);
positionMatrix = new Matrix();

positionPaint = new Paint();
positionPaint.setFilterBitmap(true);
}

@Override
protected void onMeasure(int widthMeasureSpec, int heightMeasureSpec) {
  setMeasuredDimension(MeasureSpec.getSize(widthMeasureSpec), MeasureSpec.getSize(heightMeasureSpec));
}

@Override
protected void onDraw(Canvas canvas) {

    int width = getMeasuredWidth();
    int height = getMeasuredHeight();

    if (trackMap!=null)
    {
        Bitmap resizedBitmap = Bitmap.createScaledBitmap(trackMap, height, height, true);
        canvas.drawBitmap(resizedBitmap, backgroundMatrix, backgroundPaint);

    }

        canvas.save(Canvas.MATRIX_SAVE_FLAG);
        canvas.translate(xPos-position.getWidth()/2, yPos-position.getHeight()/2);
        canvas.drawBitmap(position, positionMatrix, positionPaint);

        canvas.restore();
}

    public void updatePosition(int xpos, int ypos, Bitmap trackImage)
    {
        xPos=xpos;
        yPos=ypos;
        trackMap = trackImage;
        invalidate();
    }
}
6 ответов
Я бы предложил RelativeLayout вместо FrameLayout.
Предполагая, что вы хотите, чтобы TextView всегда был ниже ImageView, я бы использовал следующий макет.
<?xml version="1.0" encoding="utf-8"?>
<RelativeLayout
    xmlns:android="http://schemas.android.com/apk/res/android"
    android:layout_width="fill_parent"
    android:layout_height="wrap_content">
    <ImageView
        android:id="@+id/imageview"
        android:layout_width="wrap_content"
        android:layout_height="wrap_content"
        android:layout_alignParentTop="true"
        android:layout_centerInParent="true"
        android:src="@drawable/icon"
        android:visibility="visible"/>
    <TextView
        android:id="@+id/textview"
        android:layout_width="wrap_content"
        android:layout_height="wrap_content"
        android:layout_centerInParent="true"
        android:layout_below="@id/imageview"
        android:gravity="center"
        android:text="@string/hello"/>
</RelativeLayout>
Обратите внимание, что если вы установите visibility элемента в gone то пространство, которое будет занимать этот элемент, исчезнет, тогда как при использовании invisible вместо этого пространство, которое он потребляет, будет сохранено.
Если вы хотите иметь TextView поверх ImageView, просто пропустите android:layout_alignParentTop или установите его false и в TextView опустить android:layout_below="@id/imageview" приписывать. Как это.
<?xml version="1.0" encoding="utf-8"?>
<RelativeLayout
    xmlns:android="http://schemas.android.com/apk/res/android"
    android:layout_width="fill_parent"
    android:layout_height="wrap_content">
    <ImageView
        android:id="@+id/imageview"
        android:layout_width="wrap_content"
        android:layout_height="wrap_content"
        android:layout_alignParentTop="false"
        android:layout_centerInParent="true"
        android:src="@drawable/icon"
        android:visibility="visible"/>
    <TextView
        android:id="@+id/textview"
        android:layout_width="wrap_content"
        android:layout_height="wrap_content"
        android:layout_centerInParent="true"
        android:gravity="center"
        android:text="@string/hello"/>
</RelativeLayout>
Я надеюсь, что это то, что вы искали.
Мы можем выровнять вид в центре FrameLayout установив layout_gravity детского взгляда.
В XML:
layout_gravity = "center"
В коде Java:
FrameLayout.LayoutParams params = new FrameLayout.LayoutParams(LayoutParams.WRAP_CONTENT, LayoutParams.WRAP_CONTENT);
params.gravity = Gravity.CENTER;
Примечание: используйте FrameLayout.LayoutParams, а не другие существующие LayoutParams
Просто следуйте этому порядку
Вы можете сосредоточить любое количество детей в FrameLayout,
<FrameLayout
    >
    <child1
        ....
        android:layout_gravity="center"
        .....
        />
    <Child2
        ....
        android:layout_gravity="center"
        />
</FrameLayout>
Таким образом, ключ добавляет android:layout_gravity="center" в детских взглядах.
Например:
Я сосредоточил CustomView и TextView на FrameLayout как это
Код:
<FrameLayout
    android:layout_width="wrap_content"
    android:layout_height="wrap_content"
    >
    <com.airbnb.lottie.LottieAnimationView
        android:layout_width="180dp"
        android:layout_height="180dp"
        android:layout_gravity="center"
        app:lottie_fileName="red_scan.json"
        app:lottie_autoPlay="true"
        app:lottie_loop="true" />
    <TextView
        android:layout_width="wrap_content"
        android:layout_height="wrap_content"
        android:layout_gravity="center"
        android:textColor="#ffffff"
        android:textSize="10dp"
        android:textStyle="bold"
        android:padding="10dp"
        android:text="Networks Available: 1\n click to see all"
        android:gravity="center" />
</FrameLayout>
Результат:

Установите 'center_horizontal' и 'center_vertical' или просто 'center' атрибута layout_gravity виджета
    <?xml version="1.0" encoding="utf-8"?>
<FrameLayout xmlns:android="http://schemas.android.com/apk/res/android"
    xmlns:app="http://schemas.android.com/apk/res-auto"
    xmlns:tools="http://schemas.android.com/tools"
    android:layout_width="match_parent"
    android:layout_height="match_parent"
    tools:context=".MovieActivity"
    android:id="@+id/mainContainerMovie"
    >


    <android.support.v7.widget.Toolbar
        android:id="@+id/toolbar"
        android:layout_width="match_parent"
        android:layout_height="wrap_content"
        android:background="#3a3f51b5"
       />

    <ProgressBar
        android:id="@+id/movieprogressbar"
        style="?android:attr/progressBarStyle"
        android:layout_width="wrap_content"
        android:layout_height="wrap_content"
        android:layout_gravity="center_vertical|center_horizontal" />
</FrameLayout>
Чтобы центрировать вид в Framelayout, есть несколько доступных приемов. Самый простой, который я использовал для моего Webview и Progressbar(очень похож на макет двух ваших объектов), я просто добавил android:layout_gravity="center"
Вот полный XML на случай, если кому-то еще нужно сделать то же самое
<?xml version="1.0" encoding="utf-8"?>
<FrameLayout xmlns:android="http://schemas.android.com/apk/res/android"

    xmlns:tools="http://schemas.android.com/tools"
    android:layout_width="match_parent"
    android:layout_height="match_parent"
    tools:context=".WebviewPDFActivity"
    android:layout_gravity="center"
    >
    <WebView
        android:id="@+id/webView1"
        android:layout_width="match_parent"
        android:layout_height="match_parent"

        />
    <ProgressBar
        android:id="@+id/progress_circular"
        android:layout_width="250dp"
        android:layout_height="250dp"
        android:visibility="visible"
        android:layout_gravity="center"
        />


</FrameLayout>
Вот мой вывод

Следуя /questions/463271/predstavlenie-tsentra-android-v-framelayout-ne-rabotaet/463282#463282, это работает для меня, чтобы центрировать TabLayout внутри FrameLayout.
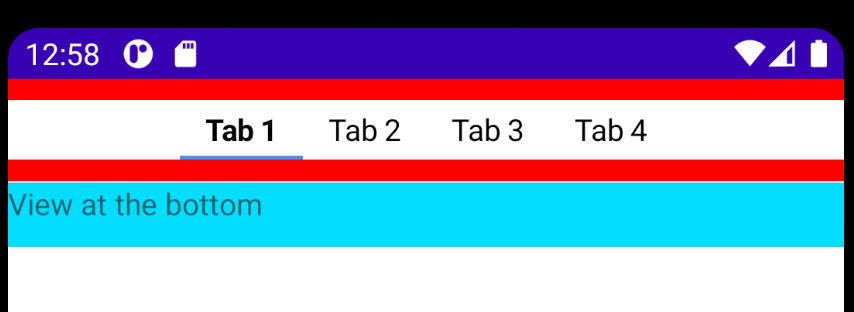
      final TabLayout tabLayout = new TabLayout(this);
// Configure TabLayout...
final FrameLayout tabLayoutContainer = new FrameLayout(this);
tabLayoutContainer.setBackgroundColor(Color.RED);

final FrameLayout.LayoutParams tabLayoutParams = new FrameLayout.LayoutParams(FrameLayout.LayoutParams.MATCH_PARENT,
                dpToPx(28));
final FrameLayout.LayoutParams containerLayoutParams = new FrameLayout.LayoutParams(FrameLayout.LayoutParams.MATCH_PARENT,
                dpToPx(48));


tabLayoutParams.gravity = Gravity.CENTER;
tabLayoutContainer.setLayoutParams(containerLayoutParams);
tabLayoutContainer.addView(tabLayout, tabLayoutParams);