Как изменить цвет текста в AlertDialog

Как изменить цвет текста в AlertDialog?
<item name="android:textColor">@color/black_text</item>
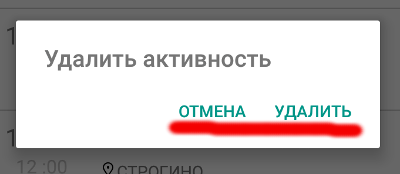
Это изменяет только цвет заголовка.
ad = new AlertDialog.Builder((new ContextThemeWrapper(context, R.style.DialogTheme)));
            ad.setTitle(R.string.my_activ_remove_title_dialog);

            ad.setPositiveButton(R.string.my_activ_remove_dialog, new DialogInterface.OnClickListener() {
                public void onClick(DialogInterface dialog, int arg1) {
                    content.remove(position);
                    notifyItemRemoved(position);
                    notifyItemRangeChanged(position, content.size());
                }

            });
            ad.setNegativeButton(R.string.my_activ_cancel_remove_dialog, new DialogInterface.OnClickListener() {
                public void onClick(DialogInterface dialog, int arg1) {

                }
            });
6 ответов
Только для изменения цвета шрифта попробуйте это:
    AlertDialog.Builder builder = new AlertDialog.Builder(this);
    builder.setTitle(Html.fromHtml("<font color='#FF7F27'>This is a test</font>"));
    builder.setPositiveButton(Html.fromHtml("<font color='#FF7F27'>Yes</font>"), new DialogInterface.OnClickListener() {
        public void onClick(DialogInterface dialog, int arg1) {
            Log.e(LOG_TAG, "Yes");
        }
    });
    builder.setNegativeButton(Html.fromHtml("<font color='#FF7F27'>No</font>"), new DialogInterface.OnClickListener() {
        public void onClick(DialogInterface dialog, int arg1) {
            Log.e(LOG_TAG, "No");
        }
    });
    builder.create();
    builder.show();
результат:
Чтобы изменить цвет шрифта и цвет фона кнопки, попробуйте это:
    AlertDialog.Builder builder = new AlertDialog.Builder(this);
    builder.setMessage(Html.fromHtml("<font color='#FF7F27'>This is a test</font>"));
    builder.setCancelable(false);
    builder.setNegativeButton("No", new DialogInterface.OnClickListener() {
        public void onClick(DialogInterface dialog, int which) {
        }
    });
    builder.setPositiveButton("Yes", new DialogInterface.OnClickListener() {
        public void onClick(DialogInterface dialog, int which) {
        }
    });
    AlertDialog alert = builder.create();
    alert.show();
    Button nbutton = alert.getButton(DialogInterface.BUTTON_NEGATIVE);
    //Set negative button background
    nbutton.setBackgroundColor(Color.MAGENTA);
    //Set negative button text color
    nbutton.setTextColor(Color.YELLOW);
    Button pbutton = alert.getButton(DialogInterface.BUTTON_POSITIVE);
    //Set positive button background
    pbutton.setBackgroundColor(Color.YELLOW);
    //Set positive button text color
    pbutton.setTextColor(Color.MAGENTA);
Результат:
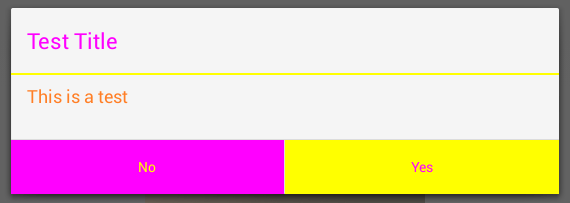
Если вы хотите изменить цвет разделителя, попробуйте это:
        AlertDialog.Builder builder = new AlertDialog.Builder(this);
        builder.setTitle("Test Title");
        builder.setMessage(Html.fromHtml("<font color='#FF7F27'>This is a test</font>"));
        builder.setCancelable(false);
        builder.setNegativeButton("No", new DialogInterface.OnClickListener() {
            public void onClick(DialogInterface dialog, int which) {
            }
        });
        builder.setPositiveButton("Yes", new DialogInterface.OnClickListener() {
            public void onClick(DialogInterface dialog, int which) {
            }
        });
        AlertDialog dialog = builder.create();
        dialog.show();
        try {
            Resources resources = dialog.getContext().getResources();
            int alertTitleId = resources.getIdentifier("alertTitle", "id", "android");
            TextView alertTitle = (TextView) dialog.getWindow().getDecorView().findViewById(alertTitleId);
            alertTitle.setTextColor(Color.MAGENTA); // change title text color

            int titleDividerId = resources.getIdentifier("titleDivider", "id", "android");
            View titleDivider = dialog.getWindow().getDecorView().findViewById(titleDividerId);
            titleDivider.setBackgroundColor(Color.YELLOW); // change divider color
        } catch (Exception ex) {
            ex.printStackTrace();
        }
        Button nbutton = dialog.getButton(DialogInterface.BUTTON_NEGATIVE);
        //Set negative button background
        nbutton.setBackgroundColor(Color.MAGENTA);
        //Set negative button text color
        nbutton.setTextColor(Color.YELLOW);
        Button pbutton = dialog.getButton(DialogInterface.BUTTON_POSITIVE);
        //Set positive button background
        pbutton.setBackgroundColor(Color.YELLOW);
        //Set positive button text color
        pbutton.setTextColor(Color.MAGENTA);
Это мой пример кода, но если вы хотите изменить цвет разделителя, учтите, что часть кода начинается с "int titleDividerId".
Результат:
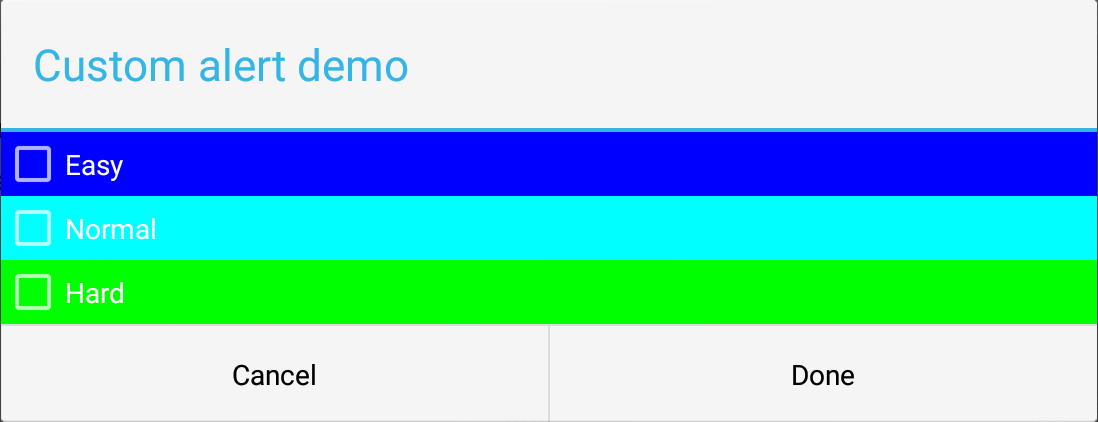
Если вы хотите настроить AlertDialog много. Например, добавив несколько флажков с пользовательским цветом фона, используйте этот подход:
AlertDialog.Builder alert = new AlertDialog.Builder(this);
        LinearLayout mainLayout       = new LinearLayout(this);
        mainLayout.setOrientation(LinearLayout.VERTICAL);

        LinearLayout layout1       = new LinearLayout(this);
        layout1.setOrientation(LinearLayout.HORIZONTAL);
        CheckBox cb1 = new CheckBox(getApplicationContext());
        cb1.setText("Easy");
        layout1.addView(cb1);
        layout1.setBackgroundColor(Color.BLUE);
        layout1.setMinimumHeight(50);

        LinearLayout layout2       = new LinearLayout(this);
        layout2.setOrientation(LinearLayout.HORIZONTAL);
        layout2.addView(new TextView(this));
        CheckBox cb2 = new CheckBox(getApplicationContext());
        cb2.setText("Normal");
        layout2.addView(cb2);
        layout2.setBackgroundColor(Color.CYAN);
        layout2.setMinimumHeight(50);

        LinearLayout layout3       = new LinearLayout(this);
        layout3.setOrientation(LinearLayout.HORIZONTAL);
        CheckBox cb3 = new CheckBox(getApplicationContext());
        cb3.setText("Hard");
        layout3.addView(cb3);
        layout3.setBackgroundColor(Color.GREEN);
        layout3.setMinimumHeight(50);

        mainLayout.addView(layout1);
        mainLayout.addView(layout2);
        mainLayout.addView(layout3);
        alert.setTitle("Custom alert demo");
        alert.setView(mainLayout);
        alert.setNegativeButton("Cancel", new DialogInterface.OnClickListener() {

            @Override
            public void onClick(DialogInterface dialog, int which) {
                dialog.cancel();
            }
        });
        alert.setPositiveButton("Done", new DialogInterface.OnClickListener() {
            @Override
            public void onClick(DialogInterface dialog, int which) {
                Toast.makeText(getBaseContext(), "done", Toast.LENGTH_SHORT).show();
            }
        });

        alert.show();
Результат:
Во-первых, я создал основной макет (вертикальный), как вы видите в коде. Затем для каждого из флажков я создал горизонтальный макет. В этом случае вы можете играть с цветами и шрифтами элементов (флажки, элементы и т. Д.). Я надеюсь, что это помогает.
После создания вашего диалога:
AlertDialog dialog = builder.create();
dialog.show();
Button buttonPositive = dialog.getButton(DialogInterface.BUTTON_POSITIVE);
buttonPositive.setTextColor(ContextCompat.getColor(this, R.color.green));
Button buttonNegative = dialog.getButton(DialogInterface.BUTTON_NEGATIVE);
buttonNegative.setTextColor(ContextCompat.getColor(this, R.color.red));
Цвет текста взят из colorAccent значение установлено в styles.xml (в соответствии со стилем, установленным в вашей деятельности).
Вот несколько шагов, которые вы можете выполнить:
1. Добавьте стиль и назовите его как хотите, в моем случае это AlertDialogTheme
<style name="AlertDialogTheme" parent="Theme.AppCompat.Light.Dialog.Alert">
    <item name="colorAccent">@color/colorPrimaryDark</item>
</style>
2. укажите свой стиль в качестве второго параметра на вашем AlertDialog.Builder()пример. Обратите внимание: если вы создаете экземпляр из Activity, замените первый аргумент наthis
AlertDialog.Builder builder = new AlertDialog.Builder(requireActivity(), R.style.AlertDialogTheme);
- Просмотрите свои изменения
           alertDialog.setOnShowListener(OnShowListener { dialog ->

        val buttonPositive: Button = alertDialog.getButton(DialogInterface.BUTTON_POSITIVE)
        buttonPositive.setTextColor(ContextCompat.getColor(requireContext(), R.color.orange_strong))

        val buttonNegative: Button = alertDialog.getButton(DialogInterface.BUTTON_NEGATIVE)
        buttonNegative.setTextColor(ContextCompat.getColor(requireContext(), R.color.orange_strong))

    })

    // show alert dialog
    alertDialog.show()
Для диалогового окна предупреждения "Материальный дизайн":
<style name="MyTheme" parent="MaterialAlertDialog.MaterialComponents">
    <item name="materialAlertDialogTitleTextStyle">@style/AlertDialogTitleText</item>
    <item name="materialAlertDialogBodyTextStyle">@style/AlertDialogBodyText</item>
</style>

<style name="AlertDialogTitleText" parent="MaterialAlertDialog.MaterialComponents.Title.Text">
    <item name="android:textColor">@android:color/black</item>
</style>

<style name="AlertDialogBodyText" parent="MaterialAlertDialog.MaterialComponents.Body.Text">
    <item name="android:textColor">@android:color/white</item>
</style>
Диалог должен быть построен с помощью конструктора материалов, и стиль должен быть установлен.
new MaterialAlertDialogBuilder(getContext(), R.style.MyTheme)
            .setTitle("Title")
            .setMessage("Message");


