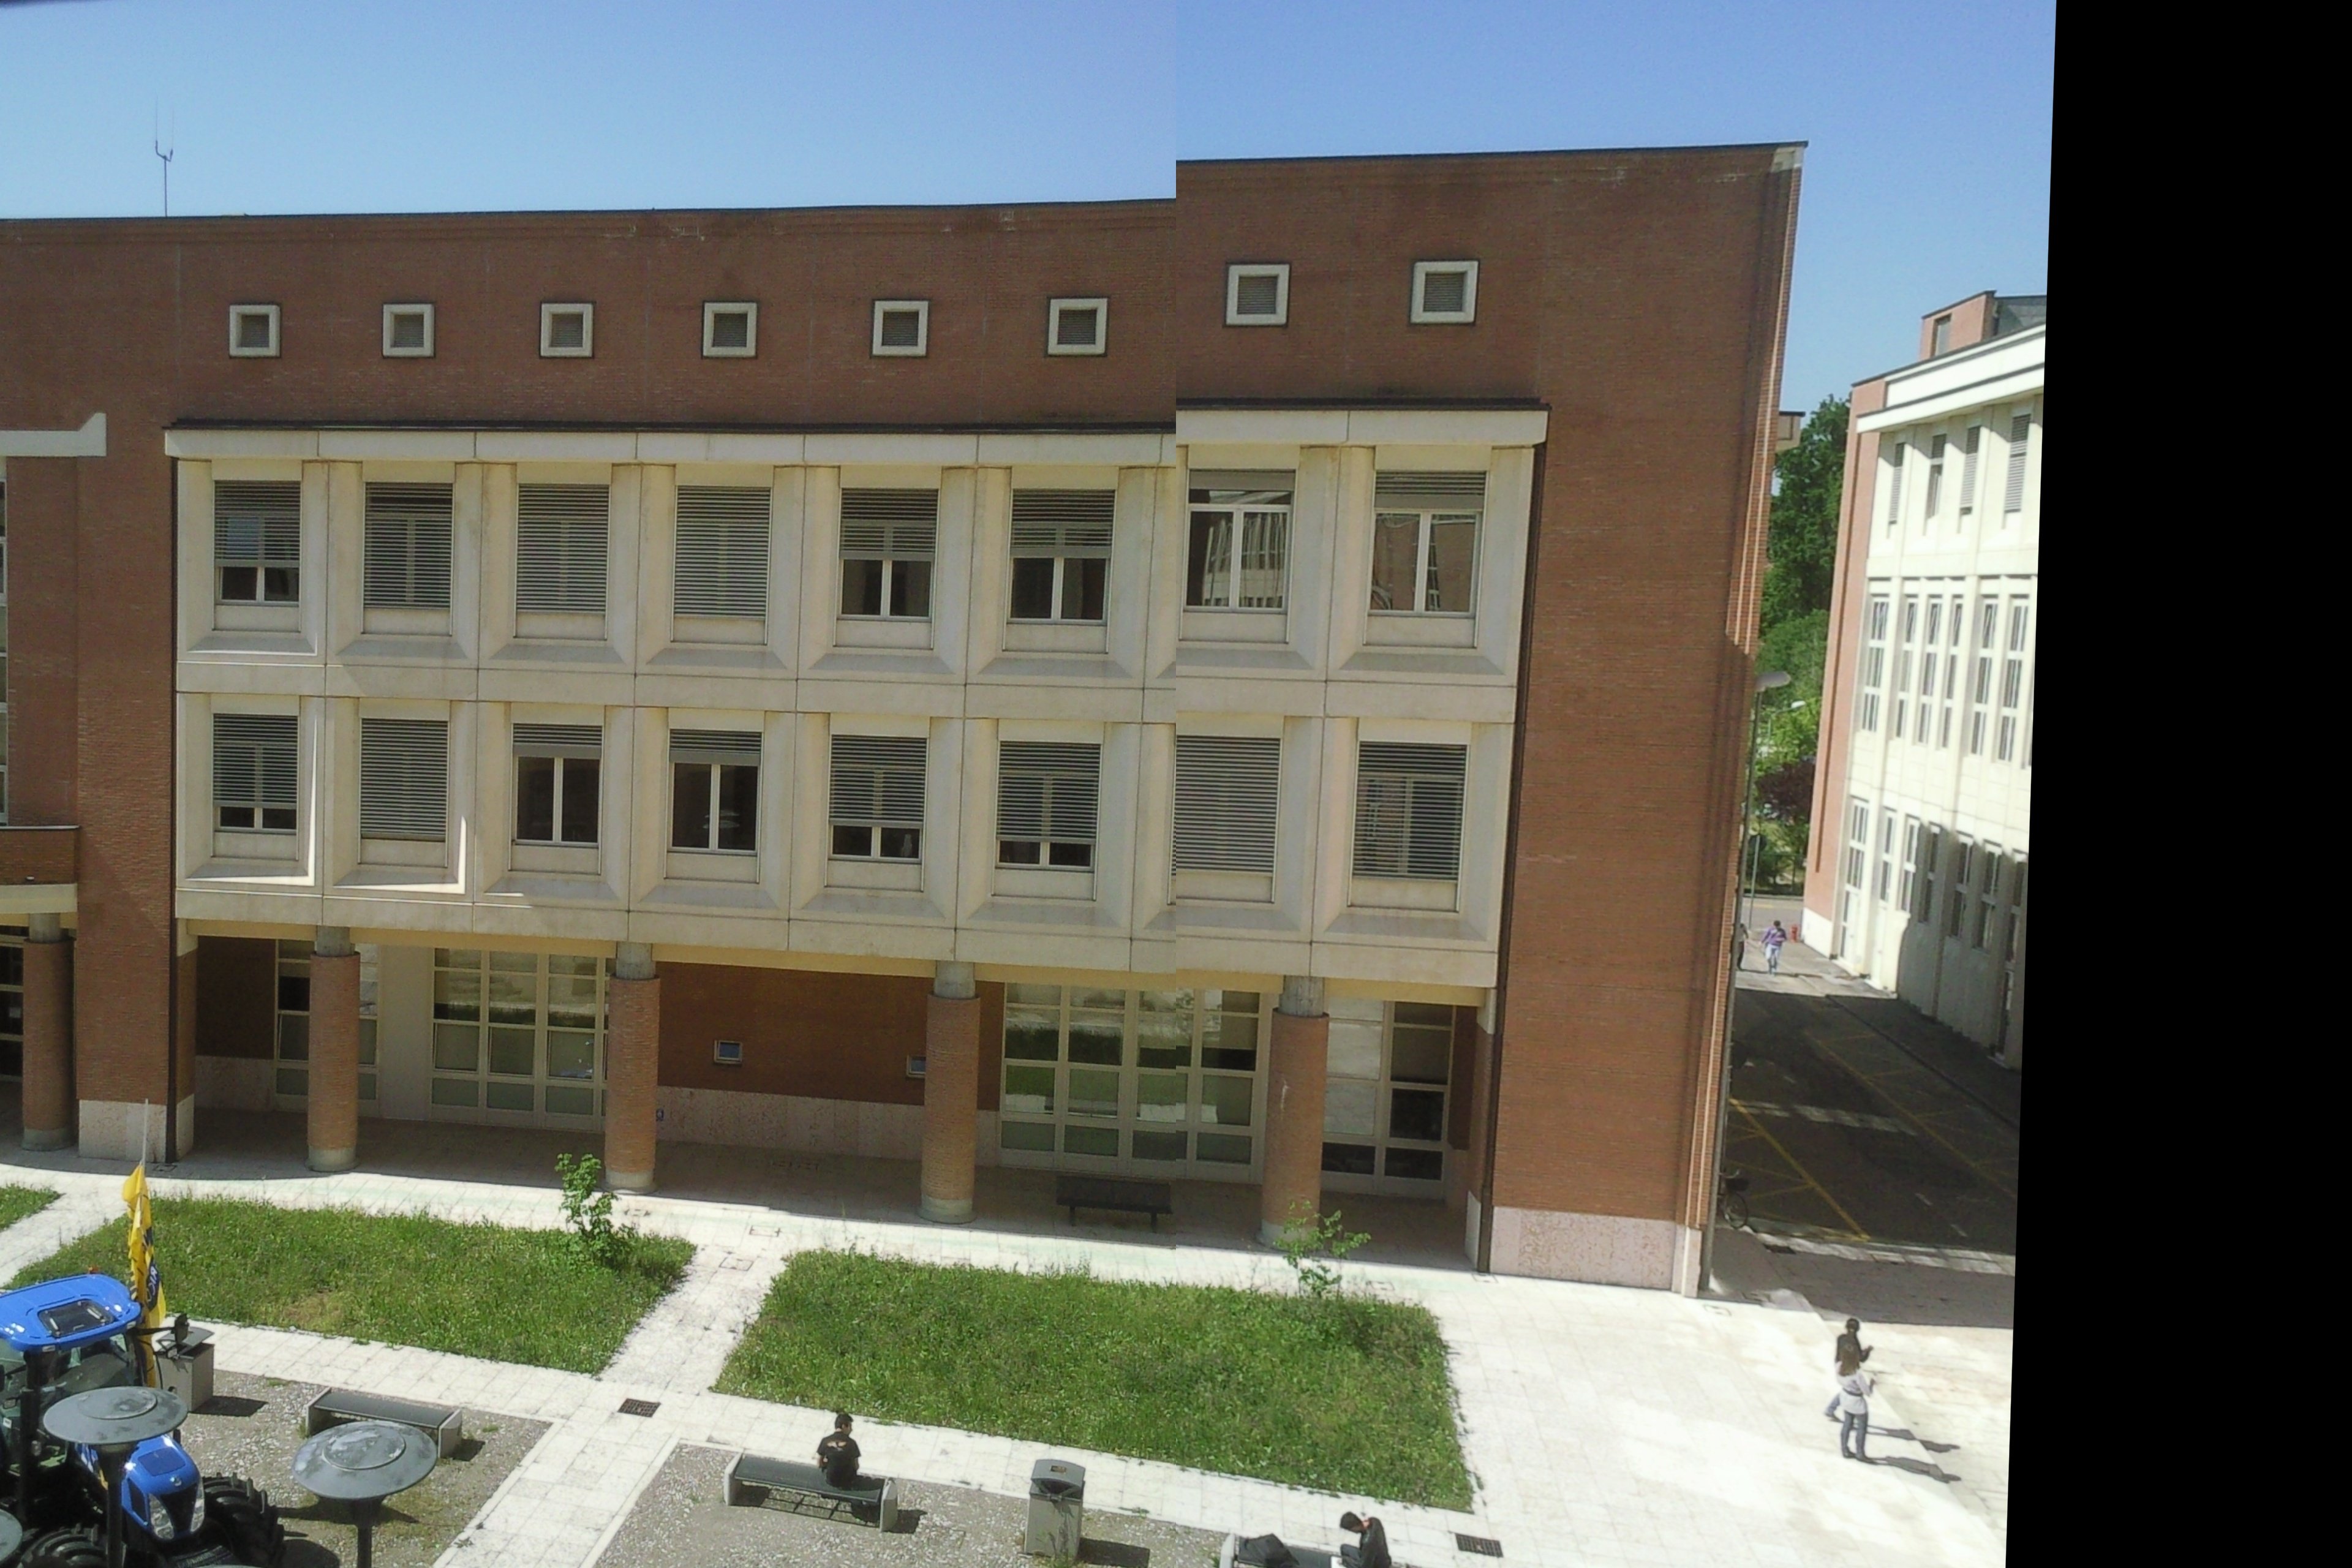
Сшивание двух изображений с помощью преобразования "Гомография" - преобразованное изображение обрезается
Сшивание изображений не работает должным образом. Деформированное изображение обрезается, и интерполяция не может быть выполнена, потому что изображения не пересекаются.
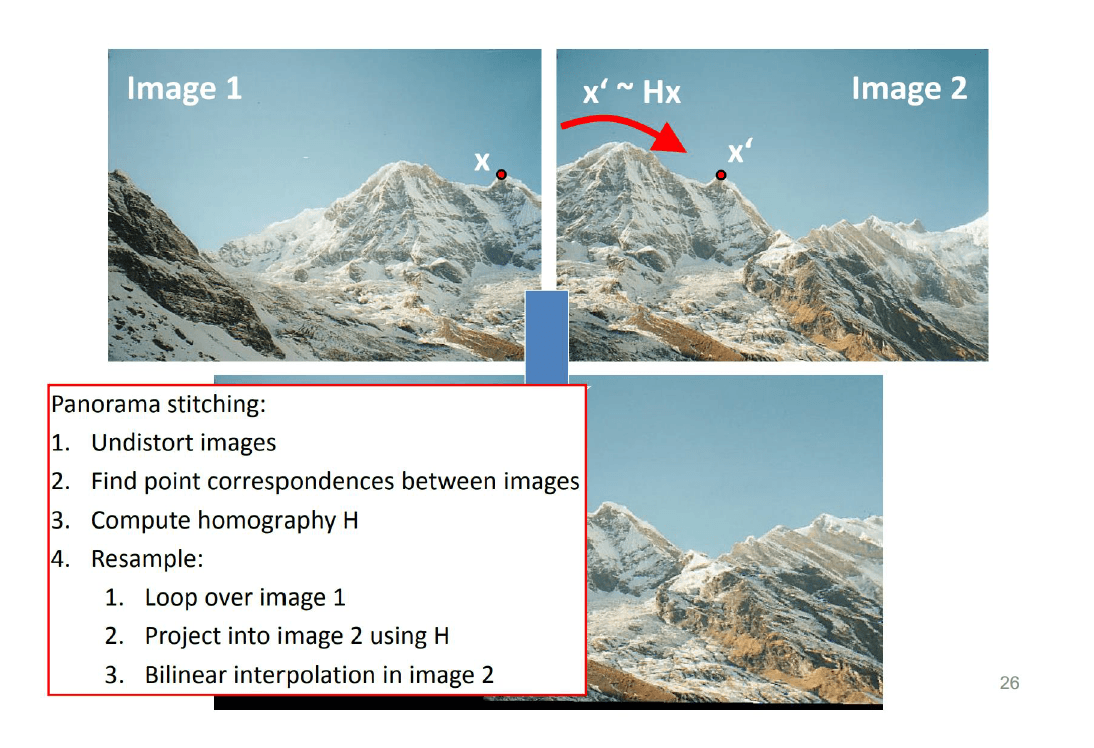
Привет, мне дали домашнее задание, в котором я должен сшить два изображения, снятые разными камерами. Я должен найти матрицу гомографии и затем деформировать второе изображение, используя эту матрицу. В конце я должен интерполировать два изображения.
К сожалению, код, который я написал, кажется, не работает должным образом. Во время второго искажения изображения я потерял большую часть информации об изображении; много пикселей черные, а не все преобразованное изображение преобразуется.
Я отслеживаю в двух изображениях по четыре пикселя в каждом порядке. Ниже вы можете найти фрагмент кода, который я написал.
# Globals
points = []

def show_and_fetch(image, title):
    cv2.namedWindow(title, cv2.WINDOW_NORMAL)
    cv2.setMouseCallback(title, mouse_callback)
    # Show the image
    cv2.imshow(title, image)
    # Wait for user input to continue
    cv2.waitKey(0)
    cv2.destroyAllWindows()


# mouse callback function
def mouse_callback(event,x,y,flags,param):
    if event == cv2.EVENT_LBUTTONDOWN:
        points.append([x, y])


def stitching():
    """
    This procedure stiches two images

    :return:
    """
    print "Stitching starts..."
    ###########################################################################
    # Get input information

    in_file_1 = utils.get_input(
        "Insert 0 to exit, the path to the first image to stitch "
        "or empty input to use default image: ", "string",
        constants.default_stitching1)

    in_file_2 = utils.get_input(
        "Insert 0 to exit, the path to the second image to stitch "
        "or empty input to use default image: ", "string",
        constants.default_stitching2)

    image_1 = utils.read_image(in_file_1)
    image_2 = utils.read_image(in_file_2)

    global points
    show_and_fetch(image_1, "Image 1 to Stitch")
    image_1_points = np.asarray(points, dtype=np.float32)
    points = []
    show_and_fetch(image_2, "Image 2 to Stitch")
    image_2_points = np.asarray(points, dtype=np.float32)

    matrix, mask = cv2.findHomography(image_1_points, image_2_points, cv2.RANSAC, 5)

    image_1_warped = cv2.warpPerspective(image_1, matrix, dsize=image_1.shape[0:2])

    utils.show_image_and_wait(image_1_warped, 'Image 1 warped', wait=False)
    utils.show_image_and_wait(image_1, 'Image 1', wait=False)
    utils.show_image_and_wait(image_2, 'Image 2')


if __name__ == "__main__":
    stitching()
Я ожидаю, что деформированное изображение преобразуется, сохраняя большую часть информации в виде пикселей. Затем к интерполяции следует применить пересечение двух изображений, которые перекрываются в определенной области.
Например, я хочу интерполировать эти два изображения:
2 ответа
Мне удалось сшить изображения на основе этого решения. Вот результат сшивания:
Вот полный код:
import cv2
import imutils
import numpy as np


class Stitcher(object):
    def __init__(self):
        self.isv3 = imutils.is_cv3()

    def stitch(self, images, ratio=0.75, reprojThresh=4.0, showMatches=False):
        (imageB, imageA) = images
        (kpsA, featuresA) = self.detectAndDescribe(imageA)
        (kpsB, featuresB) = self.detectAndDescribe(imageB)

        # match features between the two images
        m = self.matchKeypoints(kpsA, kpsB, featuresA, featuresB, ratio, reprojThresh)
        if not m:
            return None

        # otherwise, apply a perspective warp to stitch the images
        # together
        (matches, H, status) = m
        result = cv2.warpPerspective(imageA, H,
                                     (imageA.shape[1] + imageB.shape[1], imageA.shape[0]))
        result[0:imageB.shape[0], 0:imageB.shape[1]] = imageB

        # check to see if the keypoint matches should be visualized
        if showMatches:
            vis = self.drawMatches(imageA, imageB, kpsA, kpsB, matches,
                                   status)

            # return a tuple of the stitched image and the
            # visualization
            return result, vis

        # return the stitched image
        return result

    def detectAndDescribe(self, image):
        # convert the image to grayscale
        gray = cv2.cvtColor(image, cv2.COLOR_BGR2GRAY)

        # check to see if we are using OpenCV 3.X
        if self.isv3:
            # detect and extract features from the image
            descriptor = cv2.xfeatures2d.SIFT_create()
            (kps, features) = descriptor.detectAndCompute(image, None)

        # otherwise, we are using OpenCV 2.4.X
        else:
            # detect keypoints in the image
            detector = cv2.xfeatures2d.SIFT_create()
            kps = detector.detect(gray)

            # extract features from the image
            extractor = cv2.xfeatures2d.SIFT_create()
            (kps, features) = extractor.compute(gray, kps)

        # convert the keypoints from KeyPoint objects to NumPy
        # arrays
        kps = np.float32([kp.pt for kp in kps])

        # return a tuple of keypoints and features
        return kps, features

    def matchKeypoints(self, kpsA, kpsB, featuresA, featuresB,
                       ratio, reprojThresh):
        # compute the raw matches and initialize the list of actual
        # matches
        matcher = cv2.DescriptorMatcher_create("BruteForce")
        rawMatches = matcher.knnMatch(featuresA, featuresB, 2)
        matches = []

        # loop over the raw matches
        for m in rawMatches:
            # ensure the distance is within a certain ratio of each
            # other (i.e. Lowe's ratio test)
            if len(m) == 2 and m[0].distance < m[1].distance * ratio:
                matches.append((m[0].trainIdx, m[0].queryIdx))

        # computing a homography requires at least 4 matches
        if len(matches) > 4:
            # construct the two sets of points
            ptsA = np.float32([kpsA[i] for (_, i) in matches])
            ptsB = np.float32([kpsB[i] for (i, _) in matches])

            # compute the homography between the two sets of points
            (H, status) = cv2.findHomography(ptsA, ptsB, cv2.RANSAC,
                                             reprojThresh)

            # return the matches along with the homograpy matrix
            # and status of each matched point
            return (matches, H, status)

        # otherwise, no homograpy could be computed
        return None

    def drawMatches(self, imageA, imageB, kpsA, kpsB, matches, status):
        # initialize the output visualization image
        (hA, wA) = imageA.shape[:2]
        (hB, wB) = imageB.shape[:2]
        vis = np.zeros((max(hA, hB), wA + wB, 3), dtype="uint8")
        vis[0:hA, 0:wA] = imageA
        vis[0:hB, wA:] = imageB

        # loop over the matches
        for ((trainIdx, queryIdx), s) in zip(matches, status):
            # only process the match if the keypoint was successfully
            # matched
            if s == 1:
                # draw the match
                ptA = (int(kpsA[queryIdx][0]), int(kpsA[queryIdx][1]))
                ptB = (int(kpsB[trainIdx][0]) + wA, int(kpsB[trainIdx][1]))
                cv2.line(vis, ptA, ptB, (0, 255, 0), 1)

        # return the visualization
        return vis

image1 = cv2.imread('image1.jpg')
image2 = cv2.imread('image2.jpg')

stitcher = Stitcher()
(result, vis) = stitcher.stitch([image1, image2], showMatches=True)
cv2.imwrite('result.jpg', result)
Я столкнулся с той же проблемой. Оказывается, порядок моих изображений был неправильным.
У меня было два изображения для сшивания. Нужно прошивать слева направо. Тем не менее, я вычислял преобразование, так как хочу, чтобы оно сшивалось справа.