Как создать обертку с ChoiceChip с пользовательскими надписями во Flutter
Я учусь трепетать, но есть вещи, которые я нигде не могу найти.
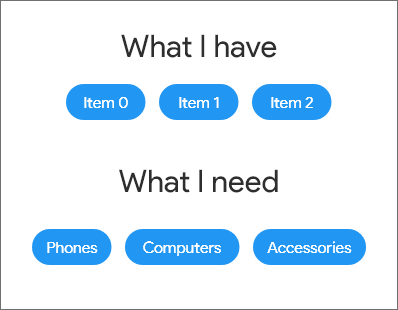
Например, я хочу сделать группу ChoiceChips, похожую на картинку
но я не знаю, как поставить специальные ярлыки в чипы такого типа.
Как я могу сделать это возможным?
 import 'package:flutter/material.dart';

 class MyThreeOptions extends StatefulWidget {
  @override
   _MyThreeOptionsState createState() => _MyThreeOptionsState();
}

  class _MyThreeOptionsState extends State<MyThreeOptions> {
  int _value = 0;

  // ----What I want to appear----//
  /*void v (int index){
   switch (index){
   case 0: Text('Phones');
   break;

   case 1: Text('Computers');
   break;

   case 2: Text('Accessories');
   break;
   }}*/

  @override
  Widget build(BuildContext context) {
  return Wrap(
  alignment: WrapAlignment.center,
  spacing: 12.0,
  children: List<Widget>.generate(
  3,
      (int index) {
      return ChoiceChip(
       pressElevation: 0.0,
       selectedColor: Colors.blue,
       backgroundColor: Colors.grey[100],
       label: Text("item $index"),
       selected: _value == index,
       onSelected: (bool selected) {
        setState(() {
          _value = selected ? index : null;
        });
      },
    );
  },
 ).toList(),
 );}
}
5 ответов
          int defaultChoiceIndex;
List<String> _choicesList = ['All', 'Pending', 'Accepted'];

    @override
  void initState() {
    // TODO: implement initState
    super.initState();
    defaultChoiceIndex = 0;
  }

    Wrap(
      spacing: 8,
      children: List.generate(_choicesList.length, (index) {
        return ChoiceChip(
          labelPadding: EdgeInsets.all(2.0),
          label: Text(
            _choicesList[index],
            style: Theme.of(context)
                .textTheme
                .bodyText2!
                .copyWith(color: Colors.white, fontSize: 14),
          ),
          selected: defaultChoiceIndex == index,
          selectedColor: Colors.deepPurple,
          onSelected: (value) {
            setState(() {
              defaultChoiceIndex = value ? index : defaultChoiceIndex;
            });
          },
          // backgroundColor: color,
          elevation: 1,
          padding: EdgeInsets.symmetric(
              horizontal: SizeConfig.widthMultiplier * 4),
        );
      }),
    );
import 'package:flutter/material.dart';
class ChoiceChips extends StatefulWidget {
  final List chipName;
  ChoiceChips({Key key, this.chipName}) : super(key: key);

  @override
  _ChoiceChipsState createState() => _ChoiceChipsState();
}

class _ChoiceChipsState extends State<ChoiceChips> {
  String _isSelected = "";

  _buildChoiceList() {
    List<Widget> choices = List();
    widget.chipName.forEach((item) {
      choices.add(Container(
        child: ChoiceChip(
          label: Text(item),
          labelStyle: TextStyle(color: Colors.white),
          selectedColor: Colors.pinkAccent,
          backgroundColor: Colors.deepPurpleAccent,
          selected: _isSelected == item,
          onSelected: (selected) {
            setState(() {
              _isSelected = item;
            });
          },
        ),
      ));
    });
    return choices;
  }

  @override
  Widget build(BuildContext context) {
    return Wrap(
      spacing: 5.0,
      runSpacing: 3.0,
      children: _buildChoiceList(),
    );
  }
}
Вам просто нужно создать свой собственный виджет с макетом вашего желания и поставить как ярлык вашего чипа.
// Your custom widget...
class CustomChipLabel extends StatelessWidget {
  @override
  Widget build(BuildContext context) {
    return Card(
      elevation: 4.0,
      child: Row(
        children: <Widget>[
          IconButton(
              iconSize: 40.0,
              icon: Icon(Icons.person),
              onPressed: null),
          Text("My Custom Chip", style: TextStyle(
            fontSize: 20.0,

          ),),
        ],
      )
    );
  }
}

Wrap(
  children: <Widget>[
    ChoiceChip(
      selected: _isSelected
      label: CustomChipLabel(), // your custom label widget
    ),
  ],
);
Хорошо, я нашел способ, но я думаю, что должен быть какой-то более эффективный, создание списка строк и передача значений, но я не могу его кодировать. Если кто-то знает какой-либо более эффективный способ выполнить это действие, его вклад приветствуется.
class MyThreeOptions extends StatefulWidget {
 @override
 _MyThreeOptionsState createState() => _MyThreeOptionsState();
 }

class _MyThreeOptionsState extends State<MyThreeOptions> {
int _value = 0;

@override
Widget build(BuildContext context) {
return Wrap(
  alignment: WrapAlignment.center,
  spacing: 12.0,
  children: <Widget>[
    ChoiceChip(
      pressElevation: 0.0,
      selectedColor: Colors.blue,
      backgroundColor: Colors.grey[100],
      label: Text("Phones"),
      selected: _value == 0,
      onSelected: (bool selected) {
        setState(() {
          _value = selected ? 0 : null;
        });
      },
    ),
    ChoiceChip(
      pressElevation: 0.0,
      selectedColor: Colors.blue,
      backgroundColor: Colors.grey[100],
      label: Text("Computers"),
      selected: _value == 1,
      onSelected: (bool selected) {
        setState(() {
          _value = selected ? 1 : null;
        });
      },
    ),
    ChoiceChip(
      pressElevation: 0.0,
      selectedColor: Colors.blue,
      backgroundColor: Colors.grey[100],
      label: Text("Accesories"),
      selected: _value == 2,
      onSelected: (bool selected) {
        setState(() {
          _value = selected ? 2 : null;
        });
      },
    ),
  ],
);
}
}
class CustomChoiceChip extends StatelessWidget {

final String text;

CustomChoiceChip({this.text});

@override
Widget build(BuildContext context) {
return Container(
  padding: EdgeInsets.symmetric(horizontal: 10.0, vertical: 10.0),
  decoration: BoxDecoration(
  color: Colors.black54,
  borderRadius: BorderRadius.all(Radius.circular(20.0))),
  child: Text(
    text,
    style: TextStyle(color: Colors.white, fontSize: 12.0),
  ),
);
} }

