Как программно добавить ограничения с помощью Swift
Я пытаюсь понять это с прошлой недели, не делая никаких шагов. Итак, мне нужно применить некоторые ограничения программно в Swift для UIView используя этот код:
var new_view:UIView! = UIView(frame: CGRectMake(0, 0, 100, 100));
new_view.backgroundColor = UIColor.redColor();
view.addSubview(new_view);

var constX:NSLayoutConstraint = NSLayoutConstraint(item: new_view, attribute: NSLayoutAttribute.CenterX, relatedBy: NSLayoutRelation.Equal, toItem: self.view, attribute: NSLayoutAttribute.CenterX, multiplier: 1, constant: 0);
self.view.addConstraint(constX);

var constY:NSLayoutConstraint = NSLayoutConstraint(item: new_view, attribute: NSLayoutAttribute.CenterY, relatedBy: NSLayoutRelation.Equal, toItem: self.view, attribute: NSLayoutAttribute.CenterY, multiplier: 1, constant: 0);
self.view.addConstraint(constY);

var constW:NSLayoutConstraint = NSLayoutConstraint(item: new_view, attribute: NSLayoutAttribute.Width, relatedBy: NSLayoutRelation.Equal, toItem: new_view, attribute: NSLayoutAttribute.Width, multiplier: 1, constant: 0);
self.view.addConstraint(constW);

var constH:NSLayoutConstraint = NSLayoutConstraint(item: new_view, attribute: NSLayoutAttribute.Height, relatedBy: NSLayoutRelation.Equal, toItem: new_view, attribute: NSLayoutAttribute.Height, multiplier: 1, constant: 0);
self.view.addConstraint(constH);
Но XCode возвращает этот странный вывод:
2014-10-03 09:48:12.657 Test[35088:2454916] Unable to simultaneously satisfy constraints.  Probably at least one of the constraints in the following list is one you don't want. Try this: (1) look at each constraint and try to figure out which you don't expect; (2) find the code that added the unwanted constraint or constraints and fix it. (Note: If you're seeing NSAutoresizingMaskLayoutConstraints that you don't understand, refer to the documentation for the UIView property translatesAutoresizingMaskIntoConstraints)
(
"<NSLayoutConstraint:0x7fa4ea446830 UIView:0x7fa4ea429290.centerX == UIView:0x7fa4ea4470f0.centerX>",
"<NSAutoresizingMaskLayoutConstraint:0x7fa4ea4516c0 h=--& v=--& UIView:0x7fa4ea429290.midX == + 50>",
"<NSLayoutConstraint:0x7fa4ea452830 'UIView-Encapsulated-Layout-Width' H:[UIView:0x7fa4ea4470f0(375)]>",
"<NSAutoresizingMaskLayoutConstraint:0x7fa4ea446db0 h=-&- v=-&- 'UIView-Encapsulated-Layout-Left' H:|-(0)-[UIView:0x7fa4ea4470f0]   (Names: '|':UIWindow:0x7fa4ea444b20 )>"
)

Will attempt to recover by breaking constraint <NSLayoutConstraint:0x7fa4ea446830 UIView:0x7fa4ea429290.centerX == UIView:0x7fa4ea4470f0.centerX>

Make a symbolic breakpoint at UIViewAlertForUnsatisfiableConstraints to catch this in the debugger. The methods in the UIConstraintBasedLayoutDebugging category on UIView listed in
<UIKit/UIView.h> may also be helpful.

2014-10-03 09:48:12.658 Test[35088:2454916] Unable to simultaneously satisfy constraints.  Probably at least one of the constraints in the following list is one you don't want. Try this: (1) look at each constraint and try to figure out which you don't expect; (2) find the code that added the unwanted constraint or constraints and fix it. (Note: If you're seeing NSAutoresizingMaskLayoutConstraints that you don't understand, refer to the documentation for the UIView property translatesAutoresizingMaskIntoConstraints)
(
"<NSLayoutConstraint:0x7fa4ea44d160 UIView:0x7fa4ea429290.centerY == UIView:0x7fa4ea4470f0.centerY>",
"<NSAutoresizingMaskLayoutConstraint:0x7fa4ea451b30 h=--& v=--& UIView:0x7fa4ea429290.midY == + 50>",
"<NSLayoutConstraint:0x7fa4ea44cf00 'UIView-Encapsulated-Layout-Height' V:[UIView:0x7fa4ea4470f0(667)]>",
"<NSAutoresizingMaskLayoutConstraint:0x7fa4ea452700 h=-&- v=-&- 'UIView-Encapsulated-Layout-Top' V:|-(0)-[UIView:0x7fa4ea4470f0]  (Names: '|':UIWindow:0x7fa4ea444b20 )>"
)

Will attempt to recover by breaking constraint <NSLayoutConstraint:0x7fa4ea44d160 UIView:0x7fa4ea429290.centerY == UIView:0x7fa4ea4470f0.centerY>

Make a symbolic breakpoint at UIViewAlertForUnsatisfiableConstraints to catch this in the debugger. The methods in the UIConstraintBasedLayoutDebugging category on UIView listed in <UIKit/UIView.h> may also be helpful.
Вы можете мне помочь? большое спасибо
20 ответов
Планируете ли вы иметь квадрат UIView ширина: 100 и высота: 100 по центру внутри UIView из UIViewController? Если это так, вы можете попробовать один из 6 следующих стилей автоматического макета (Swift 4.2 / iOS 12):
1. Использование NSLayoutConstraint инициализатор
override func viewDidLoad() {
    let newView = UIView()
    newView.backgroundColor = UIColor.red
    view.addSubview(newView)

    newView.translatesAutoresizingMaskIntoConstraints = false
    let horizontalConstraint = NSLayoutConstraint(item: newView, attribute: NSLayoutConstraint.Attribute.centerX, relatedBy: NSLayoutConstraint.Relation.equal, toItem: view, attribute: NSLayoutConstraint.Attribute.centerX, multiplier: 1, constant: 0)
    let verticalConstraint = NSLayoutConstraint(item: newView, attribute: NSLayoutConstraint.Attribute.centerY, relatedBy: NSLayoutConstraint.Relation.equal, toItem: view, attribute: NSLayoutConstraint.Attribute.centerY, multiplier: 1, constant: 0)
    let widthConstraint = NSLayoutConstraint(item: newView, attribute: NSLayoutConstraint.Attribute.width, relatedBy: NSLayoutConstraint.Relation.equal, toItem: nil, attribute: NSLayoutConstraint.Attribute.notAnAttribute, multiplier: 1, constant: 100)
    let heightConstraint = NSLayoutConstraint(item: newView, attribute: NSLayoutConstraint.Attribute.height, relatedBy: NSLayoutConstraint.Relation.equal, toItem: nil, attribute: NSLayoutConstraint.Attribute.notAnAttribute, multiplier: 1, constant: 100)
    view.addConstraints([horizontalConstraint, verticalConstraint, widthConstraint, heightConstraint])
}
override func viewDidLoad() {
    let newView = UIView()
    newView.backgroundColor = UIColor.red
    view.addSubview(newView)

    newView.translatesAutoresizingMaskIntoConstraints = false
    let horizontalConstraint = NSLayoutConstraint(item: newView, attribute: NSLayoutConstraint.Attribute.centerX, relatedBy: NSLayoutConstraint.Relation.equal, toItem: view, attribute: NSLayoutConstraint.Attribute.centerX, multiplier: 1, constant: 0)
    let verticalConstraint = NSLayoutConstraint(item: newView, attribute: NSLayoutConstraint.Attribute.centerY, relatedBy: NSLayoutConstraint.Relation.equal, toItem: view, attribute: NSLayoutConstraint.Attribute.centerY, multiplier: 1, constant: 0)
    let widthConstraint = NSLayoutConstraint(item: newView, attribute: NSLayoutConstraint.Attribute.width, relatedBy: NSLayoutConstraint.Relation.equal, toItem: nil, attribute: NSLayoutConstraint.Attribute.notAnAttribute, multiplier: 1, constant: 100)
    let heightConstraint = NSLayoutConstraint(item: newView, attribute: NSLayoutConstraint.Attribute.height, relatedBy: NSLayoutConstraint.Relation.equal, toItem: nil, attribute: NSLayoutConstraint.Attribute.notAnAttribute, multiplier: 1, constant: 100)
    NSLayoutConstraint.activate([horizontalConstraint, verticalConstraint, widthConstraint, heightConstraint])
}
override func viewDidLoad() {
    let newView = UIView()
    newView.backgroundColor = UIColor.red
    view.addSubview(newView)

    newView.translatesAutoresizingMaskIntoConstraints = false
    NSLayoutConstraint(item: newView, attribute: NSLayoutConstraint.Attribute.centerX, relatedBy: NSLayoutConstraint.Relation.equal, toItem: view, attribute: NSLayoutConstraint.Attribute.centerX, multiplier: 1, constant: 0).isActive = true
    NSLayoutConstraint(item: newView, attribute: NSLayoutConstraint.Attribute.centerY, relatedBy: NSLayoutConstraint.Relation.equal, toItem: view, attribute: NSLayoutConstraint.Attribute.centerY, multiplier: 1, constant: 0).isActive = true
    NSLayoutConstraint(item: newView, attribute: NSLayoutConstraint.Attribute.width, relatedBy: NSLayoutConstraint.Relation.equal, toItem: nil, attribute: NSLayoutConstraint.Attribute.notAnAttribute, multiplier: 1, constant: 100).isActive = true
    NSLayoutConstraint(item: newView, attribute: NSLayoutConstraint.Attribute.height, relatedBy: NSLayoutConstraint.Relation.equal, toItem: nil, attribute: NSLayoutConstraint.Attribute.notAnAttribute, multiplier: 1, constant: 100).isActive = true
}
2. Использование языка визуального формата
override func viewDidLoad() {
    let newView = UIView()
    newView.backgroundColor = UIColor.red
    view.addSubview(newView)

    newView.translatesAutoresizingMaskIntoConstraints = false
    let views = ["view": view!, "newView": newView]
    let horizontalConstraints = NSLayoutConstraint.constraints(withVisualFormat: "H:[view]-(<=0)-[newView(100)]", options: NSLayoutConstraint.FormatOptions.alignAllCenterY, metrics: nil, views: views)
    let verticalConstraints = NSLayoutConstraint.constraints(withVisualFormat: "V:[view]-(<=0)-[newView(100)]", options: NSLayoutConstraint.FormatOptions.alignAllCenterX, metrics: nil, views: views)
    view.addConstraints(horizontalConstraints)
    view.addConstraints(verticalConstraints)
}
override func viewDidLoad() {
    let newView = UIView()
    newView.backgroundColor = UIColor.red
    view.addSubview(newView)

    newView.translatesAutoresizingMaskIntoConstraints = false
    let views = ["view": view!, "newView": newView]
    let horizontalConstraints = NSLayoutConstraint.constraints(withVisualFormat: "H:[view]-(<=0)-[newView(100)]", options: NSLayoutConstraint.FormatOptions.alignAllCenterY, metrics: nil, views: views)
    let verticalConstraints = NSLayoutConstraint.constraints(withVisualFormat: "V:[view]-(<=0)-[newView(100)]", options: NSLayoutConstraint.FormatOptions.alignAllCenterX, metrics: nil, views: views)
    NSLayoutConstraint.activate(horizontalConstraints)
    NSLayoutConstraint.activate(verticalConstraints)
}
3. Используя смесь NSLayoutConstraint инициализатор и язык визуальных форматов
override func viewDidLoad() {
    let newView = UIView()
    newView.backgroundColor = UIColor.red
    view.addSubview(newView)

    newView.translatesAutoresizingMaskIntoConstraints = false
    let views = ["newView": newView]
    let widthConstraints = NSLayoutConstraint.constraints(withVisualFormat: "H:[newView(100)]", options: NSLayoutConstraint.FormatOptions(rawValue: 0), metrics: nil, views: views)
    let heightConstraints = NSLayoutConstraint.constraints(withVisualFormat: "V:[newView(100)]", options: NSLayoutConstraint.FormatOptions(rawValue: 0), metrics: nil, views: views)
    let horizontalConstraint = NSLayoutConstraint(item: newView, attribute: NSLayoutConstraint.Attribute.centerX, relatedBy: NSLayoutConstraint.Relation.equal, toItem: view, attribute: NSLayoutConstraint.Attribute.centerX, multiplier: 1, constant: 0)
    let verticalConstraint = NSLayoutConstraint(item: newView, attribute: NSLayoutConstraint.Attribute.centerY, relatedBy: NSLayoutConstraint.Relation.equal, toItem: view, attribute: NSLayoutConstraint.Attribute.centerY, multiplier: 1, constant: 0)
    view.addConstraints(widthConstraints)
    view.addConstraints(heightConstraints)
    view.addConstraints([horizontalConstraint, verticalConstraint])
}
override func viewDidLoad() {
    let newView = UIView()
    newView.backgroundColor = UIColor.red
    view.addSubview(newView)

    newView.translatesAutoresizingMaskIntoConstraints = false
    let views = ["newView": newView]
    let widthConstraints = NSLayoutConstraint.constraints(withVisualFormat: "H:[newView(100)]", options: NSLayoutConstraint.FormatOptions(rawValue: 0), metrics: nil, views: views)
    let heightConstraints = NSLayoutConstraint.constraints(withVisualFormat: "V:[newView(100)]", options: NSLayoutConstraint.FormatOptions(rawValue: 0), metrics: nil, views: views)
    let horizontalConstraint = NSLayoutConstraint(item: newView, attribute: NSLayoutConstraint.Attribute.centerX, relatedBy: NSLayoutConstraint.Relation.equal, toItem: view, attribute: NSLayoutConstraint.Attribute.centerX, multiplier: 1, constant: 0)
    let verticalConstraint = NSLayoutConstraint(item: newView, attribute: NSLayoutConstraint.Attribute.centerY, relatedBy: NSLayoutConstraint.Relation.equal, toItem: view, attribute: NSLayoutConstraint.Attribute.centerY, multiplier: 1, constant: 0)
    NSLayoutConstraint.activate(widthConstraints)
    NSLayoutConstraint.activate(heightConstraints)
    NSLayoutConstraint.activate([horizontalConstraint, verticalConstraint])
}
override func viewDidLoad() {
    let newView = UIView()
    newView.backgroundColor = UIColor.red
    view.addSubview(newView)

    newView.translatesAutoresizingMaskIntoConstraints = false
    let views = ["newView": newView]
    let widthConstraints = NSLayoutConstraint.constraints(withVisualFormat: "H:[newView(100)]", options: NSLayoutConstraint.FormatOptions(rawValue: 0), metrics: nil, views: views)
    let heightConstraints = NSLayoutConstraint.constraints(withVisualFormat: "V:[newView(100)]", options: NSLayoutConstraint.FormatOptions(rawValue: 0), metrics: nil, views: views)
    NSLayoutConstraint.activate(widthConstraints)
    NSLayoutConstraint.activate(heightConstraints)
    NSLayoutConstraint(item: newView, attribute: NSLayoutConstraint.Attribute.centerX, relatedBy: NSLayoutConstraint.Relation.equal, toItem: view, attribute: NSLayoutConstraint.Attribute.centerX, multiplier: 1, constant: 0).isActive = true
    NSLayoutConstraint(item: newView, attribute: NSLayoutConstraint.Attribute.centerY, relatedBy: NSLayoutConstraint.Relation.equal, toItem: view, attribute: NSLayoutConstraint.Attribute.centerY, multiplier: 1, constant: 0).isActive = true
}
4. Использование UIView.AutoresizingMask
Примечание. Пружины и распорки будут преобразованы в соответствующие ограничения автоматического размещения во время выполнения.
override func viewDidLoad() {
    let newView = UIView(frame: CGRect(x: 0, y: 0, width: 100, height: 100))
    newView.backgroundColor = UIColor.red
    view.addSubview(newView)

    newView.translatesAutoresizingMaskIntoConstraints = true
    newView.center = CGPoint(x: view.bounds.midX, y: view.bounds.midY)
    newView.autoresizingMask = [UIView.AutoresizingMask.flexibleLeftMargin, UIView.AutoresizingMask.flexibleRightMargin, UIView.AutoresizingMask.flexibleTopMargin, UIView.AutoresizingMask.flexibleBottomMargin]
}
5. Использование NSLayoutAnchor
override func viewDidLoad() {
    let newView = UIView()
    newView.backgroundColor = UIColor.red
    view.addSubview(newView)

    newView.translatesAutoresizingMaskIntoConstraints = false
    let horizontalConstraint = newView.centerXAnchor.constraint(equalTo: view.centerXAnchor)
    let verticalConstraint = newView.centerYAnchor.constraint(equalTo: view.centerYAnchor)
    let widthConstraint = newView.widthAnchor.constraint(equalToConstant: 100)
    let heightConstraint = newView.heightAnchor.constraint(equalToConstant: 100)
    view.addConstraints([horizontalConstraint, verticalConstraint, widthConstraint, heightConstraint])
}
override func viewDidLoad() {
    let newView = UIView()
    newView.backgroundColor = UIColor.red
    view.addSubview(newView)

    newView.translatesAutoresizingMaskIntoConstraints = false
    let horizontalConstraint = newView.centerXAnchor.constraint(equalTo: view.centerXAnchor)
    let verticalConstraint = newView.centerYAnchor.constraint(equalTo: view.centerYAnchor)
    let widthConstraint = newView.widthAnchor.constraint(equalToConstant: 100)
    let heightConstraint = newView.heightAnchor.constraint(equalToConstant: 100)
    NSLayoutConstraint.activate([horizontalConstraint, verticalConstraint, widthConstraint, heightConstraint])
}
override func viewDidLoad() {
    let newView = UIView()
    newView.backgroundColor = UIColor.red
    view.addSubview(newView)

    newView.translatesAutoresizingMaskIntoConstraints = false
    newView.centerXAnchor.constraint(equalTo: view.centerXAnchor).isActive = true
    newView.centerYAnchor.constraint(equalTo: view.centerYAnchor).isActive = true
    newView.widthAnchor.constraint(equalToConstant: 100).isActive = true
    newView.heightAnchor.constraint(equalToConstant: 100).isActive = true
}
6. Использование intrinsicContentSize а также NSLayoutAnchor
import UIKit

class CustomView: UIView {

    override var intrinsicContentSize: CGSize {
        return CGSize(width: 100, height: 100)
    }

}

class ViewController: UIViewController {

    override func viewDidLoad() {
        let newView = CustomView()
        newView.backgroundColor = UIColor.red
        view.addSubview(newView)

        newView.translatesAutoresizingMaskIntoConstraints = false
        let horizontalConstraint = newView.centerXAnchor.constraint(equalTo: view.centerXAnchor)
        let verticalConstraint = newView.centerYAnchor.constraint(equalTo: view.centerYAnchor)
        NSLayoutConstraint.activate([horizontalConstraint, verticalConstraint])
    }

}
Результат:
Это помогает мне учиться визуально, так что это дополнительный ответ.
Код котельной
override func viewDidLoad() {
    super.viewDidLoad()

    let myView = UIView()
    myView.backgroundColor = UIColor.blue
    myView.translatesAutoresizingMaskIntoConstraints = false
    view.addSubview(myView)

    // Add constraints code here
    // ...
}
Каждый из следующих примеров не зависит от других.
Закрепить левый край
myView.leading = leadingMargin + 20
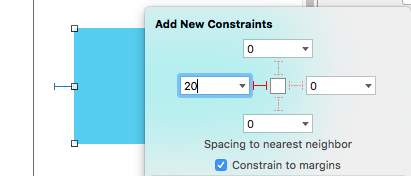
Способ 1: стиль привязки
let margins = view.layoutMarginsGuide
myView.leadingAnchor.constraint(equalTo: margins.leadingAnchor, constant: 20).isActive = true
- В дополнение к
leadingAnchor, существует такжеtrailingAnchor,topAnchor, а такжеbottomAnchor,
Способ 2: стиль NSLayoutConstraint
NSLayoutConstraint(item: myView, attribute: NSLayoutAttribute.leading, relatedBy: NSLayoutRelation.equal, toItem: view, attribute: NSLayoutAttribute.leadingMargin, multiplier: 1.0, constant: 20.0).isActive = true
- В дополнение к
.leadingсуществует также.trailing,.top, а также.bottom, - В дополнение к
.leadingMarginсуществует также.trailingMargin,.topMargin, а также.bottomMargin,
Установите ширину и высоту
width = 200height = 100
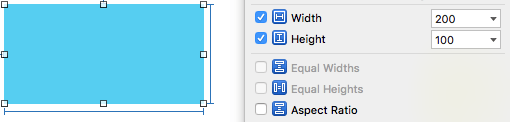
Способ 1: стиль привязки
myView.widthAnchor.constraint(equalToConstant: 200).isActive = true
myView.heightAnchor.constraint(equalToConstant: 100).isActive = true
Способ 2: стиль NSLayoutConstraint
NSLayoutConstraint(item: myView, attribute: NSLayoutAttribute.width, relatedBy: NSLayoutRelation.equal, toItem: nil, attribute: NSLayoutAttribute.notAnAttribute, multiplier: 1, constant: 200).isActive = true
NSLayoutConstraint(item: myView, attribute: NSLayoutAttribute.height, relatedBy: NSLayoutRelation.equal, toItem: nil, attribute: NSLayoutAttribute.notAnAttribute, multiplier: 1, constant: 100).isActive = true
Центр в контейнере
myView.centerX = centerXmyView.centerY = centerY
Способ 1: стиль привязки
myView.centerXAnchor.constraint(equalTo: view.centerXAnchor).isActive = true
myView.centerYAnchor.constraint(equalTo: view.centerYAnchor).isActive = true
Способ 2: стиль NSLayoutConstraint
NSLayoutConstraint(item: myView, attribute: NSLayoutAttribute.centerX, relatedBy: NSLayoutRelation.equal, toItem: view, attribute: NSLayoutAttribute.centerX, multiplier: 1, constant: 0).isActive = true
NSLayoutConstraint(item: myView, attribute: NSLayoutAttribute.centerY, relatedBy: NSLayoutRelation.equal, toItem: view, attribute: NSLayoutAttribute.centerY, multiplier: 1, constant: 0).isActive = true
Заметки
- Стиль привязки является предпочтительным методом
NSLayoutConstraintСтиль, однако он доступен только в iOS 9, поэтому, если вы поддерживаете iOS 8, вам все равно следует использоватьNSLayoutConstraintСтиль. - В приведенных выше примерах показаны только одно или два ограничения, на которые было обращено внимание. Однако для того, чтобы правильно разместить
myViewв моем тестовом проекте мне нужно было иметь четыре ограничения.
Дальнейшее чтение
- Программная документация по созданию ограничений
Если вы хотите заполнить свой супер вид, то я предлагаю быстрый способ:
    view.translatesAutoresizingMaskIntoConstraints = false
    let attributes: [NSLayoutAttribute] = [.top, .bottom, .right, .left]
    NSLayoutConstraint.activate(attributes.map {
        NSLayoutConstraint(item: view, attribute: $0, relatedBy: .equal, toItem: view.superview, attribute: $0, multiplier: 1, constant: 0)
    })
В противном случае, если вам нужны неравные ограничения, проверьте NSLayoutAnchor начиная с iOS 9. Часто гораздо проще это прочитать, используя NSLayoutConstraint напрямую:
    view.translatesAutoresizingMaskIntoConstraints = false
    view.topAnchor.constraint(equalTo: view.superview!.topAnchor).isActive = true
    view.bottomAnchor.constraint(equalTo: view.superview!.bottomAnchor).isActive = true
    view.leadingAnchor.constraint(equalTo: view.superview!.leadingAnchor, constant: 10).isActive = true
    view.trailingAnchor.constraint(equalTo: view.superview!.trailingAnchor, constant: 10).isActive = true
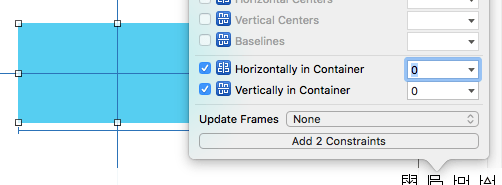
Мы можем легко сделать это в Swift 5.1
установка 1
- subview выровнять по центру просмотра
ширина подвида, высота, установленная с помощью float
view.addSubview(myView1)
myView1.translatesAutoresizingMaskIntoConstraints = false
NSLayoutConstraint.activate([
    myView1.centerXAnchor.constraint(equalTo: view.centerXAnchor),
    myView1.centerYAnchor.constraint(equalTo: view.centerYAnchor),
    myView1.widthAnchor.constraint(equalToConstant: 100),
    myView1.heightAnchor.constraint(equalToConstant: 100),
])
установка 2
- subview выровняйте, чтобы просмотреть ведущую и верхнюю привязку
ширина подпредставления устанавливается с использованием высоты ширины представления
    view.addSubview(myView2)
    myView2.translatesAutoresizingMaskIntoConstraints = false

    NSLayoutConstraint.activate([
        myView2.leadingAnchor.constraint(equalTo: view.leadingAnchor,constant: 16),
        myView2.topAnchor.constraint(equalTo: view.safeAreaLayoutGuide.topAnchor,constant: 16),
        myView2.widthAnchor.constraint(equalTo: view.widthAnchor, multiplier: 0.3),
        myView2.heightAnchor.constraint(equalTo: view.heightAnchor, multiplier: 0.3)
    ])
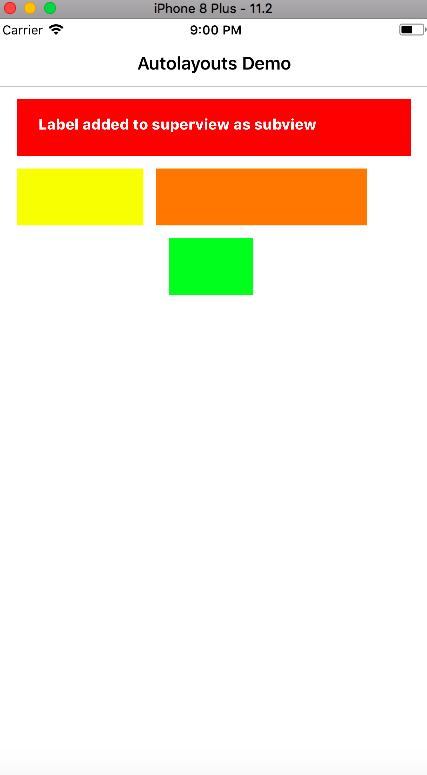
Ограничения для нескольких просмотров на детской площадке.
быстрый 3+
  var yellowView: UIView!
    var redView: UIView!

    override func loadView() {

        // UI

        let view = UIView()
        view.backgroundColor = .white

        yellowView = UIView()
        yellowView.backgroundColor = .yellow
        view.addSubview(yellowView)

        redView = UIView()
        redView.backgroundColor = .red
        view.addSubview(redView)

        // Layout
        redView.translatesAutoresizingMaskIntoConstraints = false
        yellowView.translatesAutoresizingMaskIntoConstraints = false
        NSLayoutConstraint.activate([
            yellowView.topAnchor.constraint(equalTo: view.topAnchor, constant: 20),
            yellowView.leadingAnchor.constraint(equalTo: view.leadingAnchor, constant: 20),
            yellowView.widthAnchor.constraint(equalToConstant: 80),
            yellowView.heightAnchor.constraint(equalToConstant: 80),

            redView.bottomAnchor.constraint(equalTo: view.bottomAnchor, constant: -20),
            redView.trailingAnchor.constraint(equalTo: view.trailingAnchor,constant: -20),
            redView.widthAnchor.constraint(equalToConstant: 80),
            redView.heightAnchor.constraint(equalToConstant: 80)
            ])

        self.view = view
    }
На мой взгляд, игровая площадка xcode - лучшее место для обучения программному добавлению ограничений.

В основном это включало 3 шага
fileprivate func setupName(){

lblName.text = "Hello world"

//Step 1
  lblName.translatesAutoresizingMaskIntoConstraints = false

//Step 2
  self.view.addSubview(lblName)

//Step 3
  NSLayoutConstraint.activate([
   lblName.centerXAnchor.constraint(equalTo: self.view.centerXAnchor),
   lblName.centerYAnchor.constraint(equalTo: self.view.centerYAnchor)
  ])
}
Это помещает ярлык "Привет, мир" в центр экрана.
Пожалуйста, обратитесь ссылку на ограничения Autolayout программно
Проблема, как следует из сообщения об ошибке, заключается в том, что у вас есть ограничения типа NSAutoresizingMaskLayoutConstraints что противоречит вашим явным ограничениям, потому что new_view.translatesAutoresizingMaskIntoConstraints установлен в true.
Это настройка по умолчанию для представлений, которые вы создаете в коде. Вы можете отключить его так:
var new_view:UIView! = UIView(frame: CGRectMake(0, 0, 100, 100))
new_view.translatesAutoresizingMaskIntoConstraints = false
Кроме того, ваши ограничения по ширине и высоте странные. Если вы хотите, чтобы вид имел постоянную ширину, это правильный путь:
new_view.addConstraint(NSLayoutConstraint(
    item:new_view, attribute:NSLayoutAttribute.Width,
    relatedBy:NSLayoutRelation.Equal,
    toItem:nil, attribute:NSLayoutAttribute.NotAnAttribute,
    multiplier:0, constant:100))
(Замените 100 на ту ширину, которую хотите.)
Если ваша цель развертывания - iOS 9.0 или новее, вы можете использовать этот более короткий код:
new_view.widthAnchor.constraintEqualToConstant(100).active = true
В любом случае, для такого макета (с фиксированным размером и по центру в родительском представлении) было бы проще использовать маску с автоматическим изменением размера и позволить системе преобразовать маску в ограничения:
var new_view:UIView! = UIView(frame: CGRectMake(0, 0, 100, 100))
new_view.backgroundColor = UIColor.redColor();
view.addSubview(new_view);

// This is the default setting but be explicit anyway...
new_view.translatesAutoresizingMaskIntoConstraints = true

new_view.autoresizingMask = [ .FlexibleTopMargin, .FlexibleBottomMargin,
    .FlexibleLeftMargin, .FlexibleRightMargin ]

new_view.center = CGPointMake(view.bounds.midX, view.bounds.midY)
Обратите внимание, что использование автоматического изменения размера вполне допустимо, даже если вы также используете автоматическое расположение. (UIKit все еще использует автоматическое изменение размера во многих местах внутри.) Проблема в том, что трудно применить дополнительные ограничения к представлению, которое использует автоматическое изменение размера.
Обновлено для Swift 3
import UIKit

class ViewController: UIViewController {

let redView: UIView = {

    let view = UIView()
    view.translatesAutoresizingMaskIntoConstraints = false
    view.backgroundColor = .red
    return view
}()

override func viewDidLoad() {
    super.viewDidLoad()

    setupViews()
    setupAutoLayout()
}

func setupViews() {

    view.backgroundColor = .white
    view.addSubview(redView)
}

func setupAutoLayout() {

    // Available from iOS 9 commonly known as Anchoring System for AutoLayout...
    redView.leftAnchor.constraint(equalTo: view.leftAnchor, constant: 20).isActive = true
    redView.rightAnchor.constraint(equalTo: view.rightAnchor, constant: -20).isActive = true

    redView.centerYAnchor.constraint(equalTo: view.centerYAnchor).isActive = true
    redView.heightAnchor.constraint(equalToConstant: 300).isActive = true

    // You can also modified above last two lines as follows by commenting above & uncommenting below lines...
    // redView.topAnchor.constraint(equalTo: view.topAnchor, constant: 20).isActive = true
    // redView.bottomAnchor.constraint(equalTo: view.bottomAnchor).isActive = true
 }
}

Тип ограничений
 /*
// regular use
1.leftAnchor
2.rightAnchor
3.topAnchor
// intermediate use
4.widthAnchor
5.heightAnchor
6.bottomAnchor
7.centerXAnchor
8.centerYAnchor
// rare use
9.leadingAnchor
10.trailingAnchor
etc. (note: very project to project)
*/
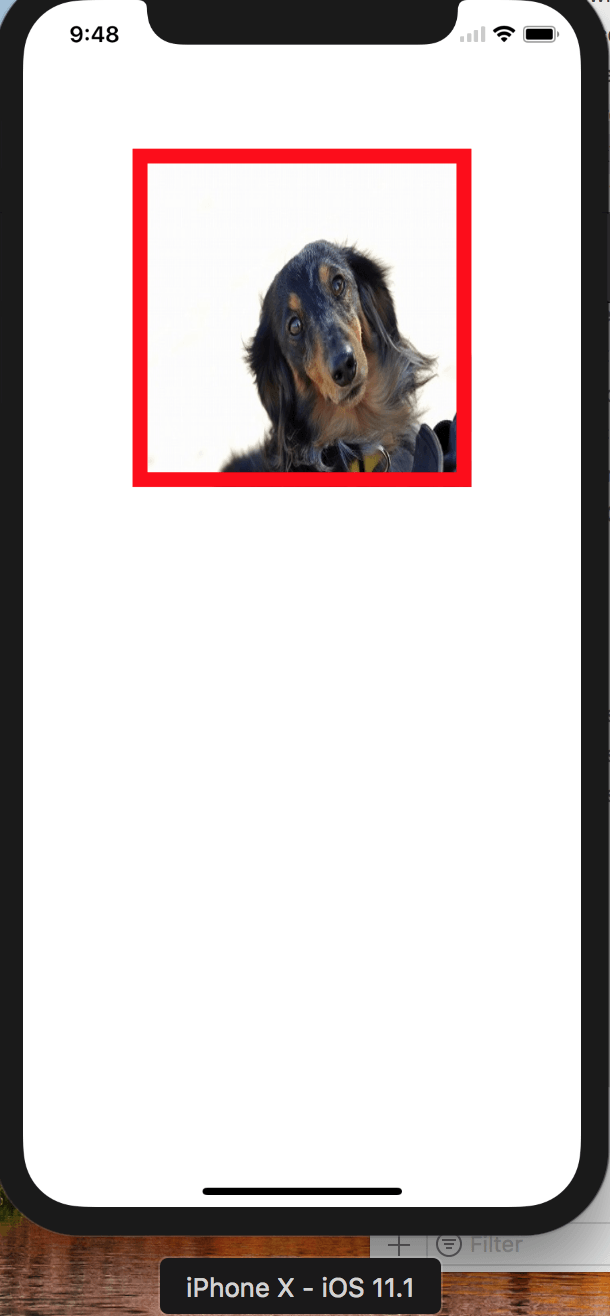
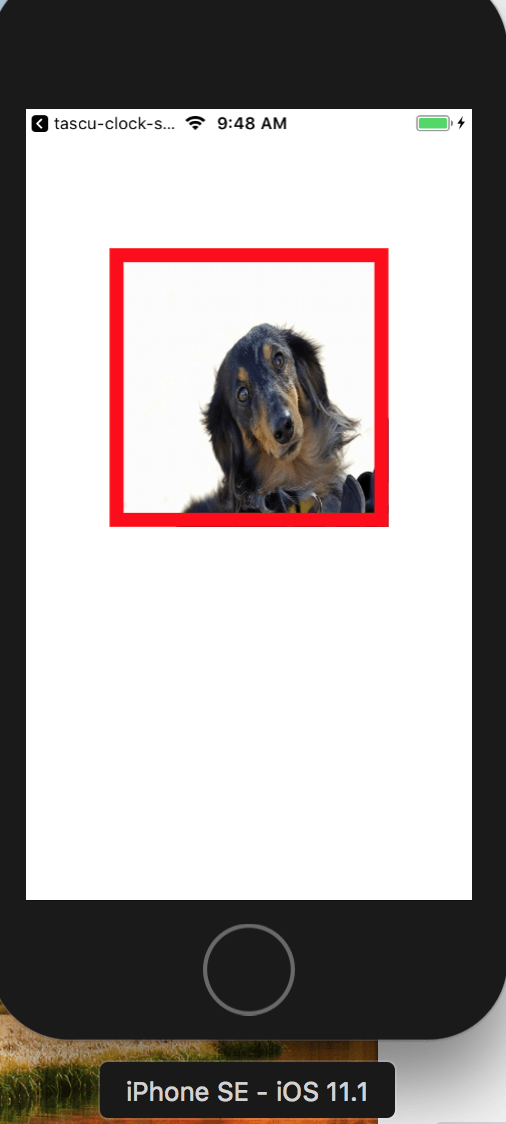
Авто макет реализуется путем наложения ограничений на изображения. Используйте NSLayoutConstraint. Можно реализовать идеальный и красивый дизайн на всех устройствах. Пожалуйста, попробуйте код ниже.
import UIKit

class ViewController: UIViewController {

override func viewDidLoad() {
super.viewDidLoad()

let myImageView:UIImageView = UIImageView()
myImageView.backgroundColor = UIColor.red
myImageView.image = UIImage(named:"sample_dog")!
myImageView.translatesAutoresizingMaskIntoConstraints = false
myImageView.layer.borderColor = UIColor.red.cgColor
myImageView.layer.borderWidth = 10
self.view.addSubview(myImageView)

view.removeConstraints(view.constraints)


view.addConstraint(NSLayoutConstraint(
item: myImageView,
attribute: .top,
relatedBy: .equal,
toItem: view,
attribute: .top,
multiplier: 1,
constant:100)

)

view.addConstraint(NSLayoutConstraint(
item: myImageView,
attribute: .centerX,
relatedBy: .equal,
toItem: view,
attribute: .centerX,
multiplier: 1,
constant:0)
)

view.addConstraint(NSLayoutConstraint(
item: myImageView,
attribute: .height,
relatedBy: .equal,
toItem: view,
attribute: .width,
multiplier: 0.5,
constant:40))

view.addConstraint(NSLayoutConstraint(
item: myImageView,
attribute: .width,
relatedBy: .equal,
toItem: view,
attribute: .width,
multiplier: 0.5,
constant:40))

}

override func didReceiveMemoryWarning() {
    super.didReceiveMemoryWarning()
}
}
в этом сценарии у меня работает следующий код: принудительный ландшафт UIImageView.
          imagePreview!.isUserInteractionEnabled = true
    imagePreview!.isExclusiveTouch = true
    imagePreview!.contentMode = UIView.ContentMode.scaleAspectFit

    // Remove all constraints
    imagePreview!.removeAllConstraints()

    // Add the new constraints
    let guide = view.safeAreaLayoutGuide
    imagePreview!.translatesAutoresizingMaskIntoConstraints = false
    imagePreview!.leadingAnchor.constraint(equalTo: guide.leadingAnchor).isActive = true
    imagePreview!.trailingAnchor.constraint(equalTo: guide.trailingAnchor).isActive = true
    imagePreview!.heightAnchor.constraint(equalTo: guide.heightAnchor, multiplier: 1.0).isActive = true
где removeAllConstraints - это расширение
      extension UIView {

    func removeAllConstraints() {
        var _superview = self.superview

        func removeAllConstraintsFromView(view: UIView) { for c in view.constraints { view.removeConstraint(c) } }

        while let superview = _superview {
            for constraint in superview.constraints {

                if let first = constraint.firstItem as? UIView, first == self {
                    superview.removeConstraint(constraint)
                }

                if let second = constraint.secondItem as? UIView, second == self {
                    superview.removeConstraint(constraint)
                }
            }

            _superview = superview.superview
        }

        self.removeConstraints(self.constraints)
        self.translatesAutoresizingMaskIntoConstraints = true
    }
}
Если вы находите, что выше, уродливо. Вы должны рассмотреть возможность использования DSL для ограничений. Например, SnapKit делает API-интерфейс ограничений намного более удобным для пользователя
view.snp.makeConstraints { make in
    make.edges.equalToSuperview()
}
Хотелось бы добавить теоретическую концепцию к ответу Иману Пети, чтобы понять, как работает автоматическая разметка.
Чтобы понять автоматическую компоновку, рассмотрите ваш вид как резиновый объект, который изначально сжимается.
Для размещения объекта на экране нам нужно 4 обязательных элемента:
Координата X объекта (горизонтальное положение).
Y координата объекта (вертикальное положение)
Ширина объекта
Высота объекта.
1 X-координата: существует несколько способов задания x-координат для вида.
Например, Ведущее ограничение, Трейлинг-ограничение, Горизонтальный центр и т. Д.
2 Координата Y: существует несколько способов задания координат y:
Например, ограничение сверху, ограничение снизу, вертикальный центр и т. Д.
3 Ширина объекта: существует два способа задания ширины для вида:
а. Добавьте фиксированное ограничение ширины (рассмотрите это ограничение как железный прут фиксированной ширины, и вы зацепили им объект вашей резины горизонтально, чтобы объект резины не сжимался и не расширялся)
б. Не добавляйте никаких ограничений по ширине, но добавьте ограничение по координатам x к обоим концам и в начале конца вида, эти два ограничения будут расширять / уменьшать объект вашей резины, вытягивая / толкая его как с конца, так и с начала и конца.
4 Высота объекта: аналогично ширине, есть также два способа ограничения высоты вида:
а. Добавьте фиксированное ограничение высоты (рассмотрите это ограничение как железный прут фиксированной высоты, и вы зацепили его резиновый объект вертикально, чтобы резиновый объект не сжимался и не расширялся)
б. Не добавляйте никаких ограничений по высоте, но добавьте ограничение по координатам x к обоим концам вида сверху и снизу, эти два ограничения будут расширять / уменьшать объект вашей резины, вытягивая / толкая его как с конца, сверху и снизу.
Это один из способов добавления ограничений программно
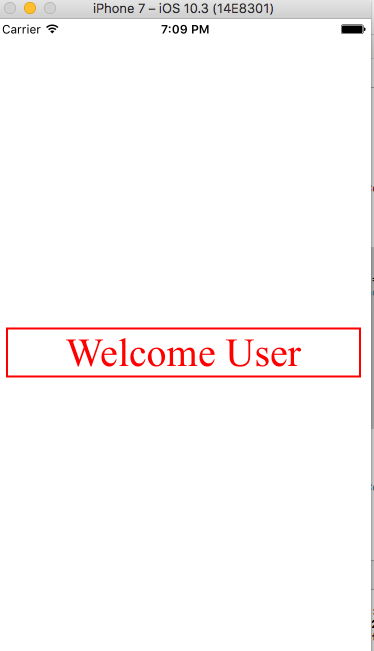
override func viewDidLoad() {
            super.viewDidLoad()


let myLabel = UILabel()
        myLabel.labelFrameUpdate(label: myLabel, text: "Welcome User", font: UIFont(name: "times new roman", size: 40)!, textColor: UIColor.red, textAlignment: .center, numberOfLines: 0, borderWidth: 2.0, BorderColor: UIColor.red.cgColor)
        self.view.addSubview(myLabel)


         let myLabelhorizontalConstraint = NSLayoutConstraint(item: myLabel, attribute: NSLayoutAttribute.centerX, relatedBy: NSLayoutRelation.equal, toItem: self.view, attribute: NSLayoutAttribute.centerX, multiplier: 1, constant: 0)
        let myLabelverticalConstraint = NSLayoutConstraint(item: myLabel, attribute: NSLayoutAttribute.centerY, relatedBy: NSLayoutRelation.equal, toItem: self.view, attribute: NSLayoutAttribute.centerY, multiplier: 1, constant: 0)
        let mylabelLeading = NSLayoutConstraint(item: myLabel, attribute: NSLayoutAttribute.leading, relatedBy: NSLayoutRelation.equal, toItem: self.view, attribute: NSLayoutAttribute.leading, multiplier: 1, constant: 10)
        let mylabelTrailing = NSLayoutConstraint(item: myLabel, attribute: NSLayoutAttribute.trailing, relatedBy: NSLayoutRelation.equal, toItem: self.view, attribute: NSLayoutAttribute.trailing, multiplier: 1, constant: -10)
        let myLabelheightConstraint = NSLayoutConstraint(item: myLabel, attribute: NSLayoutAttribute.height, relatedBy: NSLayoutRelation.equal, toItem: nil, attribute: NSLayoutAttribute.notAnAttribute, multiplier: 1, constant: 50)
        NSLayoutConstraint.activate(\[myLabelhorizontalConstraint, myLabelverticalConstraint, myLabelheightConstraint,mylabelLeading,mylabelTrailing\])
}

extension UILabel
{
    func labelFrameUpdate(label:UILabel,text:String = "This is sample Label",font:UIFont = UIFont(name: "times new roman", size: 20)!,textColor:UIColor = UIColor.red,textAlignment:NSTextAlignment = .center,numberOfLines:Int = 0,borderWidth:CGFloat = 2.0,BorderColor:CGColor = UIColor.red.cgColor){
        label.translatesAutoresizingMaskIntoConstraints = false
        label.text = text
        label.font = font
        label.textColor = textColor
        label.textAlignment = textAlignment
        label.numberOfLines = numberOfLines
        label.layer.borderWidth = borderWidth
        label.layer.borderColor = UIColor.red.cgColor
    }
}
Это немного отличается в xcode 7.3.1. это то, что я придумала
   // creating the view
        let newView = UIView()
        newView.backgroundColor = UIColor.redColor()
        newView.translatesAutoresizingMaskIntoConstraints = false
        view.addSubview(newView)

        // creating the constraint

        // attribute and relation cannot be set directyl you need to create a cariable of them
        let layout11 = NSLayoutAttribute.CenterX
        let layout21 = NSLayoutRelation.Equal
        let layout31 = NSLayoutAttribute.CenterY
        let layout41 = NSLayoutAttribute.Width
        let layout51 = NSLayoutAttribute.Height
        let layout61 = NSLayoutAttribute.NotAnAttribute

        // defining all the constraint
        let horizontalConstraint = NSLayoutConstraint(item: newView, attribute: layout11, relatedBy: layout21, toItem: view, attribute: layout11, multiplier: 1, constant: 0)
        let verticalConstraint = NSLayoutConstraint(item: newView, attribute: layout31, relatedBy: layout21, toItem: view, attribute: layout31, multiplier: 1, constant: 0)
        let widthConstraint = NSLayoutConstraint(item: newView, attribute: layout41, relatedBy: layout21, toItem: nil, attribute: layout61, multiplier: 1, constant: 100)
        let heightConstraint = NSLayoutConstraint(item: newView, attribute: layout51, relatedBy: layout21, toItem: nil, attribute: layout61, multiplier: 1, constant: 100)

        // adding all the constraint
        NSLayoutConstraint.activateConstraints([horizontalConstraint,verticalConstraint,widthConstraint,heightConstraint])
Попробуйте этот элегантный UIViewрасширение для ограничений. Вы можете легко сделать ограничения, как:
 - firstView.coverWholeSuperview()
 - firstView.constraints(size: CGSize(width: 44, height: 44), centerX: view.centerXAnchor, centerY: view.centerXAnchor)
 - firstView.constraints(top: view.topAnchor,
                         leading: secondView.leadingAnchor,
                         bottom: view.bottomAnchor,
                         trailing: secondView.trailingAnchor,
                         padding: UIEdgeInsets(top: 12, left: 12, bottom: 12, right: 12))
Вот расширение, просто скопируйте его в свой проект.
extension UIView {
    /// Attaches all sides of the receiver to its parent view
    func coverWholeSuperview(margin: CGFloat = 0.0) {
        let view = superview
        layoutAttachTop(to: view, margin: margin)
        layoutAttachBottom(to: view, margin: margin)
        layoutAttachLeading(to: view, margin: margin)
        layoutAttachTrailing(to: view, margin: margin)

    }

    /// Attaches the top of the current view to the given view's top if it's a superview of the current view
    /// or to it's bottom if it's not (assuming this is then a sibling view).
    @discardableResult
    func layoutAttachTop(to: UIView? = nil, margin: CGFloat = 0.0) -> NSLayoutConstraint {

        let view: UIView? = to ?? superview
        let isSuperview = view == superview
        let constraint = NSLayoutConstraint(item: self, attribute: .top, relatedBy: .equal,
                                            toItem: view, attribute: isSuperview ? .top : .bottom, multiplier: 1.0,
                                            constant: margin)
        superview?.addConstraint(constraint)

        return constraint
    }

    /// Attaches the bottom of the current view to the given view
    @discardableResult
    func layoutAttachBottom(to: UIView? = nil, margin: CGFloat = 0.0, priority: UILayoutPriority? = nil) -> NSLayoutConstraint {

        let view: UIView? = to ?? superview
        let isSuperview = (view == superview) || false
        let constraint = NSLayoutConstraint(item: self, attribute: .bottom, relatedBy: .equal,
                                            toItem: view, attribute: isSuperview ? .bottom : .top, multiplier: 1.0,
                                            constant: -margin)
        if let priority = priority {
            constraint.priority = priority
        }
        superview?.addConstraint(constraint)

        return constraint
    }

    /// Attaches the leading edge of the current view to the given view
    @discardableResult
    func layoutAttachLeading(to: UIView? = nil, margin: CGFloat = 0.0) -> NSLayoutConstraint {

        let view: UIView? = to ?? superview
        let isSuperview = (view == superview) || false
        let constraint = NSLayoutConstraint(item: self, attribute: .leading, relatedBy: .equal,
                                            toItem: view, attribute: isSuperview ? .leading : .trailing, multiplier: 1.0,
                                            constant: margin)
        superview?.addConstraint(constraint)

        return constraint
    }

    /// Attaches the trailing edge of the current view to the given view
    @discardableResult
    func layoutAttachTrailing(to: UIView? = nil, margin: CGFloat = 0.0, priority: UILayoutPriority? = nil) -> NSLayoutConstraint {

        let view: UIView? = to ?? superview
        let isSuperview = (view == superview) || false
        let constraint = NSLayoutConstraint(item: self, attribute: .trailing, relatedBy: .equal,
                                            toItem: view, attribute: isSuperview ? .trailing : .leading, multiplier: 1.0,
                                            constant: -margin)
        if let priority = priority {
            constraint.priority = priority
        }
        superview?.addConstraint(constraint)

        return constraint
    }

    // For anchoring View
    struct AnchoredConstraints {
        var top, leading, bottom, trailing, width, height, centerX, centerY: NSLayoutConstraint?
    }

    @discardableResult
    func constraints(top: NSLayoutYAxisAnchor? = nil, leading: NSLayoutXAxisAnchor? = nil, bottom: NSLayoutYAxisAnchor? = nil,
                trailing: NSLayoutXAxisAnchor? = nil, padding: UIEdgeInsets = .zero, size: CGSize = .zero,
                centerX: NSLayoutXAxisAnchor? = nil, centerY: NSLayoutYAxisAnchor? = nil,
                centerXOffset: CGFloat = 0, centerYOffset: CGFloat = 0) -> AnchoredConstraints {

        translatesAutoresizingMaskIntoConstraints = false
        var anchoredConstraints = AnchoredConstraints()

        if let top = top {
            anchoredConstraints.top = topAnchor.constraint(equalTo: top, constant: padding.top)
        }

        if let leading = leading {
            anchoredConstraints.leading = leadingAnchor.constraint(equalTo: leading, constant: padding.left)
        }

        if let bottom = bottom {
            anchoredConstraints.bottom = bottomAnchor.constraint(equalTo: bottom, constant: -padding.bottom)
        }

        if let trailing = trailing {
            anchoredConstraints.trailing = trailingAnchor.constraint(equalTo: trailing, constant: -padding.right)
        }

        if size.width != 0 {
            anchoredConstraints.width = widthAnchor.constraint(equalToConstant: size.width)
        }

        if size.height != 0 {
            anchoredConstraints.height = heightAnchor.constraint(equalToConstant: size.height)
        }

        if let centerX = centerX {
            anchoredConstraints.centerX = centerXAnchor.constraint(equalTo: centerX, constant: centerXOffset)
        }

        if let centerY = centerY {
            anchoredConstraints.centerY = centerYAnchor.constraint(equalTo: centerY, constant: centerYOffset)
        }

        [anchoredConstraints.top, anchoredConstraints.leading, anchoredConstraints.bottom,
         anchoredConstraints.trailing, anchoredConstraints.width,
         anchoredConstraints.height, anchoredConstraints.centerX,
         anchoredConstraints.centerY].forEach { $0?.isActive = true }

        return anchoredConstraints
    }
}
    var xCenterConstraint : NSLayoutConstraint!
    var yCenterConstraint: NSLayoutConstraint!

 xCenterConstraint = NSLayoutConstraint(item: self.view, attribute: .CenterX, relatedBy: .Equal, toItem: (Your view NAme), attribute: .CenterX, multiplier: 1, constant: 0)
            self.view.addConstraint(xCenterConstraint)

 yCenterConstraint = NSLayoutConstraint(item: self.view, attribute: .CenterY, relatedBy: .Equal, toItem: (Your view Name), attribute: .CenterY, multiplier: 1, constant: 0)
            self.view.addConstraint(yCenterConstraint)
Вы добавляете все определенные ограничения в self.view что неправильно, так как ограничения ширины и высоты должны быть добавлены к вашему newView,
Также, насколько я понимаю, вы хотите установить постоянную ширину и высоту 100:100. В этом случае вы должны изменить свой код на:
var constW = NSLayoutConstraint(item: newView,
    attribute: .Width,
    relatedBy: .Equal,
    toItem: nil,
    attribute: .NotAnAttribute,
    multiplier: 1,
    constant: 100)
newView.addConstraint(constW)

var constH = NSLayoutConstraint(item: newView,
    attribute: .Height,
    relatedBy: .Equal,
    toItem: nil,
    attribute: .NotAnAttribute,
    multiplier: 1,
    constant: 100)
newView.addConstraint(constH)
Вы можете использовать Snapkit для программной установки ограничений.
      class ViewController: UIViewController {

    let rectView: UIView = UIView(frame: CGRect(x: 0, y: 0, width: 100, height: 100))

    override func viewDidLoad() {
        super.viewDidLoad()
        setupViews()
    }

    private func setupViews() {
        rectView.backgroundColor = .red
        view.addSubview(rectView)

        rectView.snp.makeConstraints {
          $0.center.equalToSuperview()
        }
    }
}
Ошибка вызвана ограничениями, автоматически создаваемыми из маски автоизменения размеров, они создаются потому, что свойство UIView translatesAutoresizingMaskIntoConstraints имеет значение true по умолчанию.
Рассмотрите возможность использования BoxView, чтобы избавиться от всех шаблонов ручного создания ограничений и сделать ваш код кратким и читабельным. Сделать рассматриваемый макет с помощью BoxView очень просто:
boxView.items = [
   new_view.boxed.centerX().centerY().relativeWidth(1.0).relativeHeight(1.0)
]
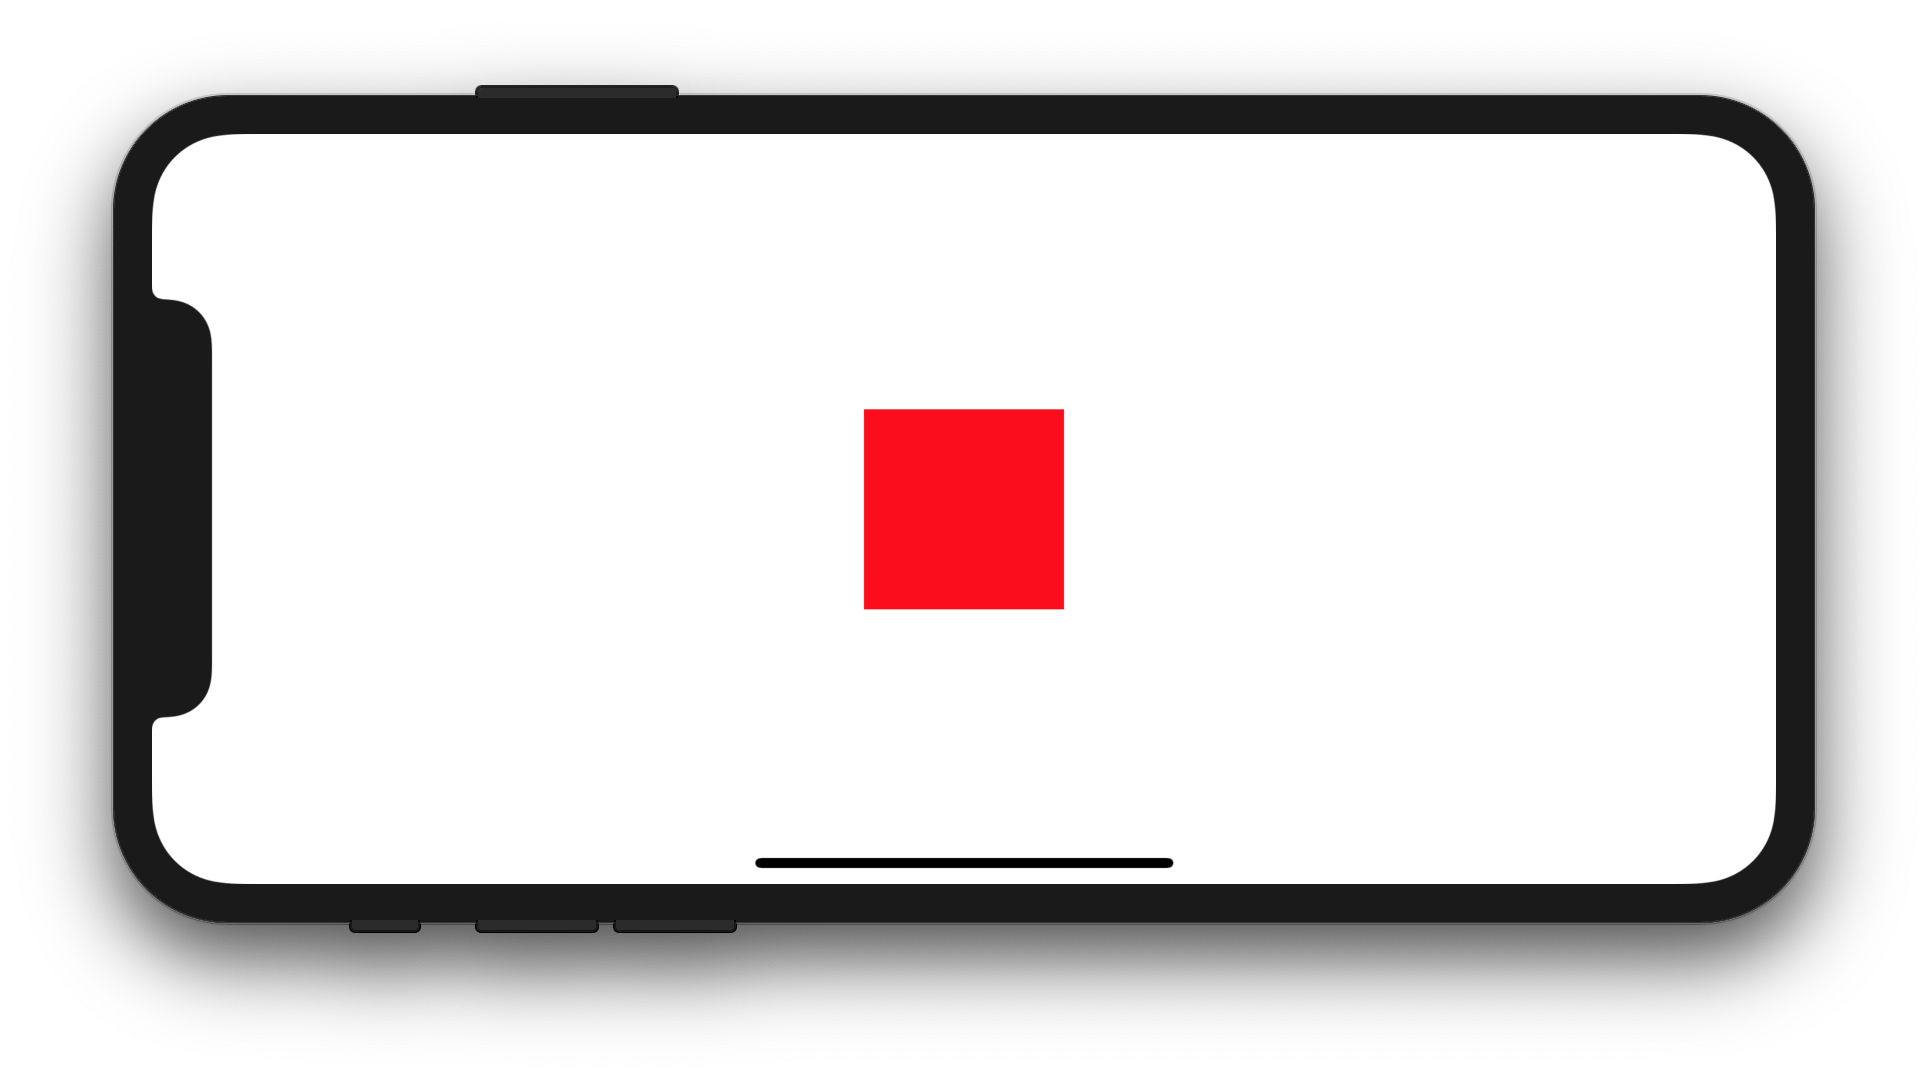
Я создал эти взгляды на данном рис. используя Autolayout программно. Вы получите глубокое понимание ограничений и как они должны применяться правильно.
Вы можете отослать это здесь "Введение в Autolayout"