Python matplotlib несколько баров
Как построить несколько баров в matplotlib, когда я попытался вызвать функцию баров несколько раз, они перекрываются и, как видно на рисунке ниже, видно только самое высокое значение красного цвета. Как я могу построить несколько баров с датами на осях х?
Пока что я попробовал это:
import matplotlib.pyplot as plt
  import datetime

    x = [datetime.datetime(2011, 1, 4, 0, 0),
         datetime.datetime(2011, 1, 5, 0, 0),
         datetime.datetime(2011, 1, 6, 0, 0)]
    y = [4, 9, 2]
    z=[1,2,3]
    k=[11,12,13]

    ax = plt.subplot(111)
    ax.bar(x, y,width=0.5,color='b',align='center')
    ax.bar(x, z,width=0.5,color='g',align='center')
    ax.bar(x, k,width=0.5,color='r',align='center')
    ax.xaxis_date()

    plt.show()
Я получил это:
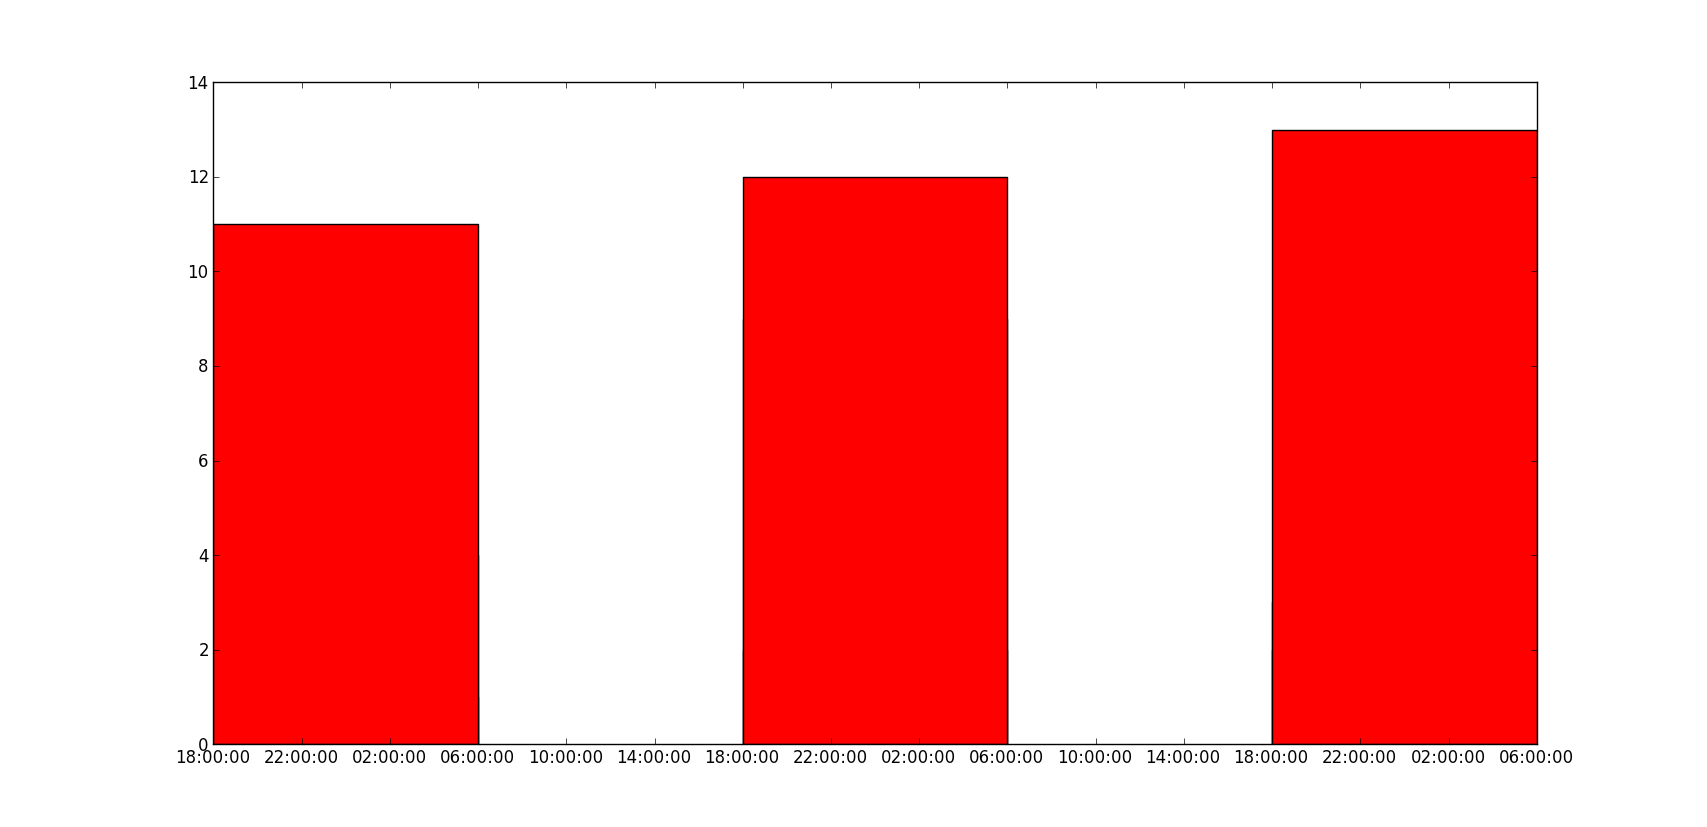
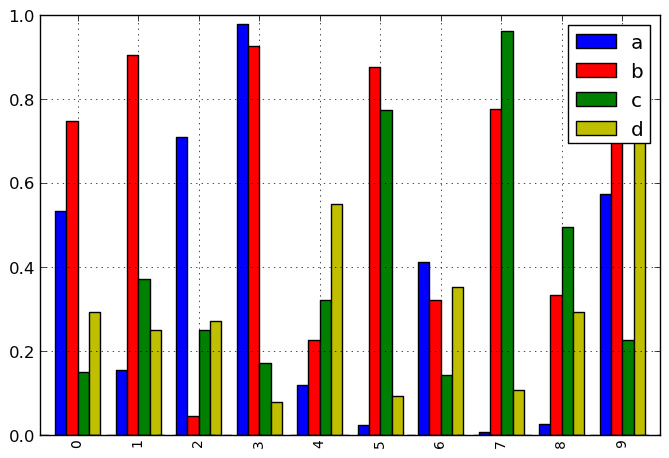
Результаты должны быть что-то вроде, но с датами на осях X и столбцы рядом друг с другом:
10 ответов
import matplotlib.pyplot as plt
from matplotlib.dates import date2num
import datetime

x = [datetime.datetime(2011, 1, 4, 0, 0),
     datetime.datetime(2011, 1, 5, 0, 0),
     datetime.datetime(2011, 1, 6, 0, 0)]
x = date2num(x)

y = [4, 9, 2]
z=[1,2,3]
k=[11,12,13]

ax = plt.subplot(111)
ax.bar(x-0.2, y,width=0.2,color='b',align='center')
ax.bar(x, z,width=0.2,color='g',align='center')
ax.bar(x+0.2, k,width=0.2,color='r',align='center')
ax.xaxis_date()

plt.show()

Я не знаю, что означает "значения y также перекрываются", решает ли следующий код вашу проблему?
ax = plt.subplot(111)
w = 0.3
ax.bar(x-w, y,width=w,color='b',align='center')
ax.bar(x, z,width=w,color='g',align='center')
ax.bar(x+w, k,width=w,color='r',align='center')
ax.xaxis_date()
ax.autoscale(tight=True)

plt.show()

Проблема с использованием дат в качестве значений x состоит в том, что если вам нужна гистограмма, как на втором рисунке, они будут неправильными. Вам следует либо использовать столбчатую диаграмму с накоплением (цвета друг над другом) или сгруппировать по дате ("фиктивная" дата на оси х, в основном просто группировка точек данных).
import numpy as np
import matplotlib.pyplot as plt

N = 3
ind = np.arange(N)  # the x locations for the groups
width = 0.27       # the width of the bars

fig = plt.figure()
ax = fig.add_subplot(111)

yvals = [4, 9, 2]
rects1 = ax.bar(ind, yvals, width, color='r')
zvals = [1,2,3]
rects2 = ax.bar(ind+width, zvals, width, color='g')
kvals = [11,12,13]
rects3 = ax.bar(ind+width*2, kvals, width, color='b')

ax.set_ylabel('Scores')
ax.set_xticks(ind+width)
ax.set_xticklabels( ('2011-Jan-4', '2011-Jan-5', '2011-Jan-6') )
ax.legend( (rects1[0], rects2[0], rects3[0]), ('y', 'z', 'k') )

def autolabel(rects):
    for rect in rects:
        h = rect.get_height()
        ax.text(rect.get_x()+rect.get_width()/2., 1.05*h, '%d'%int(h),
                ha='center', va='bottom')

autolabel(rects1)
autolabel(rects2)
autolabel(rects3)

plt.show()
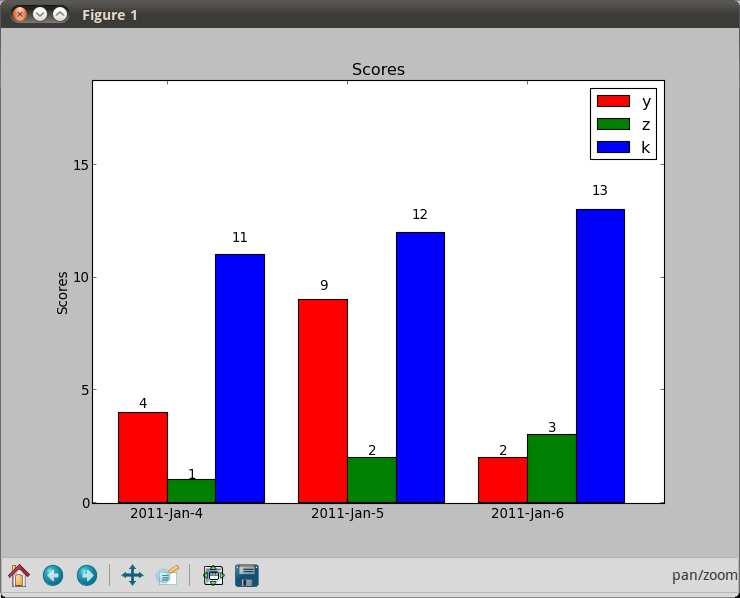
После поиска аналогичного решения и не найдя ничего достаточно гибкого, я решил написать для него свою собственную функцию. Это позволяет вам иметь столько полос в группе, сколько вы хотите, и указывать как ширину группы, так и индивидуальную ширину полос внутри групп.
Наслаждаться:
from matplotlib import pyplot as plt


def bar_plot(ax, data, colors=None, total_width=0.8, single_width=1, legend=True):
    """Draws a bar plot with multiple bars per data point.

    Parameters
    ----------
    ax : matplotlib.pyplot.axis
        The axis we want to draw our plot on.

    data: dictionary
        A dictionary containing the data we want to plot. Keys are the names of the
        data, the items is a list of the values.

        Example:
        data = {
            "x":[1,2,3],
            "y":[1,2,3],
            "z":[1,2,3],
        }

    colors : array-like, optional
        A list of colors which are used for the bars. If None, the colors
        will be the standard matplotlib color cyle. (default: None)

    total_width : float, optional, default: 0.8
        The width of a bar group. 0.8 means that 80% of the x-axis is covered
        by bars and 20% will be spaces between the bars.

    single_width: float, optional, default: 1
        The relative width of a single bar within a group. 1 means the bars
        will touch eachother within a group, values less than 1 will make
        these bars thinner.

    legend: bool, optional, default: True
        If this is set to true, a legend will be added to the axis.
    """

    # Check if colors where provided, otherwhise use the default color cycle
    if colors is None:
        colors = plt.rcParams['axes.prop_cycle'].by_key()['color']

    # Number of bars per group
    n_bars = len(data)

    # The width of a single bar
    bar_width = total_width / n_bars

    # List containing handles for the drawn bars, used for the legend
    bars = []

    # Iterate over all data
    for i, (name, values) in enumerate(data.items()):
        # The offset in x direction of that bar
        x_offset = (i - n_bars / 2) * bar_width + bar_width / 2

        # Draw a bar for every value of that type
        for x, y in enumerate(values):
            bar = ax.bar(x + x_offset, y, width=bar_width * single_width, color=colors[i % len(colors)])

        # Add a handle to the last drawn bar, which we'll need for the legend
        bars.append(bar[0])

    # Draw legend if we need
    if legend:
        ax.legend(bars, data.keys())


if __name__ == "__main__":
    # Usage example:
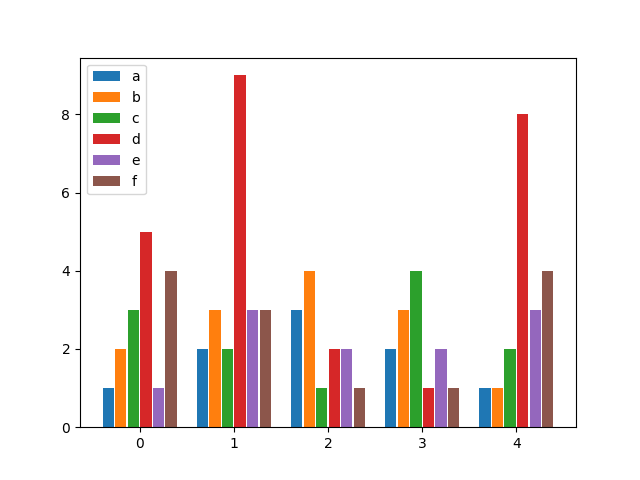
    data = {
        "a": [1, 2, 3, 2, 1],
        "b": [2, 3, 4, 3, 1],
        "c": [3, 2, 1, 4, 2],
        "d": [5, 9, 2, 1, 8],
        "e": [1, 3, 2, 2, 3],
        "f": [4, 3, 1, 1, 4],
    }

    fig, ax = plt.subplots()
    bar_plot(ax, data, total_width=.8, single_width=.9)
    plt.show()
Выход:
Я знаю, что это о matplotlib, но используя pandas а также seaborn может сэкономить вам много времени:
df = pd.DataFrame(zip(x*3, ["y"]*3+["z"]*3+["k"]*3, y+z+k), columns=["time", "kind", "data"])
plt.figure(figsize=(10, 6))
sns.barplot(x="time", hue="kind", y="data", data=df)
plt.show()
ht tps:https://stackru.com/images/6211b694a46e5cdbeba0d7ef7e1f7288bc951ff7.png
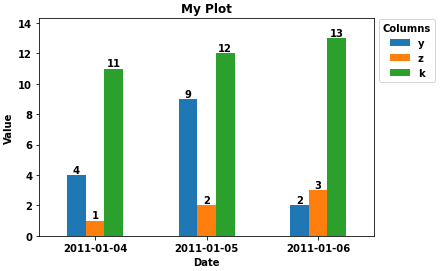
- Основываясь на существующих ответах, самое простое решение, учитывая данные в OP, - загрузить данные в фрейм данных правильным образом и построить график с .
- Загрузите списки значений в pandas с помощью
dictи укажитеxкак индекс. Индекс будет автоматически установлен в качестве оси x, а столбцы будут нанесены на график в виде столбцов. -
pandas.DataFrame.plotиспользуетmatplotlibкак бэкэнд по умолчанию.
- Загрузите списки значений в pandas с помощью
- Проверено в
python 3.8.11,pandas 1.3.2,matplotlib 3.4.3
      import pandas as pd

# using the existing lists from the OP, create the dataframe
df = pd.DataFrame(data={'y': y, 'z': z, 'k': k}, index=x)

# since there's no time component and x was a datetime dtype, set the index to be just the date
df.index = df.index.date

# display(df)
            y  z   k
2011-01-04  4  1  11
2011-01-05  9  2  12
2011-01-06  2  3  13

# plot bars or kind='barh' for horizontal bars; adjust figsize accordingly
ax = df.plot(kind='bar', rot=0, xlabel='Date', ylabel='Value', title='My Plot', figsize=(6, 4))

# add some labels
for c in ax.containers:
    # set the bar label
    ax.bar_label(c, fmt='%.0f', label_type='edge')

# add a little space at the top of the plot for the annotation
ax.margins(y=0.1)

# move the legend out of the plot
ax.legend(title='Columns', bbox_to_anchor=(1, 1.02), loc='upper left')
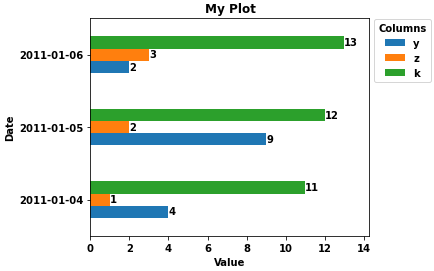
- Горизонтальные полосы, когда столбцов больше
      ax = df.plot(kind='barh', ylabel='Date', title='My Plot', figsize=(5, 4))
ax.set(xlabel='Value')
for c in ax.containers:
    # set the bar label
    ax.bar_label(c, fmt='%.0f', label_type='edge')

ax.margins(x=0.1)

# move the legend out of the plot
ax.legend(title='Columns', bbox_to_anchor=(1, 1.02), loc='upper left')
Я изменил решение pascscha, расширив интерфейс, надеюсь, это поможет кому-то другому! Ключевая особенность:
- Переменное количество записей на группу стержней
- Настраиваемые цвета
- Обработка x тиков
- Полностью настраиваемые метки полосок поверх полос
      def bar_plot(ax, data, group_stretch=0.8, bar_stretch=0.95,
             legend=True, x_labels=True, label_fontsize=8,
             colors=None, barlabel_offset=1,
             bar_labeler=lambda k, i, s: str(round(s, 3))):
    """
    Draws a bar plot with multiple bars per data point.
    :param dict data: The data we want to plot, wher keys are the names of each
      bar group, and items is a list of bar values for the corresponding group.
    :param float group_stretch: 1 means groups occupy the most (largest groups
      touch side to side if they have equal number of bars).
    :param float bar_stretch: If 1, bars within a group will touch side to side.
    :param bool x_labels: If true, x-axis will contain labels with the group
      names given at data, centered at the bar group.
    :param int label_fontsize: Font size for the label on top of each bar.
    :param float barlabel_offset: Distance, in y-values, between the top of the
      bar and its label.
    :param function bar_labeler: If not None, must be a functor with signature
      ``f(group_name, i, scalar)->str``, where each scalar is the entry found at
      data[group_name][i]. When given, returns a label to put on the top of each
      bar. Otherwise no labels on top of bars.
    """
    sorted_data = list(sorted(data.items(), key=lambda elt: elt[0]))
    sorted_k, sorted_v  = zip(*sorted_data)
    max_n_bars = max(len(v) for v in data.values())
    group_centers = np.cumsum([max_n_bars
                               for _ in sorted_data]) - (max_n_bars / 2)
    bar_offset = (1 - bar_stretch) / 2
    bars = defaultdict(list)
    #
    if colors is None:
        colors = {g_name: [f"C{i}" for _ in values]
                  for i, (g_name, values) in enumerate(data.items())}
    #
    for g_i, ((g_name, vals), g_center) in enumerate(zip(sorted_data,
                                                         group_centers)):
        n_bars = len(vals)
        group_beg = g_center - (n_bars / 2) + (bar_stretch / 2)
        for val_i, val in enumerate(vals):
            bar = ax.bar(group_beg + val_i + bar_offset,
                         height=val, width=bar_stretch,
                         color=colors[g_name][val_i])[0]
            bars[g_name].append(bar)
            if  bar_labeler is not None:
                x_pos = bar.get_x() + (bar.get_width() / 2.0)
                y_pos = val + barlabel_offset
                barlbl = bar_labeler(g_name, val_i, val)
                ax.text(x_pos, y_pos, barlbl, ha="center", va="bottom",
                        fontsize=label_fontsize)
    if legend:
        ax.legend([bars[k][0] for k in sorted_k], sorted_k)
    #
    ax.set_xticks(group_centers)
    if x_labels:
        ax.set_xticklabels(sorted_k)
    else:
        ax.set_xticklabels()
    return bars, group_centers
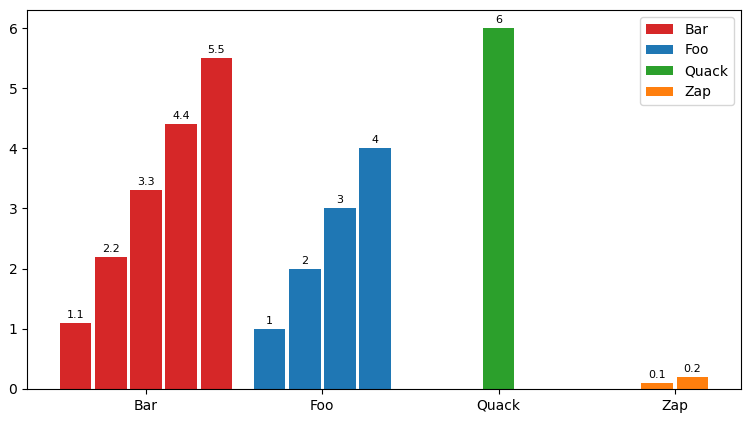
Пробный прогон:
      fig, ax = plt.subplots()
data = {"Foo": [1, 2, 3, 4], "Zap": [0.1, 0.2], "Quack": [6], "Bar": [1.1, 2.2, 3.3, 4.4, 5.5]}
bar_plot(ax, data, group_stretch=0.8, bar_stretch=0.95, legend=True,
         labels=True, label_fontsize=8, barlabel_offset=0.05,
         bar_labeler=lambda k, i, s: str(round(s, 3)))
fig.show()
Я сделал это решение: если вы хотите построить более одного графика на одной фигуре, убедитесь, что перед построением следующих графиков вы правильно настроили matplotlib.pyplot.hold(True)чтобы добавить еще один участок.
Что касается значений даты и времени по оси X, у меня работает решение с использованием выравнивания полос. Когда вы создаете еще один гистограмму с matplotlib.pyplot.bar()Просто используйте align='edge|center' и установить width='+|-distance',
Когда вы установите все бары (графики) правильно, вы увидите, что бары в порядке.
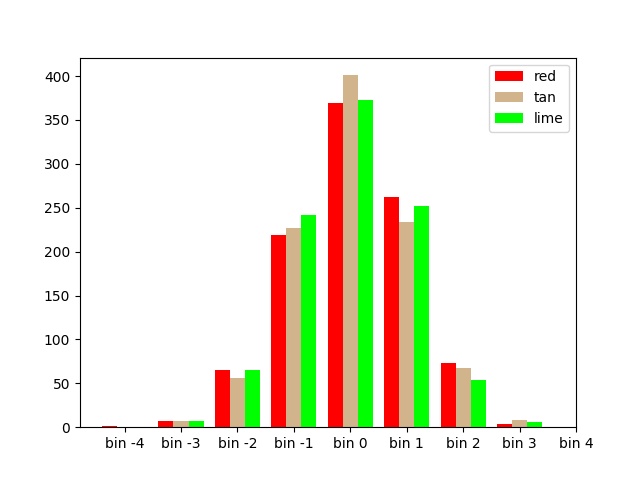
Используйте 2D-структуру данных и позвольте matplotlib обработать интервал между столбцами:
import numpy as np
import matplotlib.pyplot as plt

x = np.random.randn(1000, 3)
bins = np.arange(-4.5, 4.5, 1)
colors = ['red', 'tan', 'lime']

plt.hist(x, bins=bins, color=colors, label=colors)
plt.legend()
plt.xticks(bins + 0.5, ['bin ' + str(int(x)) for x in (bins + 0.5)])
plt.show()
rwidth = 1 аргумент в hist() удалит любое пространство между барами.
Не делайте этого с matplotlib намного сложнее. Лучше всего использовать seaborn:
здесь: https://seaborn.pydata.org/generated/seaborn.barplot.html
Эта функция помогла мне построить сгруппированную гистограмму.
      def multibarplot(ax, data, xlabels, ylabels, fill_ratio = 0.8):
    l = len(data.T)
    D = len(data)
    width = fill_ratio/D

    for i,(d,ylabel) in enumerate(zip(data,ylabels)):
        ax.bar(np.arange(l) + (i-(D-1)/2) *width,d, width=width, label=ylabel)

    ax.set_xticks(np.arange(l), xlabels)
    ax.legend()
    #ax.autoscale(tight=True)
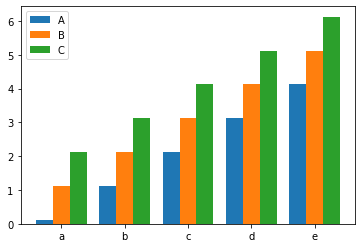
Пример звонка
      data = np.array([np.arange(i,i+5) for i in range(3)]) + .123
#plt.figure(figsize=(10,5))
ax=plt.gca()
multibarplot(ax, data, xlabels=["a","b","c","d","e"], ylabels=["A","B","C"])
