Как сделать изображение WPF отключенным?
Мне нужно изображение, которое отображается серым цветом при отключении (IsEnabled=False). Выделенная серым цветом версия изображения может быть получена путем чтения BitmapImage в FormatConvertedBitmap, который показан здесь.
Я смог заставить это работать с UserControl, но теперь я хотел бы, чтобы такое же поведение было в специализированном классе Image для большей гибкости. Мне все равно, реализован ли он в XAML, с выделенным кодом или в обоих, но он должен быть подклассом Image.
Использование может быть:
<DisableableImage Source="Images/image1.png" />
<DisableableImage Source="Images/image1.png" IsEnabled="False" />

<!-- Since IsEnabled is inherited down the tree,
     the image will be grayed out like the rest of the button -->
<Button IsEnabled="False">
    <StackPanel Orientation="Horizontal">
        <TextBlock>OK</TextBlock>
        <DisableableImage Source="Images/ok.png" />
    </StackPanel>
</Button>
5 ответов
Посмотрите на эту ссылку
РЕДАКТИРОВАТЬ: Или этот (все, что вам нужно, это класс AutoGreyableImage)
Я сделал небольшое сравнение, основанное на следующих решениях.
- Подходы в ссылке, предоставленной ОП
- Ссылки предоставлены Томасом Левеском
- Greyscale Effect
Поскольку у меня уже были лицензии на Infragistics Net Advantage для WPF, опробовать ее было легко
Вот результат
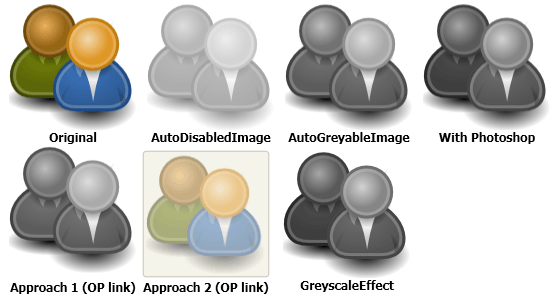
Таким образом, лучший подход зависит от того, какие результаты вы получите. Что касается меня, я думаю, что результат, произведенный AutoDisabledImage от Infragistics слишком яркий, AutoGreyableImage выполняет довольно хорошую работу (идентичный результат для подхода 1 (ссылка OP)) и GreyscaleEffect дает лучший результат.
Более полная версия AutoGreyableImage от Thomas Lebrun. Для всех, кто заинтересовался, я начал использовать класс Thomas Lebruns и столкнулся с парой исключений нулевой ссылки, а также обнаружил, что изображение не будет отключено, если свойство isEnabled было установлено первым, а источник - после.
Итак, вот класс, который, наконец, помог мне. Кстати, вы можете, конечно, добавить к этому вопрос непрозрачности, но я решил оставить это до xaml вокруг изображения.
using System;
using System.Windows;
using System.Windows.Controls;
using System.Windows.Media.Imaging;
using System.Windows.Media;

namespace MyDisabledImages
{
    /// <summary>
    /// Class used to have an image that is able to be gray when the control is not enabled.
    /// Based on the version by Thomas LEBRUN (http://blogs.developpeur.org/tom)
    /// </summary>
    public class AutoGreyableImage : Image
    {
        /// <summary>
        /// Initializes a new instance of the <see cref="AutoGreyableImage"/> class.
        /// </summary>
        static AutoGreyableImage()
        {
            // Override the metadata of the IsEnabled and Source property.
            IsEnabledProperty.OverrideMetadata(typeof(AutoGreyableImage), new FrameworkPropertyMetadata(true, new PropertyChangedCallback(OnAutoGreyScaleImageIsEnabledPropertyChanged)));
            SourceProperty.OverrideMetadata(typeof(AutoGreyableImage), new FrameworkPropertyMetadata(null, new PropertyChangedCallback(OnAutoGreyScaleImageSourcePropertyChanged)));
        }

        protected static AutoGreyableImage GetImageWithSource(DependencyObject source)
        {
            var image = source as AutoGreyableImage;
            if (image == null)
                return null;

            if (image.Source == null)
                return null;

            return image;
        }

        /// <summary>
        /// Called when [auto grey scale image source property changed].
        /// </summary>
        /// <param name="source">The source.</param>
        /// <param name="args">The <see cref="System.Windows.DependencyPropertyChangedEventArgs"/> instance containing the event data.</param>
        protected static void OnAutoGreyScaleImageSourcePropertyChanged(DependencyObject source, DependencyPropertyChangedEventArgs ars)
        {
            AutoGreyableImage image = GetImageWithSource(source);
            if (image != null)
                ApplyGreyScaleImage(image, image.IsEnabled);
        }

        /// <summary>
        /// Called when [auto grey scale image is enabled property changed].
        /// </summary>
        /// <param name="source">The source.</param>
        /// <param name="args">The <see cref="System.Windows.DependencyPropertyChangedEventArgs"/> instance containing the event data.</param>
        protected static void OnAutoGreyScaleImageIsEnabledPropertyChanged(DependencyObject source, DependencyPropertyChangedEventArgs args)
        {
            AutoGreyableImage image = GetImageWithSource(source);
            if (image != null)
            {
                var isEnabled = Convert.ToBoolean(args.NewValue);
                ApplyGreyScaleImage(image, isEnabled);
            }
        }

        protected static void ApplyGreyScaleImage(AutoGreyableImage autoGreyScaleImg, Boolean isEnabled)
        {
            try
            {
                if (!isEnabled)
                {
                    BitmapSource bitmapImage = null;

                    if (autoGreyScaleImg.Source is FormatConvertedBitmap)
                    {
                        // Already grey !
                        return;
                    }
                    else if (autoGreyScaleImg.Source is BitmapSource)
                    {
                        bitmapImage = (BitmapSource)autoGreyScaleImg.Source;
                    }
                    else // trying string
                    {
                        bitmapImage = new BitmapImage(new Uri(autoGreyScaleImg.Source.ToString()));
                    }
                    FormatConvertedBitmap conv = new FormatConvertedBitmap(bitmapImage, PixelFormats.Gray32Float, null, 0);
                    autoGreyScaleImg.Source = conv;

                    // Create Opacity Mask for greyscale image as FormatConvertedBitmap does not keep transparency info
                    autoGreyScaleImg.OpacityMask = new ImageBrush(((FormatConvertedBitmap)autoGreyScaleImg.Source).Source); //equivalent to new ImageBrush(bitmapImage)
                }
                else
                {
                    if (autoGreyScaleImg.Source is FormatConvertedBitmap)
                    {
                        autoGreyScaleImg.Source = ((FormatConvertedBitmap)autoGreyScaleImg.Source).Source;
                    }
                    else if (autoGreyScaleImg.Source is BitmapSource)
                    {
                        // Should be full color already.
                        return;
                    }

                    // Reset the Opcity Mask
                    autoGreyScaleImg.OpacityMask = null;
                }
            }
            catch (Exception)
            {
                // nothin'
            }

        }

    }
}
Если вы часто этим пользуетесь, подумайте о создании пользовательского эффекта, представленного в.NET 3.5 SP1 (не bitmapeffect) для рендеринга такой операции на вашем GPU. тогда этот эффект можно легко контролировать с помощью триггеров.
Создайте класс DisableableImage, который является типичным элементом управления WPF. Внутри поместите два элемента: изображение и прямоугольник, который появляется только тогда, когда элемент управления отключен. Прямоугольник должен иметь ту же ширину и высоту, что и изображение, и он должен накладываться на изображение. С серым цветом и альфа-значением где-то около 40%, вы должны получить эффект, похожий на фактическое затенение изображения - безо всяких усилий, чтобы реально изменить само изображение.