Как создать центрированный UICollectionView, как в Spotify's Player
У меня много трудностей при попытке создать UICollectionView, как в Player Spotify, который действует так:

Проблема для меня в два раза.
1) Как расположить ячейки по центру, чтобы вы могли видеть среднюю ячейку, а также левую и правую ячейки.
- Если я создаю квадратные ячейки и добавляю интервал между каждой ячейкой, ячейки отображаются правильно, но не по центру.
2) При pagingEnabled = YES представление коллекции корректно перемещается с одной страницы на другую. Однако без центрирования ячеек он просто перемещает представление коллекции по странице, которая является шириной экрана. Итак, вопрос в том, как заставить страницы двигаться, чтобы получить эффект выше.
3) как вы анимируете размер клеток при их движении
- Я не хочу беспокоиться об этом слишком сильно. Если бы я мог заставить это работать, это было бы здорово, но более сложные проблемы - 1 и 2.
Код, который у меня есть в настоящее время, представляет собой простой UICollectionView с обычной настройкой делегата и пользовательскими ячейками UICollectionview, которые являются квадратами. Может быть, мне нужно подкласс UICollectionViewFlowLayout? Или, может быть, мне нужно включить pagingEnabled в NO, а затем использовать пользовательские события смахивания? Буду рад любой помощи!
7 ответов
Как вы сказали в комментарии, вы хотите, чтобы в коде Objective-c была очень известная библиотека iCarousel, которая может быть полезна при выполнении вашего требования. Ссылка: https://github.com/nicklockwood/iCarousel
Вы можете использовать "Поворотный" или "Линейный" или какой-либо другой стиль с небольшими изменениями или без изменений для реализации пользовательского представления.
Для его реализации у вас есть только некоторые методы делегата, и он работает для ex:
//specify the type you want to use in viewDidLoad
_carousel.type = iCarouselTypeRotary;

//Set the following delegate methods
- (NSInteger)numberOfItemsInCarousel:(iCarousel *)carousel
{
    //return the total number of items in the carousel
    return [_items count];
}

- (UIView *)carousel:(iCarousel *)carousel viewForItemAtIndex:(NSInteger)index reusingView:(UIView *)view
{
    UILabel *label = nil;

    //create new view if no view is available for recycling
    if (view == nil)
    {
        //don't do anything specific to the index within
        //this `if (view == nil) {...}` statement because the view will be
        //recycled and used with other index values later
        view = [[UIImageView alloc] initWithFrame:CGRectMake(0, 0, 200.0f, 200.0f)];
        ((UIImageView *)view).image = [UIImage imageNamed:@"page.png"];
        view.contentMode = UIViewContentModeCenter;

        label = [[UILabel alloc] initWithFrame:view.bounds];
        label.backgroundColor = [UIColor clearColor];
        label.textAlignment = NSTextAlignmentCenter;
        label.font = [label.font fontWithSize:50];
        label.tag = 1;
        [view addSubview:label];
    }
    else
    {
        //get a reference to the label in the recycled view
        label = (UILabel *)[view viewWithTag:1];
    }

    //set item label
    label.text = [_items[index] stringValue];

    return view;
}

- (CGFloat)carousel:(iCarousel *)carousel valueForOption:(iCarouselOption)option withDefault:(CGFloat)value
{
    if (option == iCarouselOptionSpacing)
    {
        return value * 1.1;
    }
    return value;
}
Вы можете проверить полную рабочую демонстрацию в разделе " Примеры / Базовый пример iOS", который включен в ссылку на репозиторий Github.
Поскольку он старый и популярный, вы можете найти для него несколько соответствующих руководств, и он также будет намного более стабильным, чем реализация пользовательского кода.
Для того, чтобы создать горизонтальную разметку карусели, вам нужно будет создать подкласс UICollectionViewFlowLayout затем переопределить targetContentOffset(forProposedContentOffset:withScrollingVelocity:), layoutAttributesForElements(in:) а также shouldInvalidateLayout(forBoundsChange:),
Следующий Swift 4.1 - полный код iOS 11 показывает, как их реализовать.
CollectionViewController.swift
import UIKit

class CollectionViewController: UICollectionViewController {

    let collectionDataSource = CollectionDataSource()
    let flowLayout = ZoomAndSnapFlowLayout()

    override func viewDidLoad() {
        super.viewDidLoad()

        title = "Zoomed & snapped cells"

        guard let collectionView = collectionView else { fatalError() }
        //collectionView.decelerationRate = .fast // uncomment if necessary
        collectionView.dataSource = collectionDataSource
        collectionView.collectionViewLayout = flowLayout
        collectionView.register(CollectionViewCell.self, forCellWithReuseIdentifier: "Cell")
    }

}
ZoomAndSnapFlowLayout.swift
import UIKit

class ZoomAndSnapFlowLayout: UICollectionViewFlowLayout {

    let activeDistance: CGFloat = 200
    let zoomFactor: CGFloat = 0.3

    override init() {
        super.init()

        scrollDirection = .horizontal
        minimumLineSpacing = 40
        itemSize = CGSize(width: 150, height: 150)
    }

    required init?(coder aDecoder: NSCoder) {
        fatalError("init(coder:) has not been implemented")
    }

    override func prepare() {
        guard let collectionView = collectionView else { fatalError() }
        let verticalInsets = (collectionView.frame.height - collectionView.adjustedContentInset.top - collectionView.adjustedContentInset.bottom - itemSize.height) / 2
        let horizontalInsets = (collectionView.frame.width - collectionView.adjustedContentInset.right - collectionView.adjustedContentInset.left - itemSize.width) / 2
        sectionInset = UIEdgeInsets(top: verticalInsets, left: horizontalInsets, bottom: verticalInsets, right: horizontalInsets)

        super.prepare()
    }

    override func layoutAttributesForElements(in rect: CGRect) -> [UICollectionViewLayoutAttributes]? {
        guard let collectionView = collectionView else { return nil }
        let rectAttributes = super.layoutAttributesForElements(in: rect)!.map { $0.copy() as! UICollectionViewLayoutAttributes }
        let visibleRect = CGRect(origin: collectionView.contentOffset, size: collectionView.frame.size)

        // Make the cells be zoomed when they reach the center of the screen
        for attributes in rectAttributes where attributes.frame.intersects(visibleRect) {
            let distance = visibleRect.midX - attributes.center.x
            let normalizedDistance = distance / activeDistance

            if distance.magnitude < activeDistance {
                let zoom = 1 + zoomFactor * (1 - normalizedDistance.magnitude)
                attributes.transform3D = CATransform3DMakeScale(zoom, zoom, 1)
                attributes.zIndex = Int(zoom.rounded())
            }
        }

        return rectAttributes
    }

    override func targetContentOffset(forProposedContentOffset proposedContentOffset: CGPoint, withScrollingVelocity velocity: CGPoint) -> CGPoint {
        guard let collectionView = collectionView else { return .zero }

        // Add some snapping behaviour so that the zoomed cell is always centered
        let targetRect = CGRect(x: proposedContentOffset.x, y: 0, width: collectionView.frame.width, height: collectionView.frame.height)
        guard let rectAttributes = super.layoutAttributesForElements(in: targetRect) else { return .zero }

        var offsetAdjustment = CGFloat.greatestFiniteMagnitude
        let horizontalCenter = proposedContentOffset.x + collectionView.frame.width / 2

        for layoutAttributes in rectAttributes {
            let itemHorizontalCenter = layoutAttributes.center.x
            if (itemHorizontalCenter - horizontalCenter).magnitude < offsetAdjustment.magnitude {
                offsetAdjustment = itemHorizontalCenter - horizontalCenter
            }
        }

        return CGPoint(x: proposedContentOffset.x + offsetAdjustment, y: proposedContentOffset.y)
    }

    override func shouldInvalidateLayout(forBoundsChange newBounds: CGRect) -> Bool {
        // Invalidate layout so that every cell get a chance to be zoomed when it reaches the center of the screen
        return true
    }

    override func invalidationContext(forBoundsChange newBounds: CGRect) -> UICollectionViewLayoutInvalidationContext {
        let context = super.invalidationContext(forBoundsChange: newBounds) as! UICollectionViewFlowLayoutInvalidationContext
        context.invalidateFlowLayoutDelegateMetrics = newBounds.size != collectionView?.bounds.size
        return context
    }

}
CollectionDataSource.swift
import UIKit

class CollectionDataSource: NSObject, UICollectionViewDataSource {

    func collectionView(_ collectionView: UICollectionView, numberOfItemsInSection section: Int) -> Int {
        return 9
    }

    func collectionView(_ collectionView: UICollectionView, cellForItemAt indexPath: IndexPath) -> UICollectionViewCell {
        let cell = collectionView.dequeueReusableCell(withReuseIdentifier: "Cell", for: indexPath) as! CollectionViewCell
        return cell
    }

}
CollectionViewCell.swift
import UIKit

class CollectionViewCell: UICollectionViewCell {

    override init(frame: CGRect) {
        super.init(frame: frame)

        contentView.backgroundColor = .green
    }

    required init?(coder aDecoder: NSCoder) {
        fatalError("init(coder:) has not been implemented")
    }

}
Ожидаемый результат:

Источник:
Ну, я заставил UICollectionview двигаться так же, как вчера.
Я могу поделиться своим кодом с вами:)
Вот моя раскадровка
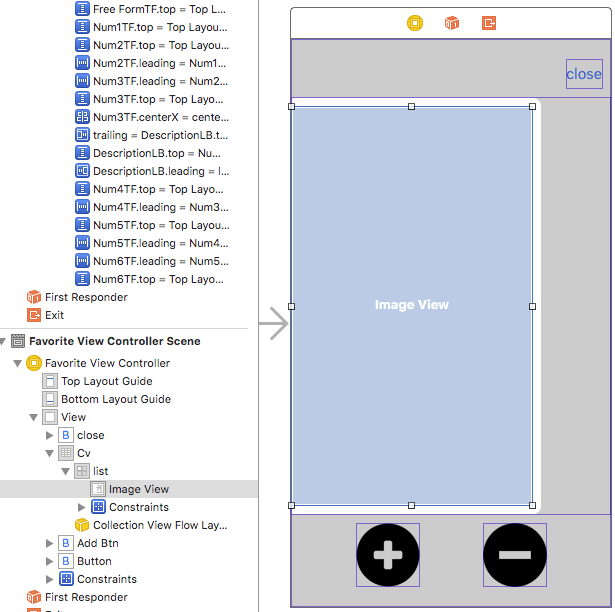
удостоверьтесь, что сняли флажок "Включено оповещение"
Вот мой код
@interface FavoriteViewController () <UICollectionViewDelegate, UICollectionViewDataSource, UICollectionViewDelegateFlowLayout>
{
    NSMutableArray * mList;

    CGSize cellSize;
}

@property (weak, nonatomic) IBOutlet UICollectionView *cv;
@end

@implementation FavoriteViewController

- (void) viewWillAppear:(BOOL)animated
{
    [super viewWillAppear:animated];

    // to get a size.
    [self.view setNeedsLayout];
    [self.view layoutIfNeeded];

    CGRect screenFrame = [[UIScreen mainScreen] bounds];
    CGFloat width = screenFrame.size.width*self.cv.frame.size.height/screenFrame.size.height;
    cellSize = CGSizeMake(width, self.cv.frame.size.height);
    // if cell's height is exactly same with collection view's height, you get an warning message.
    cellSize.height -= 1;

    [self.cv reloadData];

    // setAlpha is for hiding looking-weird at first load
    [self.cv setAlpha:0];
}

- (void) viewDidAppear:(BOOL)animated
{
    [super viewDidAppear:animated];

    [self scrollViewDidScroll:self.cv];
    [self.cv setAlpha:1];
}

#pragma mark - scrollview delegate
- (void) scrollViewDidScroll:(UIScrollView *)scrollView
{
    if(mList.count > 0)
    {
        const CGFloat centerX = self.cv.center.x;
        for(UICollectionViewCell * cell in [self.cv visibleCells])
        {
            CGPoint pos = [cell convertPoint:CGPointZero toView:self.view];
            pos.x += cellSize.width/2.0f;
            CGFloat distance = fabs(centerX - pos.x);

// If you want to make side-cell's scale bigger or smaller,
// change the value of '0.1f'
            CGFloat scale = 1.0f - (distance/centerX)*0.1f;
            [cell setTransform:CGAffineTransformMakeScale(scale, scale)];
        }
    }
}

- (void)scrollViewWillEndDragging:(UIScrollView *)scrollView withVelocity:(CGPoint)velocity targetContentOffset:(inout CGPoint *)targetContentOffset
{ // for custom paging
    CGFloat movingX = velocity.x * scrollView.frame.size.width;
    CGFloat newOffsetX = scrollView.contentOffset.x + movingX;

    if(newOffsetX < 0)
    {
        newOffsetX = 0;
    }
    else if(newOffsetX > cellSize.width * (mList.count-1))
    {
        newOffsetX = cellSize.width * (mList.count-1);
    }
    else
    {
        NSUInteger newPage = newOffsetX/cellSize.width + ((int)newOffsetX%(int)cellSize.width > cellSize.width/2.0f ? 1 : 0);
        newOffsetX = newPage*cellSize.width;
    }

    targetContentOffset->x = newOffsetX;
}

#pragma mark - collectionview delegate
- (NSInteger)collectionView:(UICollectionView *)collectionView numberOfItemsInSection:(NSInteger)section
{
    return mList.count;
}
- (UICollectionViewCell *)collectionView:(UICollectionView *)collectionView cellForItemAtIndexPath:(NSIndexPath *)indexPath
{
    UICollectionViewCell * cell = [collectionView dequeueReusableCellWithReuseIdentifier:@"list" forIndexPath:indexPath];

    NSDictionary * dic = mList[indexPath.row];

    UIImageView * iv = (UIImageView *)[cell.contentView viewWithTag:1];
    UIImage * img = [UIImage imageWithData:[dic objectForKey:kKeyImg]];
    [iv setImage:img];

    return cell;
}

- (CGSize)collectionView:(UICollectionView *)collectionView layout:(UICollectionViewLayout*)collectionViewLayout sizeForItemAtIndexPath:(NSIndexPath *)indexPath
{
    return cellSize;
}
- (UIEdgeInsets)collectionView:(UICollectionView *)collectionView layout:(UICollectionViewLayout*)collectionViewLayout insetForSectionAtIndex:(NSInteger)section
{
    CGFloat gap = (self.cv.frame.size.width - cellSize.width)/2.0f;
    return UIEdgeInsetsMake(0, gap, 0, gap);
}
- (CGFloat)collectionView:(UICollectionView *)collectionView layout:(UICollectionViewLayout*)collectionViewLayout minimumLineSpacingForSectionAtIndex:(NSInteger)section
{
    return 0;
}
- (CGFloat)collectionView:(UICollectionView *)collectionView layout:(UICollectionViewLayout*)collectionViewLayout minimumInteritemSpacingForSectionAtIndex:(NSInteger)section
{
    return 0;
}
Код ключа сделать ячейку по центру
scrollViewWillEndDragging
insetForSectionAtIndex
Ключевой код анимации размером
- scrollviewDidScroll
Я желаю, чтобы это помогло тебе
PS Если вы хотите изменить альфу так же, как загруженное изображение, добавьте [ячейка setalpha] в scrollViewDidScroll
Некоторое время назад я хотел подобное поведение, и с помощью @Mike_M я смог понять это. Хотя есть много, много способов сделать это, эта конкретная реализация заключается в создании пользовательского UICollectionViewLayout.
Код ниже (суть можно найти здесь: https://gist.github.com/mmick66/9812223)
Теперь важно установить следующее: *yourCollectionView*.decelerationRate = UIScrollViewDecelerationRateFast, это предотвращает пропуск клеток при быстром перелистывании.
Это должно охватывать части 1 и 2. Теперь, для части 3 вы могли бы включить это в пользовательский collectionView, постоянно аннулируя и обновляя, но это немного хлопотно, если вы спросите меня. Таким образом, другой подход заключается в том, чтобы установить CGAffineTransformMakeScale( , ) в UIScrollViewDidScroll где вы динамически обновляете размер ячейки в зависимости от ее расстояния от центра экрана.
Вы можете получить indexPath видимых ячеек collectionView, используя [*youCollectionView indexPathsForVisibleItems] а затем получить клетки для этих indexPaths. Для каждой ячейки вычислите расстояние от ее центра до центра yourCollectionView
Центр collectionView можно найти с помощью этого изящного метода: CGPoint point = [self.view convertPoint:*yourCollectionView*.center toView:*yourCollectionView];
Теперь установите правило, что если центр ячейки дальше чем x, то размер ячейки равен, например, "нормальному размеру", назовите его 1. И чем ближе он подходит к центру, тем ближе он становится вдвое. нормальный размер 2.
тогда вы можете использовать следующую идею if/else:
 if (distance > x) {
        cell.transform = CGAffineTransformMakeScale(1.0f, 1.0f);
 } else if (distance <= x) {

        float scale = MIN(distance/x) * 2.0f;
        cell.transform = CGAffineTransformMakeScale(scale, scale);
 }
Что происходит, так это то, что размер ячейки будет точно соответствовать вашим прикосновениям. Дайте мне знать, если у вас есть еще вопросы, так как я пишу большую часть этого из головы).
- (CGPoint)targetContentOffsetForProposedContentOffset:(CGPoint)offset
                             withScrollingVelocity:(CGPoint)velocity {

CGRect cvBounds = self.collectionView.bounds;
CGFloat halfWidth = cvBounds.size.width * 0.5f;
CGFloat proposedContentOffsetCenterX = offset.x + halfWidth;

NSArray* attributesArray = [self layoutAttributesForElementsInRect:cvBounds];

UICollectionViewLayoutAttributes* candidateAttributes;
for (UICollectionViewLayoutAttributes* attributes in attributesArray) {

    // == Skip comparison with non-cell items (headers and footers) == //
    if (attributes.representedElementCategory !=
        UICollectionElementCategoryCell) {
        continue;
    }

    // == First time in the loop == //
    if(!candidateAttributes) {
        candidateAttributes = attributes;
        continue;
    }

    if (fabsf(attributes.center.x - proposedContentOffsetCenterX) <
        fabsf(candidateAttributes.center.x - proposedContentOffsetCenterX)) {
        candidateAttributes = attributes;
    }
}

return CGPointMake(candidateAttributes.center.x - halfWidth, offset.y);

}
pagingEnabled не должен быть включен, так как каждая ячейка должна иметь ширину вашего вида, которая не будет работать для вас, так как вам нужно видеть края других ячеек. Что касается ваших пунктов 1 и 2. Я думаю, вы найдете то, что вам нужно здесь, из одного из моих последних ответов на другой вопрос.
Анимация размеров ячеек может быть достигнута путем создания подкласса UIcollectionviewFlowLayout и переопределения layoutAttributesForItemAtIndexPath: В рамках этого измените атрибуты макета, предоставленные сначала вызовом super, а затем измените размер атрибутов макета на основе позиции, поскольку это относится к центру окна.
Надеюсь, это поможет.
Если вы хотите иметь равномерный интервал между ячейками, вы можете заменить следующий метод в
ZoomAndSnapFlowLayoutиз решения Иману Пети :
      override func layoutAttributesForElements(in rect: CGRect) -> [UICollectionViewLayoutAttributes]? {
    guard let collectionView = collectionView else { return nil }
    let rectAttributes = super.layoutAttributesForElements(in: rect)!.map { $0.copy() as! UICollectionViewLayoutAttributes }
    let visibleRect = CGRect(origin: collectionView.contentOffset, size: collectionView.frame.size)
    let visibleAttributes = rectAttributes.filter { $0.frame.intersects(visibleRect) }

    // Keep the spacing between cells the same.
    // Each cell shifts the next cell by half of it's enlarged size.
    // Calculated separately for each direction.
    func adjustXPosition(_ toProcess: [UICollectionViewLayoutAttributes], direction: CGFloat, zoom: Bool = false) {
        var dx: CGFloat = 0

        for attributes in toProcess {
            let distance = visibleRect.midX - attributes.center.x
            attributes.frame.origin.x += dx

            if distance.magnitude < activeDistance {
                let normalizedDistance = distance / activeDistance
                let zoomAddition = zoomFactor * (1 - normalizedDistance.magnitude)
                let widthAddition = attributes.frame.width * zoomAddition / 2
                dx = dx + widthAddition * direction

                if zoom {
                    let scale = 1 + zoomAddition
                    attributes.transform3D = CATransform3DMakeScale(scale, scale, 1)
                }
            }
        }
    }

    // Adjust the x position first from left to right.
    // Then adjust the x position from right to left.
    // Lastly zoom the cells when they reach the center of the screen (zoom: true).
    adjustXPosition(visibleAttributes, direction: +1)
    adjustXPosition(visibleAttributes.reversed(), direction: -1, zoom: true)

    return rectAttributes
}
Вы можете создать собственный UICollectionFlowLayout
Для получения дополнительной информации проверьте это https://medium.com/@sh.soheytizadeh/zoom-uicollectionview-centered-cell-swift-5-e63cad9bcd49.