Рисование динамического прозрачного изображения поверх другого изображения с использованием SWT Graphics
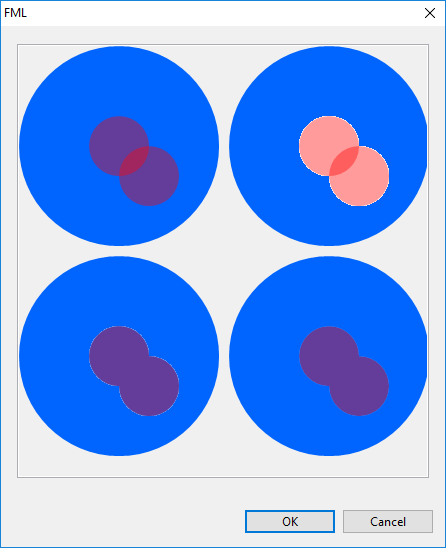
Я пытаюсь нарисовать прозрачную маску из комбинированных фигур поверх уже созданного изображения. Я привел пример техник, которые я пробую, с помощью диалогового кода, включенного в этот пост. Вот скриншот того, что он производит.
https://i.imgur.com/cGc9wqb.png
Пример 1 (вверху слева) выделяет проблему, которую я хочу решить, я хочу, чтобы 2 круга или любые пересекающиеся фигуры / дуги, все рисовались вместе с одинаковым уровнем альфа, то есть без непрозрачности смешивания, вызванной рисованием поверх вершины друг с другом.
Пример 3 (внизу слева) - моя попытка решить проблему, создав отдельное изображение со сплошными формами, а затем сделав все это изображение прозрачным, и я думаю, что при использовании этого метода изображение становится белым, а белый воспринимается как прозрачный цвет, так что край круга смешивается с белым, так что когда вы рисуете его, он вызывает эффект "ореола" вокруг фигуры.
Пример 2 (вверху слева) еще больше подчеркивает эту проблему, рисуя круги на изображении как прозрачные, чтобы вы могли видеть более розовый цвет, вызванный выделением.
Мой вопрос: без знания цвета фона и без отключения сглаживания, как мне добиться эффекта, к которому я стремлюсь? Есть ли способ, потому что все мои исследования оказываются пустыми? Может быть, мне нужно использовать другое решение для рисования изображений и перенести обратно на SWT? Я знаю, что он способен рисовать прозрачные изображения, если загружен непосредственно из файла, поэтому я знаю, что он может содержать данные такого рода, но как мне его создать?
import org.eclipse.jface.dialogs.Dialog;
import org.eclipse.swt.SWT;

import org.eclipse.swt.events.PaintEvent;
import org.eclipse.swt.events.PaintListener;
import org.eclipse.swt.graphics.Color;
import org.eclipse.swt.graphics.GC;
import org.eclipse.swt.graphics.Image;
import org.eclipse.swt.graphics.ImageData;
import org.eclipse.swt.graphics.Point;
import org.eclipse.swt.graphics.RGB;
import org.eclipse.swt.layout.GridData;
import org.eclipse.swt.layout.GridLayout;
import org.eclipse.swt.widgets.Canvas;
import org.eclipse.swt.widgets.Composite;
import org.eclipse.swt.widgets.Control;
import org.eclipse.swt.widgets.Display;
import org.eclipse.swt.widgets.Shell;

public class FMLDialog extends Dialog
{
    private Color red;
    private Color blue;

    public FMLDialog(Shell parentShell)
    {
        super(parentShell);
    }


    @Override
    protected void configureShell(Shell shell)
    {
        red = new Color(shell.getDisplay(), new RGB(255,0,0));
        blue = new Color(shell.getDisplay(), new RGB(0,100,255));
        super.configureShell(shell);
        shell.setSize(new Point(450,550));
        shell.setText("FML");
    }

    @Override
    public Control createDialogArea(final Composite comp)
    {

        Composite content = (Composite) super.createDialogArea(comp);
        Composite parent = new Composite(content, SWT.NONE);

        GridLayout gridLayout2 = new GridLayout(1, false);
        parent.setLayout(gridLayout2);
        parent.setLayoutData(new GridData(SWT.FILL, SWT.FILL, true, true));

        final Canvas c = new Canvas(parent, SWT.BORDER);
        c.setLayoutData(new GridData(SWT.FILL, SWT.FILL, true, true));
        c.addPaintListener(new PaintListener() {

            @Override
            public void paintControl(PaintEvent e) {
                e.gc.setAntialias(SWT.ON);
                drawFirstLayer(e.gc, 0, 0);
                drawFirstLayer(e.gc, 210, 0);
                drawFirstLayer(e.gc, 210, 210);
                drawFirstLayer(e.gc, 0, 210);

                drawSecondLayerTake1(e.gc, 0, 0);
                drawSecondLayerTake2(e.gc, 210, 0);
                drawSecondLayerTake3(e.gc, 0, 210);
                drawSecondLayerTake4(e.gc, 210, 210);
            }
        });

        return content;

    }

    private void drawFirstLayer(GC gc, int x, int y) {
        gc.setBackground(blue);
        gc.fillOval(x, y, 200 , 200);
    }

    private void drawSecondLayerTake1(GC gc, int x, int y) {
        // Simply draw 2 transparent circles
        // Issue here is the overlap between circles where the Alpha layers up
        gc.setAlpha(100);
        gc.setBackground(red);
        gc.fillOval(x + 70, y + 70, 60 , 60);
        gc.fillOval(x + 100, y + 100, 60 , 60);
        gc.setAlpha(255);
    }

    private void drawSecondLayerTake2(GC gc, int x, int y) {
        // Create an image with 2 transparent circles
        // Issue here is the overlap between circles where the Alpha layers up from the first
        // PLUS becasue my transparent colour is fixed to white the alpa on the circles is blended in to the white
        final Image src = new Image(null, 300, 300);
        final ImageData imageData = src.getImageData();
        imageData.transparentPixel = imageData.getPixel(0, 0);
        src.dispose();
        final Image processedImage = new Image(Display.getCurrent(), imageData);
        final GC imageGC = new GC(processedImage);
        imageGC.setAntialias(SWT.ON);
        imageGC.setAlpha(100);
        imageGC.setBackground(red);
        imageGC.fillOval(70, 70, 60 , 60);
        imageGC.fillOval(100, 100, 60 , 60);
        imageGC.dispose();

        gc.drawImage(processedImage, x + 0, y + 0);

    }

    private void drawSecondLayerTake3(GC gc, int x, int y) {
        // Create an image with 2 solid circles, then draw that image on to the canvas with Alpha values.
        // Overlap issue goes away because the whole image is being made transparent together HOWEVER
        // there is a Halo effect around the edge of the red where the original circles were antialiased to blend into the "white"
        // background.

        final Image src = new Image(null, 300, 300);
        final ImageData imageData = src.getImageData();
        imageData.transparentPixel = imageData.getPixel(0, 0);
        src.dispose();
        final Image processedImage = new Image(Display.getCurrent(), imageData);
        final GC imageGC = new GC(processedImage);
        imageGC.setAntialias(SWT.ON);
        imageGC.setBackground(red);
        imageGC.fillOval(70, 70, 60 , 60);
        imageGC.fillOval(100, 100, 60 , 60);
        imageGC.dispose();

        gc.setAlpha(100);
        gc.drawImage(processedImage, x + 0, y + 0);

    }

    private void drawSecondLayerTake4(GC gc, int x, int y) {
        // I need this one to draw like take 3 but without the white "halo" effect on the edge
        // How?!
    }

    public static void main(String[] args) {
        Display d = new Display();
        Shell s = new Shell();

        FMLDialog fml = new FMLDialog(s);
        fml.open();
    }

}
2 ответа
I was able to get the desired result using the method described by Sean Bright here: /questions/18481289/risovanie-prozrachnogo-izobrazheniya-s-ispolzovaniem-java-swt/18481296#18481296.
В принципе:
- we create an image
srcи сgcwe fill it with transparent color - we draw the ovals with solid color
- we get the resulting image data: now, the pixel data array of the image (
imageData.data) is also going to contain the alpha values, while the alpha data array of the image (imageData.alphaData) являетсяnull - we manually fix
imageData.alphaDataby extracting the alpha values at the right positions fromimageData.data; this part assumes that we are working with 32 bit depth of color; it won't work otherwise - теперь, когда
alphaDataизimageDatais fixed, we create an imageprocessedImagewith it - с
gcwe finally drawprocessedImagewith partial transparency
Here's the code (which is Sean's code with some changes):
private void drawSecondLayerTake4(GC gc, int x, int y) {

    final int width = 300;
    final int height = 300;

    final Image src = new Image(null, width, height);

    final GC imageGC = new GC(src);

    imageGC.setAntialias(SWT.ON);

    // This sets the alpha on the entire canvas to transparent
    imageGC.setAlpha(0);
    imageGC.fillRectangle(0, 0, width, height);

    // Reset our alpha and draw the ovals
    imageGC.setAlpha(255);
    imageGC.setBackground(red);
    imageGC.fillOval(70, 70, 60, 60);
    imageGC.fillOval(100, 100, 60, 60);

    // We're done with the GC, so dispose of it
    imageGC.dispose();

    final ImageData imageData = src.getImageData();
    imageData.alphaData = new byte[width * height];

    // This is the hacky bit that is making assumptions about
    // the underlying ImageData.  In my case it is 32 bit data
    // so every 4th byte in the data array is the alpha for that
    // pixel...
    for (int idx = 0; idx < (width * height); idx++) {
        final int coord = (idx * 4) + 3;
        imageData.alphaData[idx] = imageData.data[coord];
    }

    // Now that we've set the alphaData, we can create our
    // final image
    final Image processedImage = new Image(Display.getCurrent(), imageData);

    gc.setAlpha(100);
    gc.drawImage(processedImage, x + 0, y + 0);

    // And get rid of the canvas
    src.dispose();

}
И вот результат:
Вы можете использовать Path объединить 2 круга в один объект, а затем залить его прозрачным цветом.
Это гораздо более простое решение, чем мой предыдущий ответ, и эффект ореола отсутствует.
Код:
private void drawSecondLayerTake4(GC gc, int x, int y) {

    final Path path = new Path(Display.getCurrent());
    path.addArc(x + 70, y + 70, 60, 60, 0, 360);
    path.addArc(x + 100, y + 100, 60, 60, 0, 360);

    gc.setAlpha(100);
    gc.setBackground(red);

    // needed to avoid holes in the path
    gc.setFillRule(SWT.FILL_WINDING);

    gc.fillPath(path);

    path.dispose();
}
И результат:

