Установить шрифт для всех текстовых представлений в действии?
Можно ли установить шрифт для всех TextViews в деятельности? Я могу установить шрифт для одного textView с помощью:
    TextView tv=(TextView)findViewById(R.id.textView1);
    Typeface face=Typeface.createFromAsset(getAssets(), "font.ttf");
    tv.setTypeface(face);
Но я хотел бы изменить все textViews сразу, вместо того, чтобы устанавливать это вручную для каждого textView, любая информация будет оценена!
7 ответов
Solution1:: Просто вызовите этот метод, передав родительское представление в качестве аргумента.
private void overrideFonts(final Context context, final View v) {
    try {
        if (v instanceof ViewGroup) {
            ViewGroup vg = (ViewGroup) v;
            for (int i = 0; i < vg.getChildCount(); i++) {
                View child = vg.getChildAt(i);
                overrideFonts(context, child);
         }
        } else if (v instanceof TextView ) {
            ((TextView) v).setTypeface(Typeface.createFromAsset(context.getAssets(), "font.ttf"));
        }
    } catch (Exception e) {
 }
 }
Solution2:: вы можете создать подкласс класса TextView с вашим собственным шрифтом и использовать его вместо textview.
public class MyTextView extends TextView {

    public MyTextView(Context context, AttributeSet attrs, int defStyle) {
        super(context, attrs, defStyle);
        init();
    }

    public MyTextView(Context context, AttributeSet attrs) {
        super(context, attrs);
        init();
    }

    public MyTextView(Context context) {
        super(context);
        init();
    }

    private void init() {
        if (!isInEditMode()) {
            Typeface tf = Typeface.createFromAsset(getContext().getAssets(), "font.ttf");
            setTypeface(tf);
        }
    }

}
Тот из моей личной коллекции:
private void setFontForContainer(ViewGroup contentLayout) {
    for (int i=0; i < contentLayout.getChildCount(); i++) {
        View view = contentLayout.getChildAt(i);
        if (view instanceof TextView)
            ((TextView)view).setTypeface(yourFont);
        else if (view instanceof ViewGroup)
            setFontForContainer((ViewGroup) view);
    }
}
Если вы ищете более общее программное решение, я создал статический класс, который можно использовать для установки гарнитуры всего представления (пользовательский интерфейс Activity). Обратите внимание, что я работаю с Mono (C#), но вы можете легко реализовать это с помощью Java.
Вы можете передать этому классу макет или конкретное представление, которое вы хотите настроить. Если вы хотите быть очень эффективным, вы можете реализовать его с помощью шаблона Singleton.
public static class AndroidTypefaceUtility
{
    static AndroidTypefaceUtility()
    {
    }
    //Refer to the code block beneath this one, to see how to create a typeface.
    public static void SetTypefaceOfView(View view, Typeface customTypeface)
    {
    if (customTypeface != null && view != null)
    {
            try
            {
                if (view is TextView)
                    (view as TextView).Typeface = customTypeface;
                else if (view is Button)
                    (view as Button).Typeface = customTypeface;
                else if (view is EditText)
                    (view as EditText).Typeface = customTypeface;
                else if (view is ViewGroup)
                    SetTypefaceOfViewGroup((view as ViewGroup), customTypeface);
                else
                    Console.Error.WriteLine("AndroidTypefaceUtility: {0} is type of {1} and does not have a typeface property", view.Id, typeof(View));
                }
                catch (Exception ex)
                {
                    Console.Error.WriteLine("AndroidTypefaceUtility threw:\n{0}\n{1}", ex.GetType(), ex.StackTrace);
                    throw ex;
                }
            }
            else
            {
                Console.Error.WriteLine("AndroidTypefaceUtility: customTypeface / view parameter should not be null");
            }
        }

        public static void SetTypefaceOfViewGroup(ViewGroup layout, Typeface customTypeface)
        {
            if (customTypeface != null && layout != null)
            {
                for (int i = 0; i < layout.ChildCount; i++)
                {
                    SetTypefaceOfView(layout.GetChildAt(i), customTypeface);
                }
            }
            else
            {
                Console.Error.WriteLine("AndroidTypefaceUtility: customTypeface / layout parameter should not be null");
            }
        }

    }
В вашей деятельности вам нужно будет создать объект Typeface. Я создаю мой в OnCreate(), используя файл.ttf, расположенный в моей папке Resources/Assets/. Убедитесь, что файл помечен как актив Android в его свойствах.
protected override void OnCreate(Bundle bundle)
{
    ...
    LinearLayout rootLayout = (LinearLayout)FindViewById<LinearLayout>(Resource.Id.signInView_LinearLayout);
    Typeface allerTypeface = Typeface.CreateFromAsset(base.Assets,"Aller_Rg.ttf");
    AndroidTypefaceUtility.SetTypefaceOfViewGroup(rootLayout, allerTypeface);
}
Лучшие ответы
1. Установка собственного шрифта для одного textView
Typeface typeface = Typeface.createFromAsset(getContext().getAssets(), "Fonts/FontName.ttf");
textView.setTypeface (typeface);
2. Установка собственного шрифта для всех текстовых представлений
Создайте JavaClass, как показано ниже
public class CustomFont extends android.support.v7.widget.AppCompatTextView {

    public CustomFont(Context context) {
        super(context);
        init();
    }

    public CustomFont(Context context, AttributeSet attrs) {
        super(context, attrs);
        init();
    }

    public CustomFont(Context context, AttributeSet attrs, int defStyleAttr) {
        super(context, attrs, defStyleAttr);
        init();
    }

    private void init() {
            Typeface tf = Typeface.createFromAsset(getContext().getAssets(), "fonts/FontName.ttf");
            setTypeface(tf);
    }
}
И на вашей странице XML
<packageName.javaClassName>

...

/>
=>
    <com.mahdi.hossaini.app1.CustomFont
    android:id="@+id/TextView1"
    android:layout_width="wrap_content"
    android:layout_height="wrap_content"
    android:layout_centerHorizontal="true"
    android:text="KEEP IT SIMPLE"
    android:textAlignment="center" />
Вы можете использовать Calligraphy библиотека, которая доступна здесь:
Библиотека каллиграфии Android
Расширяя ответ Агарвала... вы можете установить обычный, полужирный, курсив и т. Д., Переключая стиль вашего TextView.
import android.content.Context;
import android.graphics.Typeface;
import android.util.AttributeSet;
import android.widget.TextView;

public class TextViewAsap extends TextView {

    public TextViewAsap(Context context, AttributeSet attrs, int defStyle) {
        super(context, attrs, defStyle);
        init();
    }

    public TextViewAsap(Context context, AttributeSet attrs) {
        super(context, attrs);
        init();
    }

    public TextViewAsap(Context context) {
        super(context);
        init();
    }

    private void init() {
        if (!isInEditMode()) {
            Typeface tf = Typeface.DEFAULT;

            switch (getTypeface().getStyle()) {
                case Typeface.BOLD:
                    tf = Typeface.createFromAsset(getContext().getAssets(), "Fonts/Asap-Bold.ttf");
                    break;

                case Typeface.ITALIC:
                    tf = Typeface.createFromAsset(getContext().getAssets(), "Fonts/Asap-Italic.ttf");
                    break;

                case Typeface.BOLD_ITALIC:
                    tf = Typeface.createFromAsset(getContext().getAssets(), "Fonts/Asap-Italic.ttf");
                    break;

                default:
                    tf = Typeface.createFromAsset(getContext().getAssets(), "Fonts/Asap-Regular.ttf");
                    break;
            }

            setTypeface(tf);
        }
    }

}
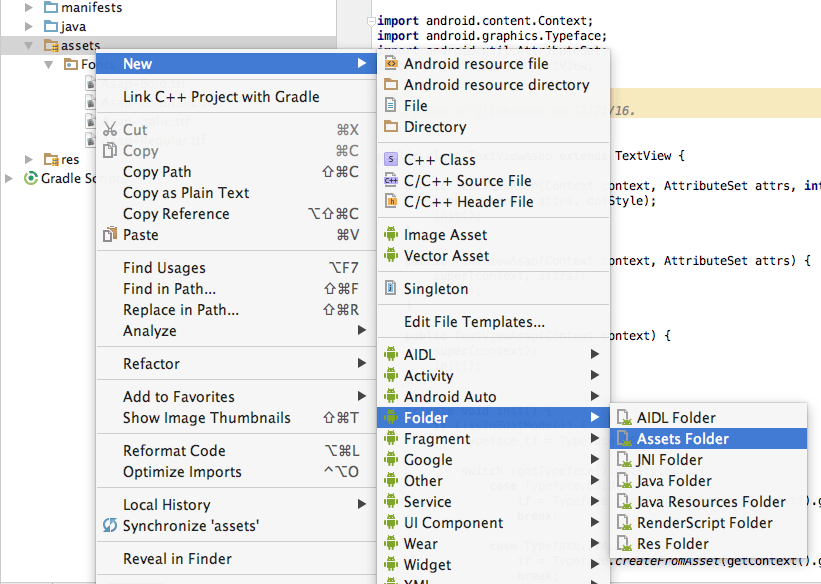
Вы можете создать папку "Активы" следующим образом: 
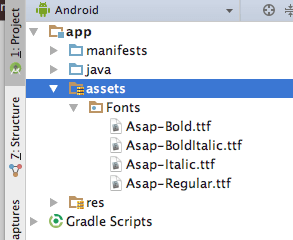
И ваша папка Assets должна выглядеть так:
Наконец, ваш TextView в xml должен быть представлением типа TextViewAsap. Теперь он может использовать любой стиль, который вы закодировали...
<com.example.project.TextViewAsap
                android:layout_width="wrap_content"
                android:layout_height="wrap_content"
                android:text="Example Text"
                android:textStyle="bold"/>
Вы можете использовать наследование стилей.
Пусть каждый из ваших TextView в действии объявит стиль через android:textAppearence, а не вручную android:typeface.
Затем пусть каждый стиль наследует стиль активности, например:
<TextView ...
      android:textAppearance="@style/item_name"/>
<TextView ...
      android:textAppearance="@style/item_details"/>
в style.xml:
<style name="ActivityStyle">
    <item name="android:fontFamily">@font/font</item>
</style>
<style name="item_name" parent="ActivityStyle">
    <item name="android:textStyle">bold</item>
    <item name="android:textSize">20sp</item>
</style>
<style name="item_details" parent="ActivityStyle">
    <item name="android:textSize">15sp</item>
</style>
Пример более "универсального" способа с использованием отражения:
** он представляет идею вовлечения детского метода viewgroup setTextSize(int,float), но вы можете принять его, как в случае вашего вопроса, к setTypeFace()
 /**
 * change text size of view group children for given class
 * @param v - view group ( for example Layout/widget)
 * @param clazz  - class to override ( for example EditText, TextView )
 * @param newSize - new font size
 */
public static void overrideTextSize(final View v, Class<?> clazz, float newSize) {
    try {
        if (v instanceof ViewGroup) {
            ViewGroup vg = (ViewGroup) v;
            for (int i = 0; i < vg.getChildCount(); i++) {
                View child = vg.getChildAt(i);
                overrideTextSize(child, clazz, newSize);
            }
        } else if (clazz.isAssignableFrom(v.getClass())) {
            /** create array for params */
            Class<?>[] paramTypes = new Class[2];
            /** set param array */
            paramTypes[0] = int.class;  // unit
            paramTypes[1] = float.class; // size
            /** get method for given name and parameters list */
            Method method = v.getClass().getMethod("setTextSize",paramTypes);
            /** create array for arguments */
            Object arglist[] = new Object[2];
            /** set arguments array */
            arglist[0] = TypedValue.COMPLEX_UNIT_SP;
            arglist[1] = newSize;
            /** invoke method with arguments */
            method.invoke(v,arglist);
        }
    } catch (Exception e) {
        e.printStackTrace();
    }
}
ВНИМАНИЕ:
с помощью отражения следует быть очень осторожным. Класс отражения это очень "исключительный"
- Например, вы должны проверить наличие аннотаций, чтобы предотвратить различные виды проблем. В случае использования метода SetTextSize () желательно проверить аннотации android.view.RemotableViewMethod
