Почему масштаб для заполнения дает большее изображение, чем размер UIImageVIew? (используя swift)
Я пытаюсь показать список названий мест, в том числе его фото, используя PFQueryTableViewController, Он включен в ParseUI SDK от http://parse.com/
Мне удалось показать изображение. К сожалению, когда я изменяю режим UIImageView на Aspect fill, изображение становится больше, чем должно быть.
вот картинки:
https://dl.dropboxusercontent.com/u/86529526/pic_normal.png https://dl.dropboxusercontent.com/u/86529526/pic_error.png
в pic_normal, вы увидите две ячейки, с двумя нормальными изображениями. в pic_errorВы увидите, что вторая ячейка перекрывается изображением первой ячейки.
Может ли кто-нибудь помочь мне решить эту проблему? Я также поместил весь мой код здесь:
import UIKit

class TableViewController: PFQueryTableViewController, UISearchBarDelegate {

    @IBOutlet var searchBar: UISearchBar!


    // Initialise the PFQueryTable tableview
    override init(style: UITableViewStyle, className: String!) {
        super.init(style: style, className: className)
    }

    required init(coder aDecoder: NSCoder) {
        super.init(coder: aDecoder)

        // Configure the PFQueryTableView
        self.pullToRefreshEnabled = true
        self.paginationEnabled = false
    }

    // Define the query that will provide the data for the table view
    override func queryForTable() -> PFQuery {

        // Start the query object
        var query = PFQuery(className: "Places")

        // query with pointer
        query.includeKey("mainPhoto")

        // Add a where clause if there is a search criteria
        if searchBar.text != "" {
            query.whereKey("name", containsString: searchBar.text)
        }

        // Order the results
        query.orderByAscending("name")

        // Return the qwuery object
        return query
    }


    //override func tableView(tableView: UITableView, cellForRowAtIndexPath indexPath: NSIndexPath) -> UITableViewCell
    override func tableView(tableView: UITableView, cellForRowAtIndexPath indexPath: NSIndexPath, object: PFObject) -> PFTableViewCell? {
        var cell = tableView.dequeueReusableCellWithIdentifier("CustomCell") as! CustomTableViewCell!
        if cell == nil {
            cell = CustomTableViewCell(style: UITableViewCellStyle.Default, reuseIdentifier: "CustomCell")
        }

        // Extract values from the PFObject to display in the table cell
        if let name = object["name"] as? String{
            cell.name.text = name
        }

        // display initial image
        var initialThumbnail = UIImage(named: "question")
        cell.photo.image = initialThumbnail


        // extract image from pointer
        if let pointer = object["mainPhoto"] as? PFObject {
            cell.detail.text = pointer["photoTitle"] as? String!
            if let thumbnail = pointer["photo"] as? PFFile {
                cell.photo.file = thumbnail
                cell.photo.loadInBackground()
            }
        }
        cell.sendSubviewToBack(cell.photo)

        // return the cell
        return cell
    }


    // In a storyboard-based application, you will often want to do a little preparation before navigation
    override func prepareForSegue(segue: UIStoryboardSegue, sender: AnyObject?) {

        // Get the new view controller using [segue destinationViewController].
        var detailScene = segue.destinationViewController as! DetailViewController

        // Pass the selected object to the destination view controller.
        if let indexPath = self.tableView.indexPathForSelectedRow() {
            let row = Int(indexPath.row)
            detailScene.currentObject = objects[row] as? PFObject
        }
    }

    override func viewDidLoad(){
        super.viewDidLoad()
        let tapGesture = UITapGestureRecognizer(target:self, action:Selector("hideKeyboard"))
        tapGesture.cancelsTouchesInView = true
        tableView.addGestureRecognizer(tapGesture)
    }

    func hideKeyboard(){
        tableView.endEditing(true)
    }

    override func viewDidAppear(animated: Bool) {

        // Refresh the table to ensure any data changes are displayed
        tableView.reloadData()

        // Delegate the search bar to this table view class
        searchBar.delegate = self
    }

    func searchBarTextDidEndEditing(searchBar: UISearchBar) {

        // Dismiss the keyboard
        searchBar.resignFirstResponder()

        // Force reload of table data
        self.loadObjects()
    }

    func searchBarSearchButtonClicked(searchBar: UISearchBar) {

        // Dismiss the keyboard
        searchBar.resignFirstResponder()

        // Force reload of table data
        self.loadObjects()
    }

    func searchBarCancelButtonClicked(searchBar: UISearchBar) {

        // Clear any search criteria
        searchBar.text = ""

        // Dismiss the keyboard
        searchBar.resignFirstResponder()

        // Force reload of table data
        self.loadObjects()
    }

}
5 ответов
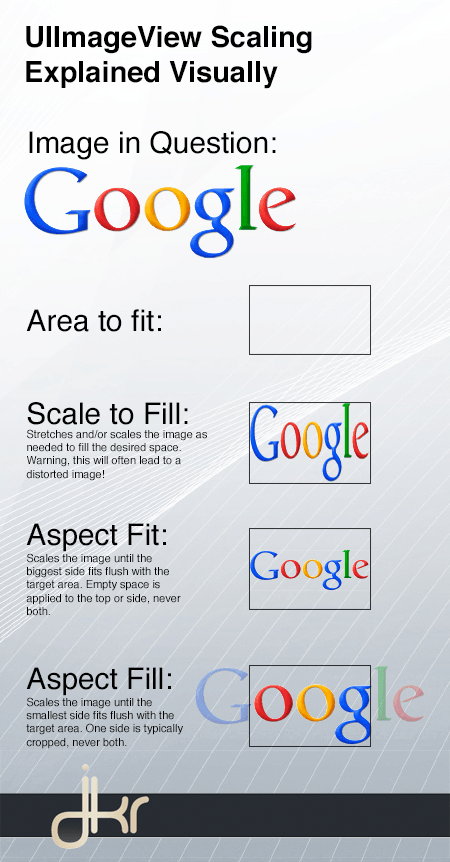
С режимом контента, установленным на Aspect Fill, попробуйте установить клипы на грани в true, причём причина в режиме контента aspect fill продолжает заполнять фрейм представления изображения до тех пор, пока фрейм полностью не заполнится содержимым, сохраняя при этом aspect ratio неповрежденными. В процессе заполнения контейнера с сохранением пропорций изображения вертикальная или горизонтальная рамка полностью заполняется, и заполнение продолжается до тех пор, пока другая часть (если горизонтальная, чем вертикальная или наоборот) полностью не заполнена. Таким образом, первая заполненная часть либо по вертикали, либо по горизонтали выйдет за границы, и содержимое будет видно за рамкой вида изображения. Чтобы обрезать лишний контент, нам нужно обрезать лишнюю часть, используя imageView clipsToBounds свойство установлено в true
cell.photo.contentMode = UIViewContentMode.ScaleAspectFill
cell.photo.clipsToBounds = true

Ссылка: ответ в другом посте, который дает вам четкое представление - /questions/41896698/kak-proportsionalno-masshtabirovat-uiimageview/41896712#41896712
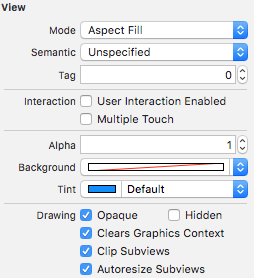
В качестве альтернативы для парней, которые предпочитают Interface Builder, вы можете проверить Clip Subviews на вашем изображении, когда вы выбираете Aspect Fill, тогда он не изменит ваш вид изображения, но сохранит тот же формат изображения.
Если вы хотите сохранить соотношение сторон с изменяющейся шириной, затем используйте AspectFill, а также используйте свойство imageview clipstoBounds, оно не будет расширять представление изображения за рамкой.
UIViewContentModeScaleToFill
Масштабирует контент, чтобы соответствовать его размеру, изменяя соотношение сторон контента, если это необходимо
UIViewContentModeScaleAspectFill
Масштабирует содержимое, чтобы заполнить размер представления. Некоторая часть содержимого может быть обрезана, чтобы заполнить границы представления.
Так что ваши варианты использования
UIViewContentModeScaleToFillи, возможно, изменить соотношение сторон отображаемого изображения,UIViewContentModeScaleAspectFillи использоватьclipToBounds = YESна вашеPFImageView, чтобы обрезать части изображения за пределами.
