Значок уведомления об элементе действия Android
Я хочу добавить значок уведомления на изображение корзины, помещенное в панель действий, и манипулировать им программно. Любая помощь?
12 ответов
Вы можете показать на заказ MenuItem на ActionBar создавая custom layout за MenuItem, Чтобы установить пользовательский макет, вы должны использовать атрибут пункта меню app:actionLayout,
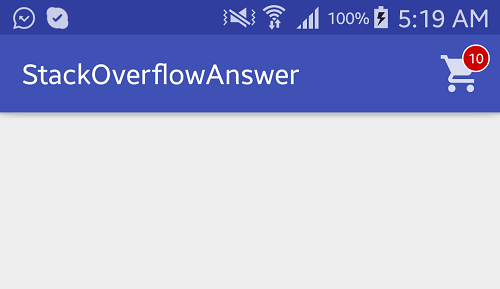
Выполните следующие шаги, чтобы создать Badge на Cart Пункт действия. Смотрите прикрепленный image за результат.
- Создайте собственный макет с
ImageView(для значка корзины) иTextView(для значения счета)
макет / custom_action_item_layout.xml:
<?xml version="1.0" encoding="utf-8"?>
<FrameLayout
    style="?attr/actionButtonStyle"
    xmlns:android="http://schemas.android.com/apk/res/android"
    android:layout_width="wrap_content"
    android:layout_height="wrap_content"
    android:clipToPadding="false"
    android:focusable="true">

    <ImageView
        android:layout_width="wrap_content"
        android:layout_height="wrap_content"
        android:layout_gravity="center"
        android:src="@drawable/ic_action_cart"/>

    <TextView
        android:id="@+id/cart_badge"
        android:layout_width="20dp"
        android:layout_height="20dp"
        android:layout_gravity="right|end|top"
        android:layout_marginEnd="-5dp"
        android:layout_marginRight="-5dp"
        android:layout_marginTop="3dp"
        android:background="@drawable/badge_background"
        android:gravity="center"
        android:padding="3dp"
        android:textColor="@android:color/white"
        android:text="0"
        android:textSize="10sp"/>

</FrameLayout>
- Создать рисованный круг
badgeфон с помощьюShape,
рисуем / badge_background.xml:
<?xml version="1.0" encoding="utf-8"?>
<shape xmlns:android="http://schemas.android.com/apk/res/android" android:shape="oval">

    <solid android:color="@android:color/holo_red_dark"/>
    <stroke android:color="@android:color/white" android:width="1dp"/>

</shape>
- добавлять
custom layoutв менюitem,
Меню / main_menu.xml
<menu
    xmlns:android="http://schemas.android.com/apk/res/android"
    xmlns:app="http://schemas.android.com/apk/res-auto" >

    <item
        android:id="@+id/action_cart"
        android:icon="@drawable/ic_action_cart"
        android:title="Cart"
        app:actionLayout="@layout/custom_action_item_layout"
        app:showAsAction="always"/>

</menu>
- В вашей MainActivity добавьте следующие коды:
MainActivity.java:
public class MainActivity extends AppCompatActivity {
    ................
    ......................
    TextView textCartItemCount;
    int mCartItemCount = 10;

    @Override
    protected void onCreate(Bundle savedInstanceState) {
        super.onCreate(savedInstanceState);
        setContentView(R.layout.activity_main);

        .....................
        ............................
    }

    @Override
    public boolean onCreateOptionsMenu(Menu menu) {
        getMenuInflater().inflate(R.menu.trash, menu);

        final MenuItem menuItem = menu.findItem(R.id.action_cart);

        View actionView = MenuItemCompat.getActionView(menuItem);
        textCartItemCount = (TextView) actionView.findViewById(R.id.cart_badge);

        setupBadge();

        actionView.setOnClickListener(new View.OnClickListener() {
            @Override
            public void onClick(View v) {
                onOptionsItemSelected(menuItem);
            }
        });

        return true;
    }

    @Override
    public boolean onOptionsItemSelected(MenuItem item) {

        switch (item.getItemId()) {

            case R.id.action_cart: {
                // Do something
                return true;
            }
        }
        return super.onOptionsItemSelected(item);
    }

    private void setupBadge() {

        if (textCartItemCount != null) {
            if (mCartItemCount == 0) {
                if (textCartItemCount.getVisibility() != View.GONE) {
                    textCartItemCount.setVisibility(View.GONE);
                }
            } else {
                textCartItemCount.setText(String.valueOf(Math.min(mCartItemCount, 99)));
                if (textCartItemCount.getVisibility() != View.VISIBLE) {
                    textCartItemCount.setVisibility(View.VISIBLE);
                }
            }
        }
    }

    ..................
    ..............................

}
ВЫХОД:
Использование компонентов материала для Android (1.3.0).
      val badge = BadgeDrawable.create(context)
BadgeUtils.attachBadgeDrawable(badge, toolbar, R.id.your_menu_item)
Возможно, это будет более быстрое и простое решение. Например, xml:
    <ru.nikartm.support.ImageBadgeView
    android:id="@+id/ibv_icon2"
    android:layout_width="80dp"
    android:layout_height="80dp"
    android:layout_marginTop="30dp"
    android:layout_gravity="center"
    android:padding="10dp"
    app:ibv_badgeValue="100"
    app:ibv_badgeTextSize="12sp"
    app:ibv_fixedBadgeRadius="15dp"
    app:ibv_badgeTextStyle="bold"
    app:ibv_badgeTextColor="#ffffff"
    app:ibv_badgeColor="#00ACC1"
    app:ibv_badgeLimitValue="false"
    android:src="@drawable/ic_shopping_cart" />
Или программно:
imageBadgeView.setBadgeValue(27)
            .setBadgeOvalAfterFirst(true)
            .setBadgeTextSize(16)
            .setMaxBadgeValue(999)
            .setBadgeTextFont(typeface)
            .setBadgeBackground(getResources().getDrawable(R.drawable.rectangle_rounded))
            .setBadgePosition(BadgePosition.BOTTOM_RIGHT)
            .setBadgeTextStyle(Typeface.NORMAL)
            .setShowCounter(true)
            .setBadgePadding(4);
Я надеюсь, что это поможет.
Простейший взлом, придав стиль.
        <TextView
                android:id="@+id/fabCounter"
                style="@style/Widget.Design.FloatingActionButton"
                android:layout_width="wrap_content"
                android:layout_height="wrap_content"
                android:layout_alignParentEnd="true"
                android:layout_centerVertical="true"
                android:layout_marginEnd="10dp"
                android:padding="5dp"
                android:text="10"
                android:textColor="@android:color/black"
                android:textSize="14sp" />

вы достигаете этого с помощью Google Material Design
      dependencies {
    // ...
    implementation 'com.google.android.material:material:<version>'
    // ...
}

override fun onPrepareOptionsMenu(menu: Menu?): Boolean {
    val badge = BadgeDrawable.create(this)
    badge.number = 10
    BadgeUtils.attachBadgeDrawable(badge, binding.toolbar, R.id.favorite)
    return super.onPrepareOptionsMenu(menu)
}
    **Create a custom_layout**

    ////////

    <?xml version="1.0" encoding="utf-8"?>
    <FrameLayout
        style="?attr/actionButtonStyle"
        xmlns:android="http://schemas.android.com/apk/res/android"
        android:layout_width="wrap_content"
        android:layout_height="wrap_content"
        android:clipToPadding="false"
        android:focusable="true">

        <ImageView
            android:layout_width="wrap_content"
            android:layout_height="wrap_content"
            android:layout_gravity="center"
            android:src="@drawable/notifications_white"/>

        <TextView
            android:id="@+id/cart_badge"
            android:layout_width="20dp"
            android:layout_height="20dp"
            android:layout_marginLeft="55dp"
            android:layout_marginTop="3dp"
            android:background="@drawable/badge_background"
            android:gravity="center"
            android:padding="3dp"
            android:textColor="@android:color/white"
            android:text="0"
            android:textSize="10sp"
            android:visibility="gone"
            />

    </FrameLayout>

    //////

    **Create badge_background**
    /////

    <?xml version="1.0" encoding="utf-8"?>
    <shape xmlns:android="http://schemas.android.com/apk/res/android" android:shape="oval">

        <solid android:color="@android:color/holo_red_dark"/>
        <stroke android:color="@android:color/white" android:width="1dp"/>

    </shape>

    /////
    **Create main_menu**

////
    <menu
        xmlns:android="http://schemas.android.com/apk/res/android"
        xmlns:app="http://schemas.android.com/apk/res-auto" >

        <item
            android:id="@+id/action_cart"
            android:icon="@drawable/notifications_white"
            android:title="Cart"
            app:actionLayout="@layout/custom_layout"
            app:showAsAction="always"/>

    </menu>

/////
    **In MainActivty.java**

         int count = 0;
        TextView textCartItemCount;

/// build a method inside your MainActivity ////

     @Override
        public boolean onCreateOptionsMenu(Menu menu) {
            getMenuInflater().inflate(R.menu.main_menu, menu);

            final MenuItem menuItem = menu.findItem(R.id.action_cart);

            View actionView = MenuItemCompat.getActionView(menuItem);
            textCartItemCount = (TextView) actionView.findViewById(R.id.cart_badge);

            setupBadge();

            actionView.setOnClickListener(new View.OnClickListener() {
                @Override
                public void onClick(View v) {
                    onOptionsItemSelected(menuItem);
                }
            });

            return true;
        }

        @Override
        public boolean onOptionsItemSelected(MenuItem item) {

            switch (item.getItemId()) {

                case R.id.action_cart: {
                    // Do something
                    return true;
                }
            }
            return super.onOptionsItemSelected(item);
        }

        private void setupBadge() {
    ///make a button in MainActivty layout
            button.setOnClickListener(new View.OnClickListener() {
                @Override
                public void onClick(View v) {
                    if (count >= 0) {
                        textCartItemCount.setVisibility(View.VISIBLE);
                        textCartItemCount.setText(String.valueOf(++count));
                    } else {
                        textCartItemCount.setVisibility(View.GONE);`enter code here`
                    }

                }
            });
Вы можете использовать компонент значка Material Design :
https://material.io/develop/android/components/badging
доступно на:
implementation "com.google.android.material:material:1.3.0+"
Используя https://github.com/nikartm/Image-Support, который позаботится о создании значка с дополнительными параметрами, такими как ограничение максимального количества и т. Д.
layout_menu_cart.xml
<?xml version="1.0" encoding="utf-8"?>
<FrameLayout style="?attr/actionButtonStyle"
    xmlns:app="http://schemas.android.com/apk/res-auto"
    xmlns:android="http://schemas.android.com/apk/res/android"
    android:layout_width="wrap_content"
    android:layout_height="wrap_content"
    android:clipToPadding="false"
    android:focusable="true"
    android:clickable="true"
    xmlns:tools="http://schemas.android.com/tools">

    <ru.nikartm.support.ImageBadgeView
        android:id="@+id/cart_menu_icon"
        android:layout_width="wrap_content"
        android:layout_height="wrap_content"
        android:layout_gravity="center"
        android:src="@drawable/ic_shopping_cart_black"
        tools:ibv_badgeValue="101"
        app:ibv_maxBadgeValue="99"
        app:ibv_badgeTextSize="7sp"
        app:ibv_fixedBadgeRadius="7dp"
        app:ibv_badgeTextStyle="bold"
        app:ibv_badgeTextColor="#ffffff"
        app:ibv_badgeColor="@color/colorAccent"
        app:ibv_badgeLimitValue="true" />

</FrameLayout>
main_menu.xml
<?xml version="1.0" encoding="utf-8"?>
<menu xmlns:android="http://schemas.android.com/apk/res/android"
    xmlns:app="http://schemas.android.com/apk/res-auto">
    <item
        android:id="@+id/menu_cart"
        android:title="Cart"
        android:icon="@drawable/ic_shopping_cart_black"
        app:actionLayout="@layout/layout_menu_cart"
        app:showAsAction="always"/>
</menu>
YourActivity.kt
val menuItem = menu.findItem(R.id.menu_cart) as MenuItem
val actionView = menuItem.actionView

actionView.findViewById<ImageBadgeView>(R.id.cart_menu_icon).badgeValue = count
Этот ответ является изменением ответа Фердуса Ахмеда, поскольку я не могу прокомментировать ответ, поэтому я публикую новый ответ.
Я делаю репост только MainActivity
Вы можете отобразить настраиваемый MenuItem на ActionBar, создав настраиваемый макет для MenuItem. Чтобы установить собственный макет, вы должны использовать атрибут пункта меню app:actionLayout.
Создайте собственный макет с помощью ImageView(для значка корзины) и TextView(для значения счетчика)
Основная деятельность:
public class MainActivity extends AppCompatActivity {
................
......................
TextView textCartItemCount;
int mCartItemCount = 10;

@Override
protected void onCreate(Bundle savedInstanceState) {
    super.onCreate(savedInstanceState);
    setContentView(R.layout.activity_main);

    .....................
    ............................
}

@Override
public boolean onCreateOptionsMenu(Menu menu) {
    getMenuInflater().inflate(R.menu.main_menu, menu);

    **FrameLayout actionView =
                  (FrameLayout)menu.findItem(R.id.action_cart).getActionView();
    textCartItemCount = (TextView) actionView.findViewById(R.id.cart_badge);**

    setupBadge();

    actionView.setOnClickListener(new View.OnClickListener() {
        @Override
        public void onClick(View v) {
            onOptionsItemSelected(menuItem);
        }
    });

    return true;
}

@Override
public boolean onOptionsItemSelected(MenuItem item) {

    switch (item.getItemId()) {

        case R.id.action_cart: {
            // Do something
            return true;
        }
    }
    return super.onOptionsItemSelected(item);
}

private void setupBadge() {

    if (textCartItemCount != null) {
        if (mCartItemCount == 0) {
            if (textCartItemCount.getVisibility() != View.GONE) {
                textCartItemCount.setVisibility(View.GONE);
            }
        } else {
            textCartItemCount.setText(String.valueOf(Math.min(mCartItemCount, 99)));
            if (textCartItemCount.getVisibility() != View.VISIBLE) {
                textCartItemCount.setVisibility(View.VISIBLE);
            }
        }
    }
}

..................
..............................
}
      override fun onPrepareOptionsMenu(menu: Menu?): Boolean {
    if (alertBadge == null) alertBadge = createBadgeDrawable(this)
    if (chatBadge == null) chatBadge = createBadgeDrawable(this)
    return super.onPrepareOptionsMenu(menu)
}

private fun checkForAlertBadge() {
    viewModel.fetchDashboardWithSyncStatus.observe(this) {
        alertBadge?.changeBadgeValue(it.activeNotifications, binding.toolbarLayout.centerToolbar, R.id.action_alerts)
    }
}


@androidx.annotation.OptIn(com.google.android.material.badge.ExperimentalBadgeUtils::class)
fun BadgeDrawable.changeBadgeValue(value: Int, toolbar: Toolbar, @IdRes menuItemId: Int) {
    if (value == 0) {
        BadgeUtils.detachBadgeDrawable(this, toolbar, menuItemId)
    } else {
        if (number == 0) {
            BadgeUtils.attachBadgeDrawable(this, toolbar, menuItemId)
        }
        number = if (value > 99) 99 else value
    }
}

fun createBadgeDrawable(context: Context): BadgeDrawable {
    return BadgeDrawable.create(context).apply {
        horizontalOffset = context.resources.getDimension(com.mikashboks.droid.resource.R.dimen.dimen_8dp).toInt()
    }
}
                      val cartCount = Utility.getPreference(MainApplication.instance.getContext(), Constants.PREF_CART_COUNT)
                Log.e("cart_count", cartCount)
                if (cartCount.isNotEmpty()) {
                    val rl = RelativeLayout(this)
                    val paramsRR = LinearLayout.LayoutParams(ViewGroup.LayoutParams.WRAP_CONTENT, ViewGroup.LayoutParams.WRAP_CONTENT)
                    paramsRR.gravity = Gravity.CENTER
                    rl.layoutParams = paramsRR

                    val iv = ImageView(this)
                    iv.loadFromUrl(iconUrl[i])
                    val params = LinearLayout.LayoutParams(getPixel(24f).toInt(), getPixel(23f).toInt())
                    params.setMargins(getPixel(10f).toInt(), 0, getPixel(10f).toInt(), 0)
                    params.gravity = Gravity.CENTER
                    iv.setPadding(4, 4, 4, 4)
                    iv.layoutParams = params

                    val tv = TextView(this)
                    val paramsRl = LinearLayout.LayoutParams(getPixel(12f).toInt(), getPixel(12f).toInt())
                    paramsRl.setMargins(getPixel(25f).toInt(), 0, getPixel(10f).toInt(), 0)
                    params.gravity = Gravity.RIGHT
                    tv.setPadding(8, 0, 4, 8)
                    tv.text = cartCount
                    tv.setTextSize(8f)
                    tv.setTextColor(Color.parseColor("#E31119"))
                    tv.setBackgroundResource(R.drawable.badge_background)
                    tv.layoutParams = paramsRl

                    rl.addView(iv)
                    rl.addView(tv)

                    ll_options_items?.addView(rl)
Следуйте шагу ниже
реализация 'com.nex3z:notification-badge:1.0.4' Реализуйте указанный выше артефакт в своем build.gradle (приложении)
Создайте файл меню и файл ресурсов с именем visitdetails.xml. Обратите внимание, вы можете назвать свое любое желаемое имя.
      <?xml version="1.0" encoding="utf-8"?>
<menu xmlns:android="http://schemas.android.com/apk/res/android"
    xmlns:app="http://schemas.android.com/apk/res-auto"
    app:menu="@menu/attendant_menu">

    <item
        android:id="@+id/action_notifications"
        android:title="Search"
        android:icon="@drawable/ic_baseline_accessible_24"
        app:showAsAction="always"
        app:actionLayout="@layout/action_bar_notification" />

</menu>
- Создайте action_bar_notification.xml в файле макета.
      <?xml version="1.0" encoding="utf-8"?>
<RelativeLayout xmlns:android="http://schemas.android.com/apk/res/android"
    xmlns:app="http://schemas.android.com/apk/res-auto"
    android:layout_width="match_parent"
    android:layout_height="match_parent"
    style="@android:style/Widget.ActionButton">

    <ImageView
        android:id="@+id/icon_images"
        android:layout_width="wrap_content"
        android:layout_height="wrap_content"
        android:src="@drawable/ic_baseline_accessible_24"/>

    <com.nex3z.notificationbadge.NotificationBadge
        android:id="@+id/badge"
        android:layout_width="28dp"
        android:layout_height="28dp"
        app:nbMaxTextLength="2"
        android:layout_toRightOf="@+id/icon_images"
        android:textColor="@color/white"
        android:layout_alignTop="@+id/icon_images"
        android:layout_marginTop="-12dp"
        android:layout_marginLeft="-10dp"
        />

</RelativeLayout>
- Обратите внимание, что я использую привязку просмотра. Добавьте панель инструментов к своей деятельности или фрагменту xml.
       <?xml version="1.0" encoding="utf-8"?>
<RelativeLayout xmlns:android="http://schemas.android.com/apk/res/android"
    xmlns:app="http://schemas.android.com/apk/res-auto"
    xmlns:tools="http://schemas.android.com/tools"
    android:layout_width="match_parent"
    android:layout_height="match_parent"
    android:background="@color/white"
    android:orientation="vertical"
    tools:context="">

    <androidx.appcompat.widget.Toolbar
        android:id="@+id/_customers_toolbar"
        android:layout_width="match_parent"
        android:layout_height="?attr/actionBarSize"
        android:background="@color/white"
        android:elevation="4dp"
        android:theme="@style/AppTheme.Toolbar"
        app:titleTextColor="@color/white"
        app:subtitleTextAppearance="@font/roboto_mediumitalic"
        app:subtitleTextColor="@color/white"
        app:navigationIcon="@drawable/ic_baseline_arrow_back_24"
        />
</RelativeLayout>
Обратите внимание, что идентификатор панели инструментов - это @ + id / _customers_toolbar, который я связываю с помощью setSupportActionBar(binding.CustomersToolbar)
- Кодировка ожидаемая. добавьте этот setSupportActionBar(binding.CustomersToolbar) в свой onCreate
      override fun onCreate(savedInstanceState: Bundle?) {
setSupportActionBar(binding.CustomersToolbar)
}
      class UrAvtivityName : AppCompatActivity() {

  var item_Notification: MenuItem? = null
  var notificationBadgeView: View? = null
  var notificationBadge: NotificationBadge? = null

  override fun onCreate(savedInstanceState: Bundle?) {
        super.onCreate(savedInstanceState)
        setSupportActionBar(binding.CustomersToolbar)
  }

  override fun onCreateOptionsMenu(menu: Menu?): Boolean {
        menuInflater.inflate(R.menu.visitdetails, menu)
        item_Notification = menu!!.findItem(R.id.action_notifications)
        notificationBadgeView = item_Notification!!.actionView
        notificationBadge = notificationBadgeView!!.findViewById(R.id.badge) as NotificationBadge

       notificationBadgeView!!.setOnClickListener {

        }

        setupBadge()
        return true
    }

    private fun setupBadge() {

         if (it == 0) {
            notificationBadge!!.isVisible = false
            return
         }
         notificationBadge!!.isVisible = true
         notificationBadge!!.setText("2")
    }
}